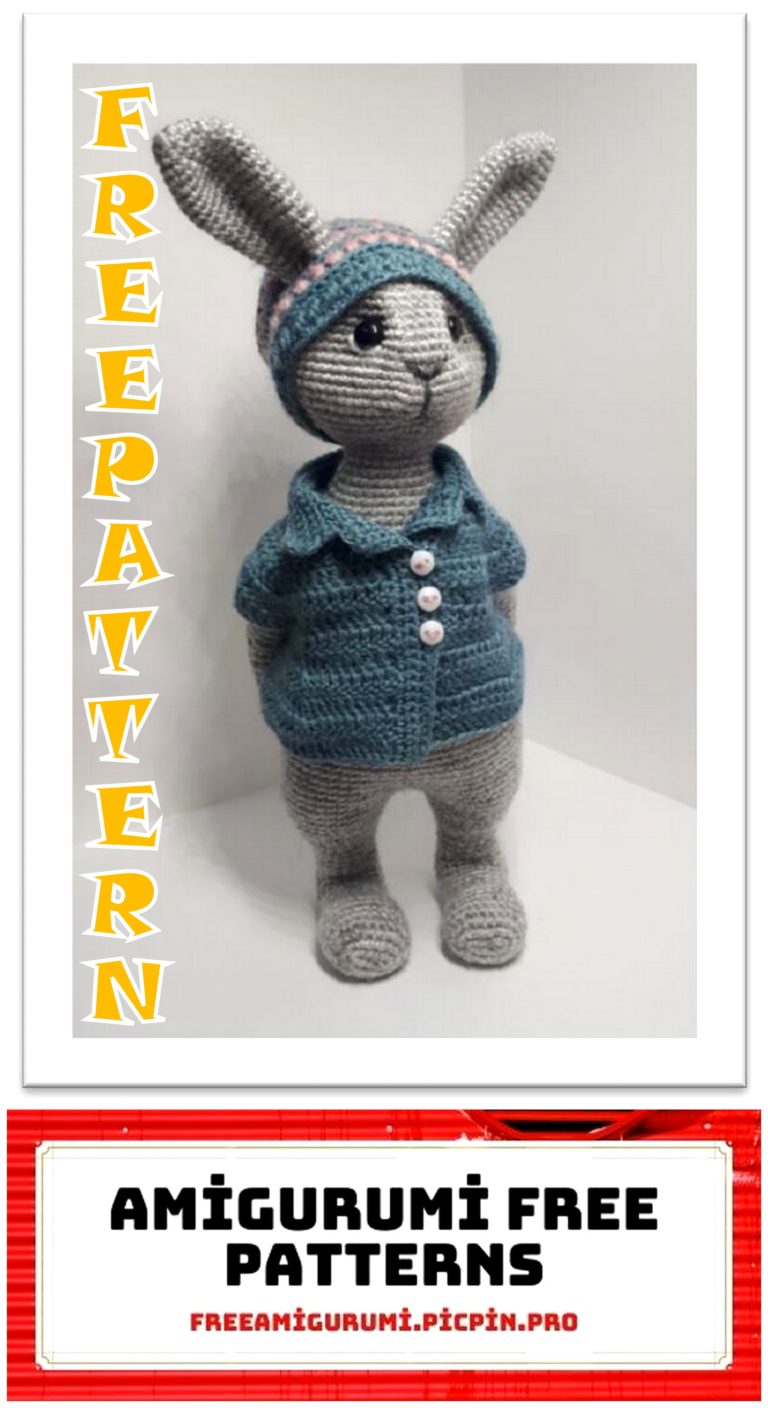
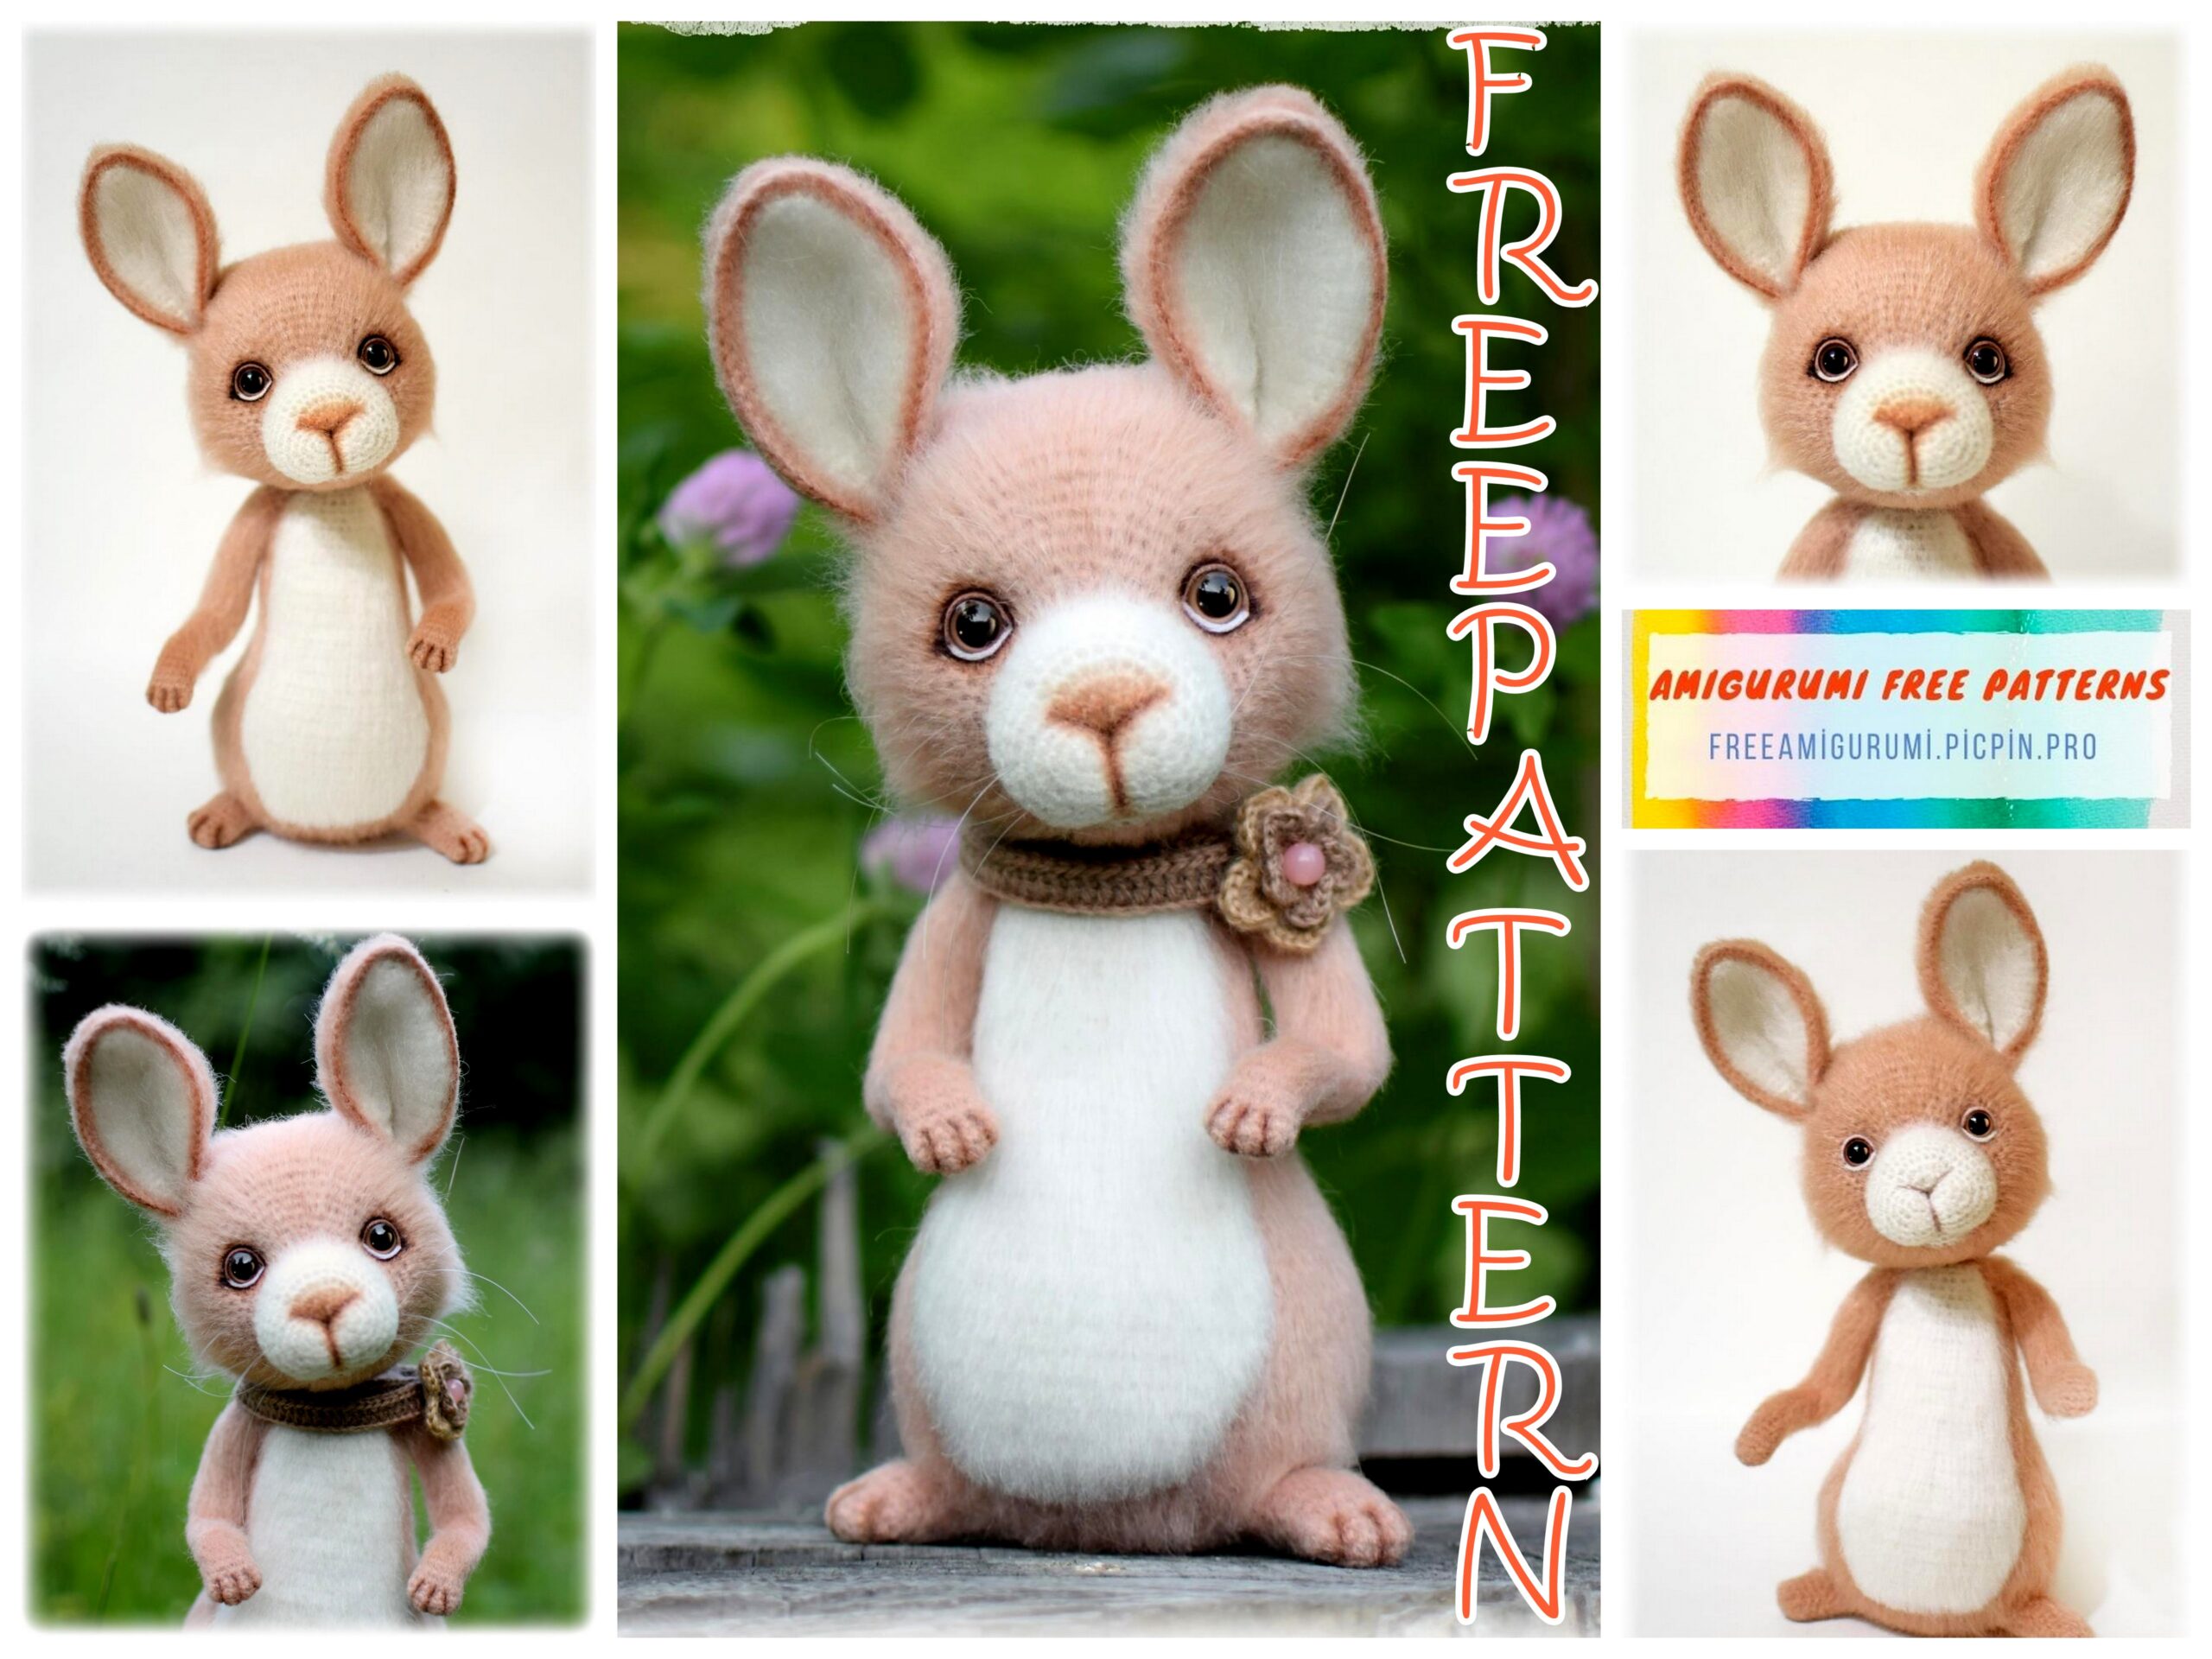
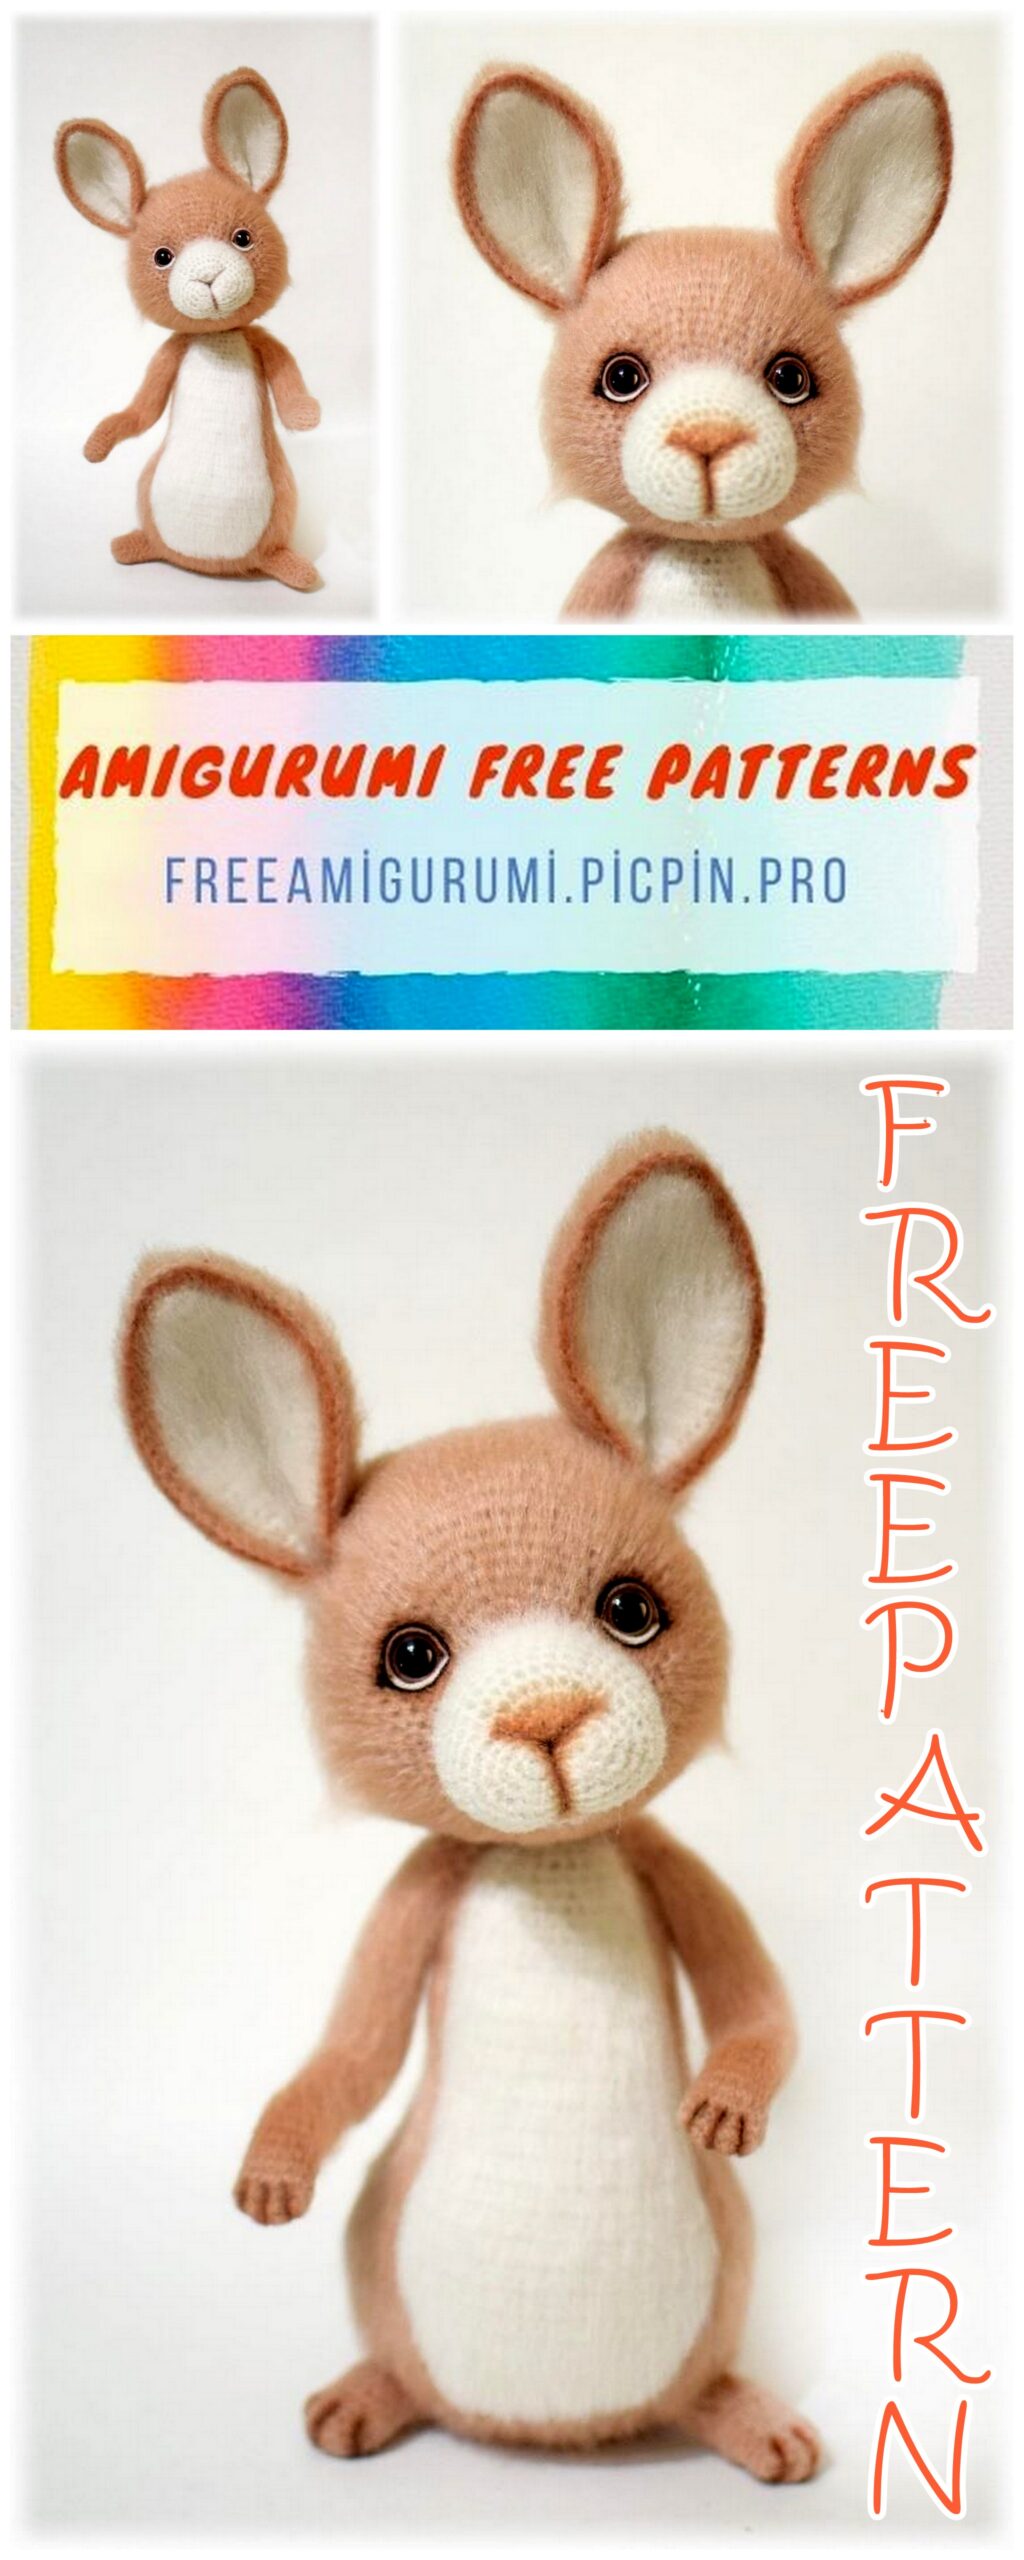
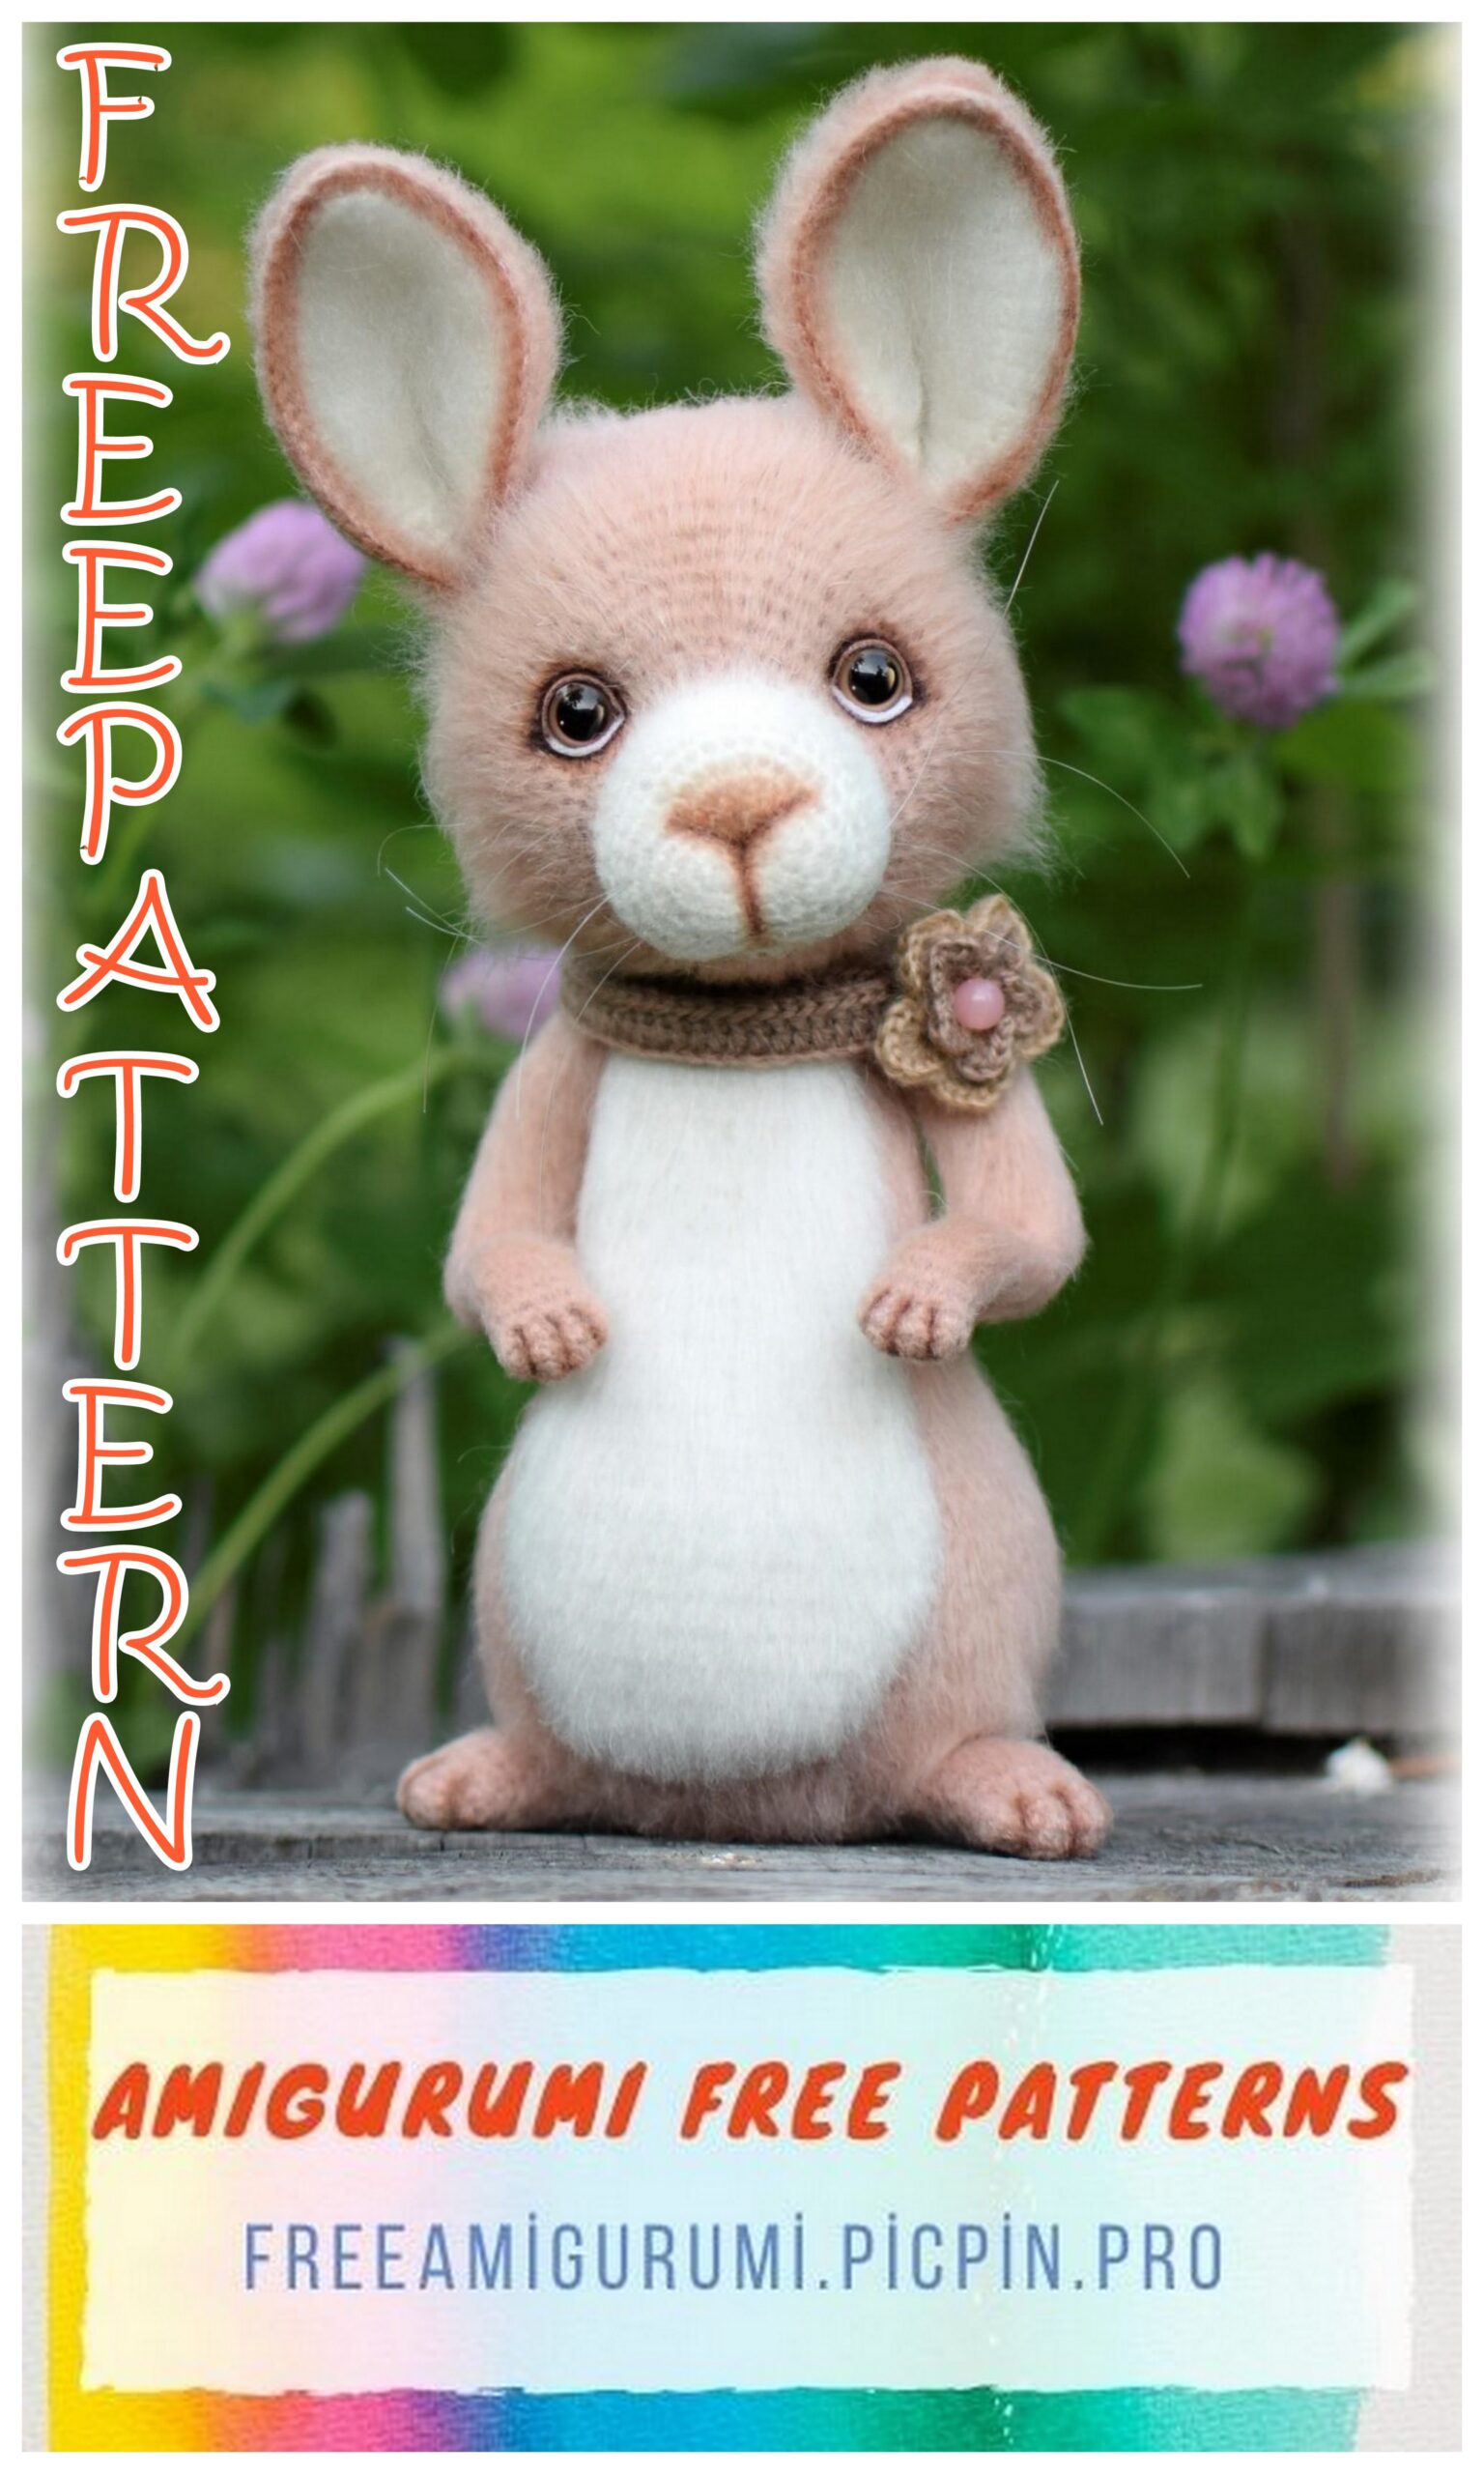
Little Cute Bunny Amigurumi Free Pattern
You should visit our site for the most beautiful free amigurumi patterns. In this article, we shared with you the amigurumi bunny pattern.
Abbrevations:
Ch – chain
Sc – single crochet;
Sl-st – slip stitch
Dc – double crochet;
Hdc – half double crochet;
Inc – inc (knit 2 sc in 1 loop of the previous row);
Dec – decrease (we knit together 2 loops of the previous row);
3 in 1 – double inc (knit 3 sc in 1 loop of the previous row);
3 together – double decrease (we knit a decrease from three loops at the same time).
Necessary materials:
• Any pink yarn containing mohair (about 50g), as well as some white yarn (about 10g), about 450-550m / 100g (I used Italian bobbin kid-mohair folded in two strands);
• A hook that matches your yarn (mine is 1.5mm);
• Synthetic filler;
• Copper wire with a diameter of 0.75mm for the upper legs and 1mm for the lower legs and overall frame. Consumption depends on the density of your knitting and the chosen yarn;
• A pair of eyes with a diameter of 10 mm and, if desired, pieces of white and pink threads about 1 meter long for the formation of the eyelids (I have it “Jeans” from YartArt);
• Optionally, you can use tinting agents (I have a brown capillary pen and dry pastels of brown and powdery shades);
• Thin fishing line or monofilament for the mustache;
• Other handicraft devices (pliers, cloth adhesive plaster, Velcro for clothes or a slicker for fleece, glue, scissors, needles and threads for tightening and embroidering a nose, etc.).
When using the same materials, the Hare turns out to be about 25 cm tall.
All parts of the toy are knitted in a spiral, unless otherwise indicated in the description.
For convenience, when knitting, we will use a thread of a contrasting color – add.
marker. They will denote the end of the current row and the beginning of the next, as well as mark the necessary loops for knitting parts in the knitting process.
When the marker is shifted to the right, we will knit additional loops that are not included in the description – offset loops.
I also recommend not to remove the markers until the end of the knitting of the toy, unless otherwise indicated in the description. This will make it easier for us to navigate the loops if confusion arises in the process.
Paws – legs.
We knit two identical parts. The marker runs along the edge of the foot. The offset loops are indicated in the description.
We knit with pink yarn.
We collect 6 ch, from the second loop from the hook we begin to knit:
1st row: on one side of the chain ch: 4 sc, 3 sc in 1; on the second side of the chain ch: 3 sc, inc (12)
2nd row: (5 sc, inc) x 2 times (14)
Rows 3-7: 14 sc.
At the end of the seventh row, if necessary, knit 1 offset loop.
Rows 8-10: 2 sc, dec, 6 sc, inc, 3 sc (14)
11,12 rows: 1 sc, dec, 6 sc, inc, 4 sc (14)
Add. markers can be used to mark the 8th and 13th loops of the 12th row of both paws, for convenience when tying them into the body.
You don’t need to fill in the details yet. We will do this after knitting.
Paws – hands.
We knit two identical parts.
The marker runs along the edge of the foot, if necessary, we align it ourselves using the offset loop.
We knit with pink yarn.
We collect 5 ch, we begin to knit from the second loop from the hook.
1 row: on one side of the chain ch: 3 sc, 3 sc in 1; on the second side of the chain ch: 2 sc, inc (10)
2nd row: (4 sc, inc) x 2 times (12)
Rows 3-6: 12 sc.
7 row: 7 sc, dec x 2 times, 1 sc (10)
8 row: 7 sc, 2 sl-st, 1 sc (10)
9-16 rows: 10 sc.
17 row: 1 sc, 2 sl-st, 3 sc, 3 sc 1 x 2 times, 2 sc (14)
Row 18: 1 sc, inc x 2 times, 11 sc (16)
19, 20 rows: 16 sc.
Row 21: 9 sc, dec x 3 times, 1 sc (13)
Rows 22-34: 13 sc.
In the 34th row add. with a marker, you can mark the 3rd and 11th loops of the right foot and the 11th and 6th loops of the left foot for convenience when knitting them into the body.
We insert the frames inside the legs, after making a loop at the end, as shown in the photo. The length of the wire is equal to the length of the legs + 5 cm for connecting the frame of the legs with the common frame of the body.
After that, carefully fill the hands of the paws, form the elbow and shoulder. We stuff the elbow harder so that it keeps its shape better, we stuff the shoulder and brushes resiliently, not until the canvas expands. Leave the distance from the hand to the elbow without filler.
Tail.
The marker is not aligned.
We knit with white yarn.
1st row: 6 sc into magic ring
2nd row: inc x 6 times (12)
3 row: (3 sc in 1, 3 sc) x 3 times (18)
4th row: 1 sc, (3 sc in 1, 5 sc) x 2 times, 3 sc in 1, 4 sc (24)
5 row: 2 sc, 3 sc in 1, (7 sc, inc) x 2 times, 5 sc (28)
6-8 rows: 28 sc.
Row 9: dec, 3 sc together, dec, 21 sc (24)
10 row: 3 sc together, 6 sc, dec x 2 times, 1 sc, dec x 2 times, 6 sc (18)
11 row: 1 sc, dec x 3 times, 5 sc, dec x 3 times (12)
Add. markers can mark the 5th and 9th loops of the 11th row for convenience when
tying the tail into the body.
Body.
We stuff the body elasticly during the knitting process. The marker runs down the middle
belly up. If necessary, align the marker using the offset loop.
We knit with a pink thread.
1st row: 6 sc into magic ring
2nd row: inc x 6 times (12)
3rd row: (1 sc, 3 sc in 1) x 2 times, 4 sc, (3 sc in 1, 1 sc) x 2 times (20)
4th row: 2 sc, 3 sc in 1, 3 sc, 3 sc in 1, 6 sc, 3 sc in 1, 3 sc, 3 sc in 1, 2 sc (28)
5 row: 3 sc, 3 sc in 1, 5 sc, 3 sc in 1, 8 sc, 3 sc in 1, 5 sc, 3 sc in 1, 3 sc (36)
6 row: 4 sc, inc, 7 sc, inc, 10 sc, inc, 7 sc, inc, 4 sc (40)
7 row: 6 sc, knit 6 sc capturing the loops of one leg (from the beginning of the additional marker, see photo) and the body at the same time, inc, 3 sc, inc, 1 sc, inc, 2 sc, inc, 1 sc, inc, 3 sc, inc, knit 6 sc, grabbing the sts of the second leg (from the beginning of the additional marker) and the body at the same time, 6 sc (46)
Row 8: Body: 1 sc, inc, 4 sc; on the remaining loops of the leg: 3 sc, 3 sc in 1 x 2 times, 3 sc; on the body: 22 sc; on the remaining loops of the leg: 3 sc, 3 sc in 1 x 2 times, 3 sc; body: 4 sc, inc, 1 sc (60)
9th row: 4 sc, inc, 50 sc, inc, 4 sc (62)
10 row: 2 sc, inc, 56 sc, inc, 2 sc (64)
11 row: 6 sc, inc, 7 sc, inc x 2 times, 32 sc, inc x 2 times, 7 sc, inc, 6 sc (70)
We check the position of the marker, it should be located strictly in the middle of the belly. In the next row we will knit a tail.
12 row: 32 sc, 6 sc capturing the tail loops (from the beginning of the additional marker) and the body at the same time, 32 sc (70)
Row 13: 32 sc, 6 sc along remaining tail loops, 32 sc (70)
Row 14: 16 sc, inc x 2 times, 34 sc, inc x 2 times, 16 sc (74)
15, 16 rows: 74 sc.
17 row: 17 sc, inc x 2 times, 36 sc, inc x 2 times, 17 sc (78)
18, 19 rows: 78 sc.
Row 20: 18 sc, inc x 2 times, 38 sc, inc x 2 times, 18 sc (82)
21, 22 rows: 82 sc.
23 row: 18 sc, dec x 2 times, 38 sc, dec x 2 times, 18 sc (78)
24, 25 rows: 78 sc.
26 row: 17 sc, dec x 2 times, 36 sc, dec x 2 times, 17 sc (74)
27, 28 rows: 74 sc.
Row 29: 16 sc, dec x 2 times, 34 sc, dec x 2 times, 16 sc (70)
We prepare the frame for the lower legs. One of the lines will be used as the main frame.
For the first segment, we measure out a wire equal to the knitted part of the body x 5, for the second we measure a wire equal to the knitted part of the body x 10.
I have sections of 40 and 80 cm, folded in half.
We insert the frames inside the legs, after making a loop at the end, as shown in the photo. Firmly fill the legs, after that we connect the frames to each other using an adhesive plaster.
30 row: 22 sc, (dec, 6 sc) x 3 times, dec, 22 sc (66)
Row 31: 24 sc, dec, 3 sc, dec, 4 sc, dec, 3 sc, dec, 24 sc (62)
32 row: 15 sc, dec x 2 times, 7 sc, dec, 6 sc, dec, 7 sc, dec x 2 times, 15 sc (56)
Row 33: 20 sc, dec, 12 sc, dec, 20 sc (54)
34 row: 54 sc.
35 row: 14 sc, dec x 2 times, 18 sc, dec x 2 times, 14 sc (50)
36, 37 rows: 50 sc.
38 row: 14 sc, dec, 18 sc, dec, 14 sc (48)
Row 39: 48 sc.
40 row: 13 sc, dec, 18 sc, dec, 13 sc (46)
41 row: 46 sc.
42 row: 12 sc, dec, 18 sc, dec, 12 sc (44)
43 row: 44 sc.
Row 44: 11 sc, dec, 18 sc, dec, 11 sc (42)
45 row: 42 sc.
46 row: 10 sc, dec, 18 sc, dec, 10 sc (40)
47 row: 40 sc.
48 row: 9 sc, dec, 18 sc, dec, 9 sc (38)
49 row: 38 sc.
50 row: 8 sc, dec, 18 sc, dec, 8 sc (36)
51 row: 36 sc.
Row 52: 8 sc, dec, 16 sc, dec, 8 sc (34)
53 row: 34 sc.
We check the position of the marker, it should be located strictly in the middle of the belly.
In the next row we will knit the legs.
54 row: 6 sc, 6 sc grabbing the loops of the right paw (from the beginning of the additional marker) and the body at the same time, 10 sc, 6 sc capturing the loops of the left paw (from the beginning of the additional marker) and the body at the same time, 6 sc (34)
Row 55: 6 sc, 7 sc over remaining arm loops, 10 sc, 7 sc over remaining arm loops, 6 sc (36)
We fill the body, after that and attach the arm frames to the main body frame.
56 row: (5 sc, dec) x 2 times, 8 sc, (dec, 5 sc) x 2 times (32)
Row 57: 7 sc, 3 sc together, 12 sc, 3 sc together, 7 sc (28)
Row 58: 5 sc, dec, 1 sc, dec, 8 sc, dec, 1 sc, dec, 5 sc (24)
Row 59: (2 sc, dec) x 6 times (18)
60 row: 18 sc.
We cut the thread, hide it. The hare’s body is ready!
Belly pad.
The overlay is knitted in rotary rows, at the beginning of each row we knit
1 ch lift (this loop is not indicated in the description).
We knit with a white thread.
We collect 7 ch, from the second loop from the hook we begin to knit.
1st row: 6 sc.
2nd row: inc, 4 sc, inc (8)
3rd row: 8 sc.
4th row: inc, 6 sc, inc (10)
5 row: 10 sc.
6 row: inc, 8 sc, inc (12)
7 row: 12 sc.
8 row: inc, 10 sc, inc (14)
Rows 9-12: 14 sc.
13th row: inc, 12 sc, inc (16)
Rows 14-17: 16 sc.
18 row: inc, 14 sc, inc (18)
19-22 rows: 18 sc.
23 row: inc, 16 sc, inc (20)
24 row: 20 sc.
25 row: inc, 18 sc, inc (22)
26 row: 22 sc.
27 row: inc, 20 sc, inc (24)
Rows 28-33: 24 sc.
34 row: dec, 20 sc, dec (22)
35 row: 22 sc.
36 row: dec, 18 sc, dec (20)
37 row: 20 sc.
38 row: dec, 16 sc, dec (18)
Row 39: 18 sc.
40 row: dec, 14 sc, dec (16)
41 row: 16 sc.
42 row: dec, 12 sc, dec (14)
We do not cut the thread, without turning the work, we tie the resulting part around the perimeter: 42 sc along the edge; 6 sc for half-loops of ch chain along the top of the overlay; 42 sc along the second rib; dec, 10 sc, dec along the bottom of the onlay.
We cut the thread, hide it.
Now it is most convenient to sew an overlay to the body of a hare. Once the head is installed, this will be a little more difficult.
Therefore, we place the pad right next to the last row of the neck, symmetrically fix the part relative to the body marker, take the white auxiliary bobbin thread and sew the pad.
Head.
Knitting begins with the pads, the marker runs along the side of the part, you do not need to align it yet.
We knit with a white thread.
We collect 7 ch, from the second loop from the hook we begin to knit:
1 row: on one side of the chain ch: 5 sc, 3 sc in 1; on the second side of the chain ch: 4 sc, inc (14)
2nd row: inc, 4 sc, inc x 3 times, 4 sc, inc x 2 times (20)
3rd row: 3 sc, inc x 2 times, 4 sc, inc x 2 times, 6 sc, inc x 2 times, 1 sc (26)
4th row: 3 sc, inc, 2 sc, inc, 5 sc, inc x 2 times, 8 sc, inc x 2 times, 2 sc (32)
5 row: 2 sc, inc, 6 sc, inc, 5 sc, inc x 2 times, 10 sc, inc x 2 times, 3 sc (38)
6-10 rows: 38 sc.
11 row: 19 sc, dec x 2 times, 10 sc, dec x 2 times, 1 sc (34)
We cut the thread, hide it. Count 9 sc clockwise from the last stitch in row 11. We expose a new marker. It should be located strictly in the middle of the muzzle.
We continue to knit in pink, starting from the 10th loop, that is, the next one after the new marker.
Next, align the marker in the middle of the face using the offset loop.
12 row: inc x 3 times, 28 sc, inc x 3 times (40)
13 row: 5 sc, inc, 4 sc, inc x 3 times, 14 sc, inc x 3 times, 4 sc, inc, 5 sc (48)
14th row: 1 sc, inc, 8 sc, inc, 2 sc, inc, 20 sc, inc, 2 sc, inc, 8 sc, inc, 1 sc (54)
15 row: 4 sc, inc, 8 sc, inc x 2 times, 24 sc, inc x 2 times, 8 sc, inc, 4 sc (60)
16 row: 2 sc, inc, 12 sc, inc x 2 times, 26 sc, inc x 2 times, 12 sc, inc, 2 sc (66)
Row 17: 5 sc, inc, 11 sc, inc x 2 times, 28 sc, inc x 2 times, 11 sc, inc, 5 sc (72)
18 row: (1 sc, inc) x 2 times, 64 sc, (inc, 1 sc) x 2 times (76)
19th row: inc, 2 sc, inc, 68 sc, inc, 2 sc, inc (80)
20-25 rows: 80 sc.
Align the position of the marker. In the next row we will form a hole for the frame.
26 row: 39 sc, 2 ch (skip 2 sc), 39 sc (80)
27-30 rows: 80 sc.
31 row: 8 sc, dec, 14 sc, dec, 28 sc, dec, 14 sc, dec, 8 sc (76)
32 row: 7 sc, dec, 13 sc, dec, 28 sc, dec, 13 sc, dec, 7 sc (72)
Row 33: 6 sc, dec, 12 sc, dec, 28 sc, dec, 12 sc, dec, 6 sc (68)
34 row: 5 sc, dec, 11 sc, dec, 28 sc, dec, 11 sc, dec, 5 sc (64)
35 row: 4 sc, dec, 10 sc, dec, 28 sc, dec, 10 sc, dec, 4 sc (60)
36 row: (8 sc, dec) x 6 times (54)
37 row: 54 sc.
38 row: (7 sc, dec) x 6 times (48)
Row 39: (6 sc, dec) x 6 times (42)
40 row: (5 sc, dec) x 6 times (36)
Firmly fill the head up to about the middle.
We insert the wire coming out of the neck into the hole in the head. We twist the remaining end of the wire in a spiral and put it inside the head.
We continue to knit together with the frame, finally stuffing our head in the process.
41 row: (4 sc, dec) x 6 times (30)
42 row: (3 sc, dec) x 6 times (24)
43 row: (2 sc, dec) x 6 times (18)
44 row: (1 sc, dec) x 6 times (12)
We leave the resulting hole not closed, later we will make tightening through it.
Cut off the thread, leaving a long end to knit the last row.
We will tie 45 row after tightening: dec x 6 times (6)
Ears.
Each ear consists of two identical parts (half-ears), connected to form one whole ear.
First, we knit a white half-ear, after that we knit a pink one.
All parts are knitted in rotary rows, at the beginning of each row do not forget to knit 1 ch lift (it is not indicated in the description).
We collect 2 ch, from the second loop from the hook we begin to knit.
1 row: 3 sc in 1 (3)
2nd row: inc, 1 sc, inc (5)
3rd row: 5 sc.
4th row: inc, 3 sc, inc (7)
5 row: 7 sc.
6 row: inc, 5 sc, inc (9)
7 row: 9 sc.
8 row: inc, 7 sc, inc (11)
9 row: 11 sc.
10 row: inc, 9 sc, inc (13)
11 row: 13 sc.
12th row: inc, 11 sc, inc (15)
Rows 13-20: 15 sc.
21 row: dec, 11 sc, dec (13)
22 row: 13 sc.
23 row: dec, 9 sc, dec (11)
24 row: 11 sc.
25 row: dec, 7 sc, dec (9)
26 row: 9 sc.
27 row: dec, 5 sc, dec (7)
28 row: 7 sc.
Without turning the work, we knit in a circle:
27 sc along the rib, 3 sc in 1 (half-ear angle), 27 sc along the second rib.
Cut the thread at the white half-ear, hide it.
We do not cut the thread of the pink half-ear, we begin to connect the half-ears with it into a full ear.
We place the details with the wrong sides to ourselves, first a pink half-ear, then a white one (see photo above).
We knit along the perimeter, capturing the loops of both half ears:
Row 1: ch, 28 sc, inc to top, 28 sc, 7 sc to bottom.
We connect the lower corners of the ear to each other. Insert the hook into the last knitted stitch, then into the first knitted stitch of row 1, knit 1 sl-st.
The missed distance is 7 sc along the bottom of the ear.
Row 2: 56 sl-st along the remaining ear loops.
Cut the thread, leaving the end for sewing. We bring it to the edge of the ear.
We knit the second ear in the same way.
I recommend combing and trimming the ears immediately before sewing.
Straighteners.
Now it is convenient to sew the head to the body, which we will do!
And after that we will deal with the tightening.
Tie points:
1 and 4 – 14 rows, 7 sc to the right and left of the marker line, respectively.
2 and 3 – 14 rows, 9 sc to the right and left of the marker line, respectively.
We fix the thread at point 2.
We introduce the needle at point 1 and bring it out into the hole left on the back of the head.
We pick up a little filler, and from the hole on the back of the head, without touching the knitted fabric, we bring the needle to point 2.
We tighten the thread well, repeat the tightening.
We tighten the second eye socket in the same way. We fix the new thread at point 3, insert the needle at point 4 and bring it out into the hole on the back of the head.
We pick up the filler and bring the needle to point 3. We tighten the thread, repeat the tightening. After both eye sockets are ready, we check the depth of both ties and only after that we fix the threads.
You can also shape the bridge of the nose.
From point 2, from the outside, we enter into point 1.
From the inside of the head we bring the needle to point 4, and from the outside we introduce it to point 3. Next, from the inside we bring the needle out to point 2.
We tighten the thread to form a tightening, if necessary, repeat the process. We fix and cut the thread.
Next, let’s start shaping the nose.
We comb the pads and carefully trim this area, leaving a pile of 1-2 mm in length to give the canvas a velvety texture.
Nose embroidery points:
Points 1 and 2 are row 4, 5 sc to the right and left of the marker line, respectively.
Point 3 – 1 row along the marker line.
Point 4 – 8 rows down the marker line.
Points 5 and 6 are 11 rows down, 5 sc to the right and left of the marker line, respectively.
We fix the thread at point 3, from the outside we introduce the needle to point 1, from the inside we bring it back to point 3.
From point 3 from the outside we introduce the needle to point 2, from the inside we bring it back to point 3.
From point 3, on the inside, we draw the needle to point 4, from the outside, we take it to point 3.
You can also shape a smile.
To do this, from point 3, from the inside, we draw the needle to point 5.
From point 5 on the outside we enter
the needle to point 4, on the inside we get to point 6, we return on the outside to point 4.
If necessary, we repeat the whole process, fix the thread, hide it and cut it off.
Now let’s start sewing on the ears.
Conditional sewing points for ears – 26 row, 16 sc to the right and left of the marker line.
30 row, 15 sc to the right and left of the marker line.
Since I fixed the ears on my head without the help of a wire, I had to work a little to get them into the desired position.
To do this, we sew the ear along the entire perimeter, pulling the thread well with each stitch.
After that, you can additionally fix the eyelet with a waist.
We withdraw the needle in the middle of the ear through the canvas in the head. At the base of the ear, from the inside, we introduce the needle and bring it to the outside in two rows above (see photo).
Next, we stitch the ear through and through, grabbing a couple of loops of the head canvas, and return to the starting point in the middle of the ear. We tighten the thread for better fixation, repeat the process if necessary. Cut the thread and hide it.
Sew the second ear in the same way.
Now we can finally comb our hare. We scratch everything except the back of the head.
We do not close the hole there yet, we will do it a little later.
You can also trim your feet and hands and trim your belly a little.
If, like me, your ears are a little loose when combing and no longer hold the desired shape, you can make the last through-tightening.
To do this, we fix the thread in the middle of the ear, at the base.
We stitch it through and insert the thread near the ear at the crown.
We draw the thread inside the head, draw it to a symmetrical point on the crown next to the second ear
(see photo)
Sew through the second ear and remove the needle at its base.
After making a stitch in the same loop at the base of the ear, sew through the head and return to the starting point. We tighten the thread well, the ears should fit tightly into the head.
Repeat the hauling if necessary. We fasten, hide and cut the thread.
Face decoration.
We sew or glue the pupils into the places of the eye sockets.
You can also shape the eyelids of the hare if you wish.
To do this, cut off two identical lengths of pink and white threads, about 35 cm long, and connect them together with an ordinary knot.
For centuries, I took yarn about 1.5 times thicker than yarn for knitting a hare.
We insert the needle into the hole on the back of the head, do not tighten the end of the thread with the knot inward, it should hang freely for the convenience of aligning and securing future eyelids.
We withdraw the needle to the edge of the eye, closer to the middle of the pupil.
We introduce the needle at the bridge of the nose symmetrically to the first point (see photo).
And again we bring the needle into the hole in the back of the head.
We design the second eyelid in the same way.
After that we equalize the tension of the threads and check the symmetry of the eyelids with each other.
We fix the eyelids with glue. To do this, carefully move the thread away from the pupil, apply glue to a needle or a toothpick, go through a thin layer of glue along the perimeter of the pupil and carefully fix the eyelids around the eye. It is more convenient to do this in turn. First the upper eyelid, then the lower.
Further, you can safely fasten the threads at the back of the head. It is enough just to tie them together several times, cut off the excess length and lay the threads inside the head.
Now you can finally close the hole in the head, after adding the required amount of filler inside, and comb the back of the head.
And now we will deal with the constrictions on the legs.
First, let’s pull the legs.
We count four rows up from the beginning of knitting.
We will do the banners from right to left.
The distance between them is 2 sc.
We fasten the thread on the inside of the foot and start the process.
We make the first stitch on top of the canvas, tighten the thread tightly.
We draw the needle inside the canvas, display it in the place of the second constriction.
We repeat: we pulled it, tightened the thread, brought it out in place of the third constriction.
We repeat.
If the constrictions seem thin, repeat the process again, but from left to right. We fix and hide the thread.
The first foot is ready, we do the same with the second.
We pull the handles according to the same principle, with only one difference – we retreat three rows from the beginning of knitting and make constrictions at a distance of 1 sc from each other.
Toning.
I decided to place accents on the face, as well as highlight the ears and legs.
To do this, take a dry pastel of suitable shades (I have brown and powdery) and a brown capillary pen.
It is better to rub dry pastel into powder and work with it with a brush.
With a darker shade, we highlight the eyelids, as well as the contour of the nose and smile. After that, we go through the same areas with lighter shades, slightly shading all the lines. For the eyelids, I used pastels of brown shades, for the nose and smile – powdery colors.
Optionally, for greater expressiveness, the eyelids can be brought in with a capillary handle.
We shade the ears along the contour with a powdery color, shading the pastel well with a brush or a slicker.
With brown pastel we outline the contours of the constrictions on the legs.