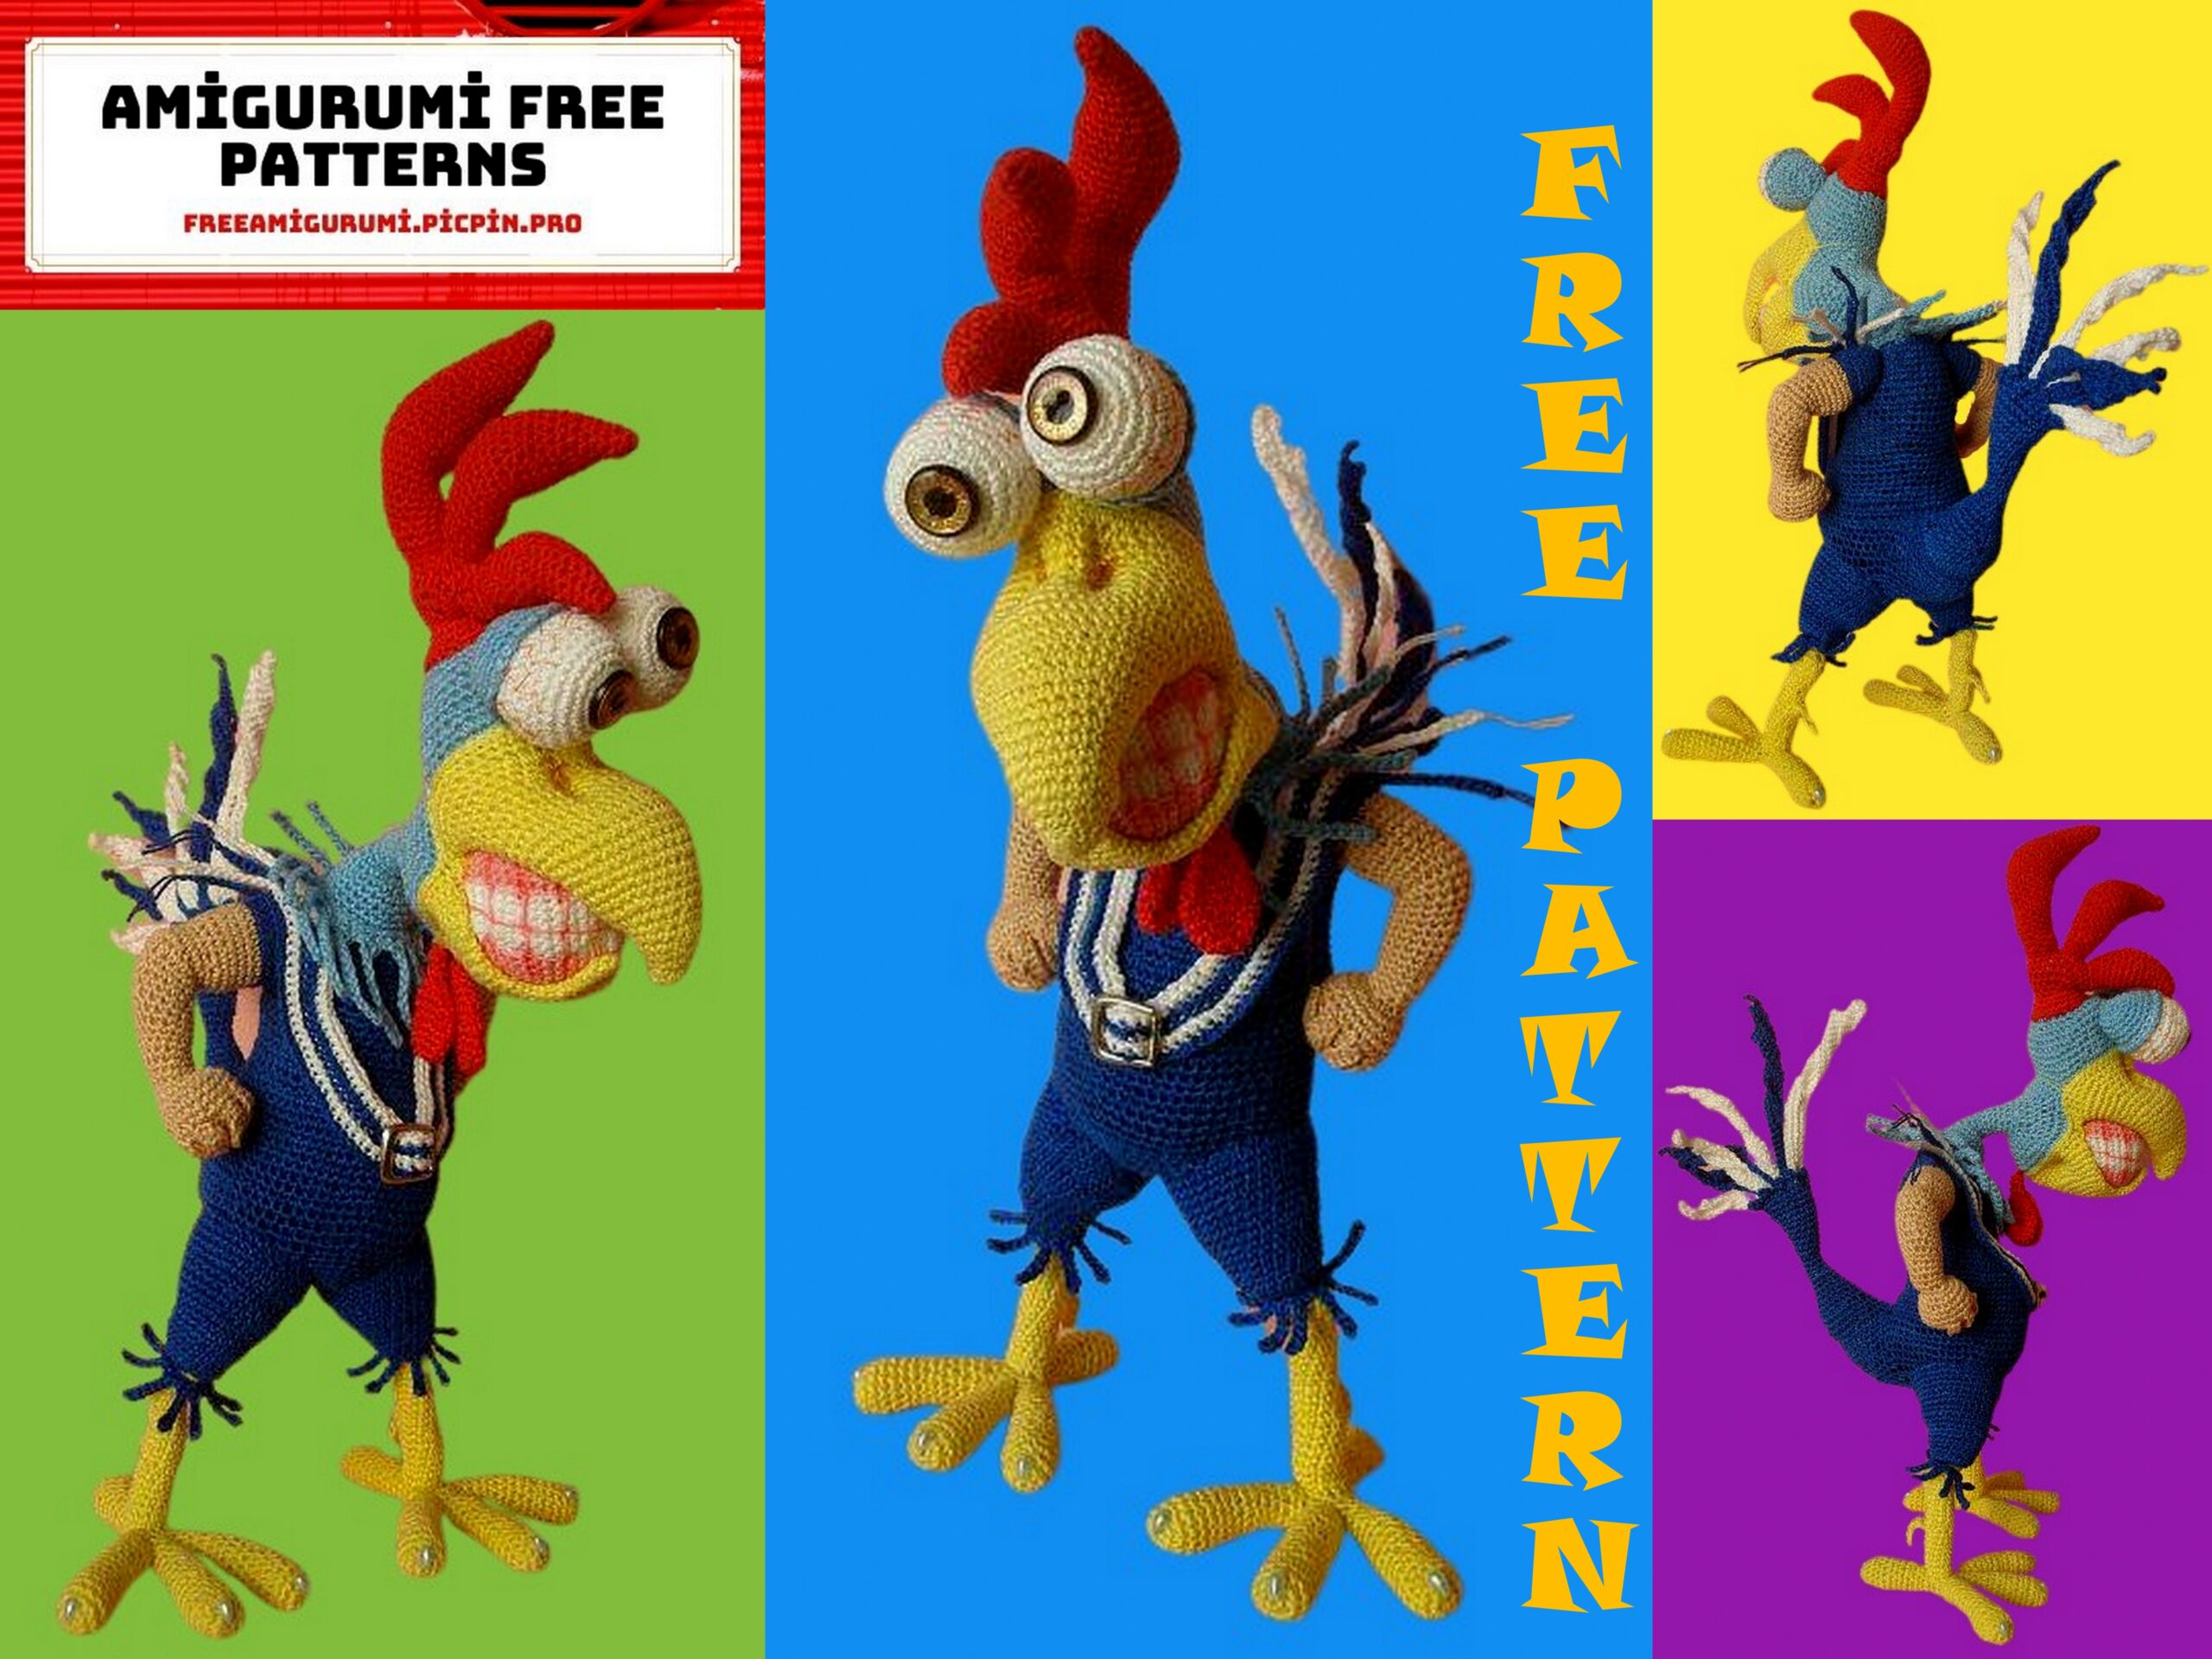
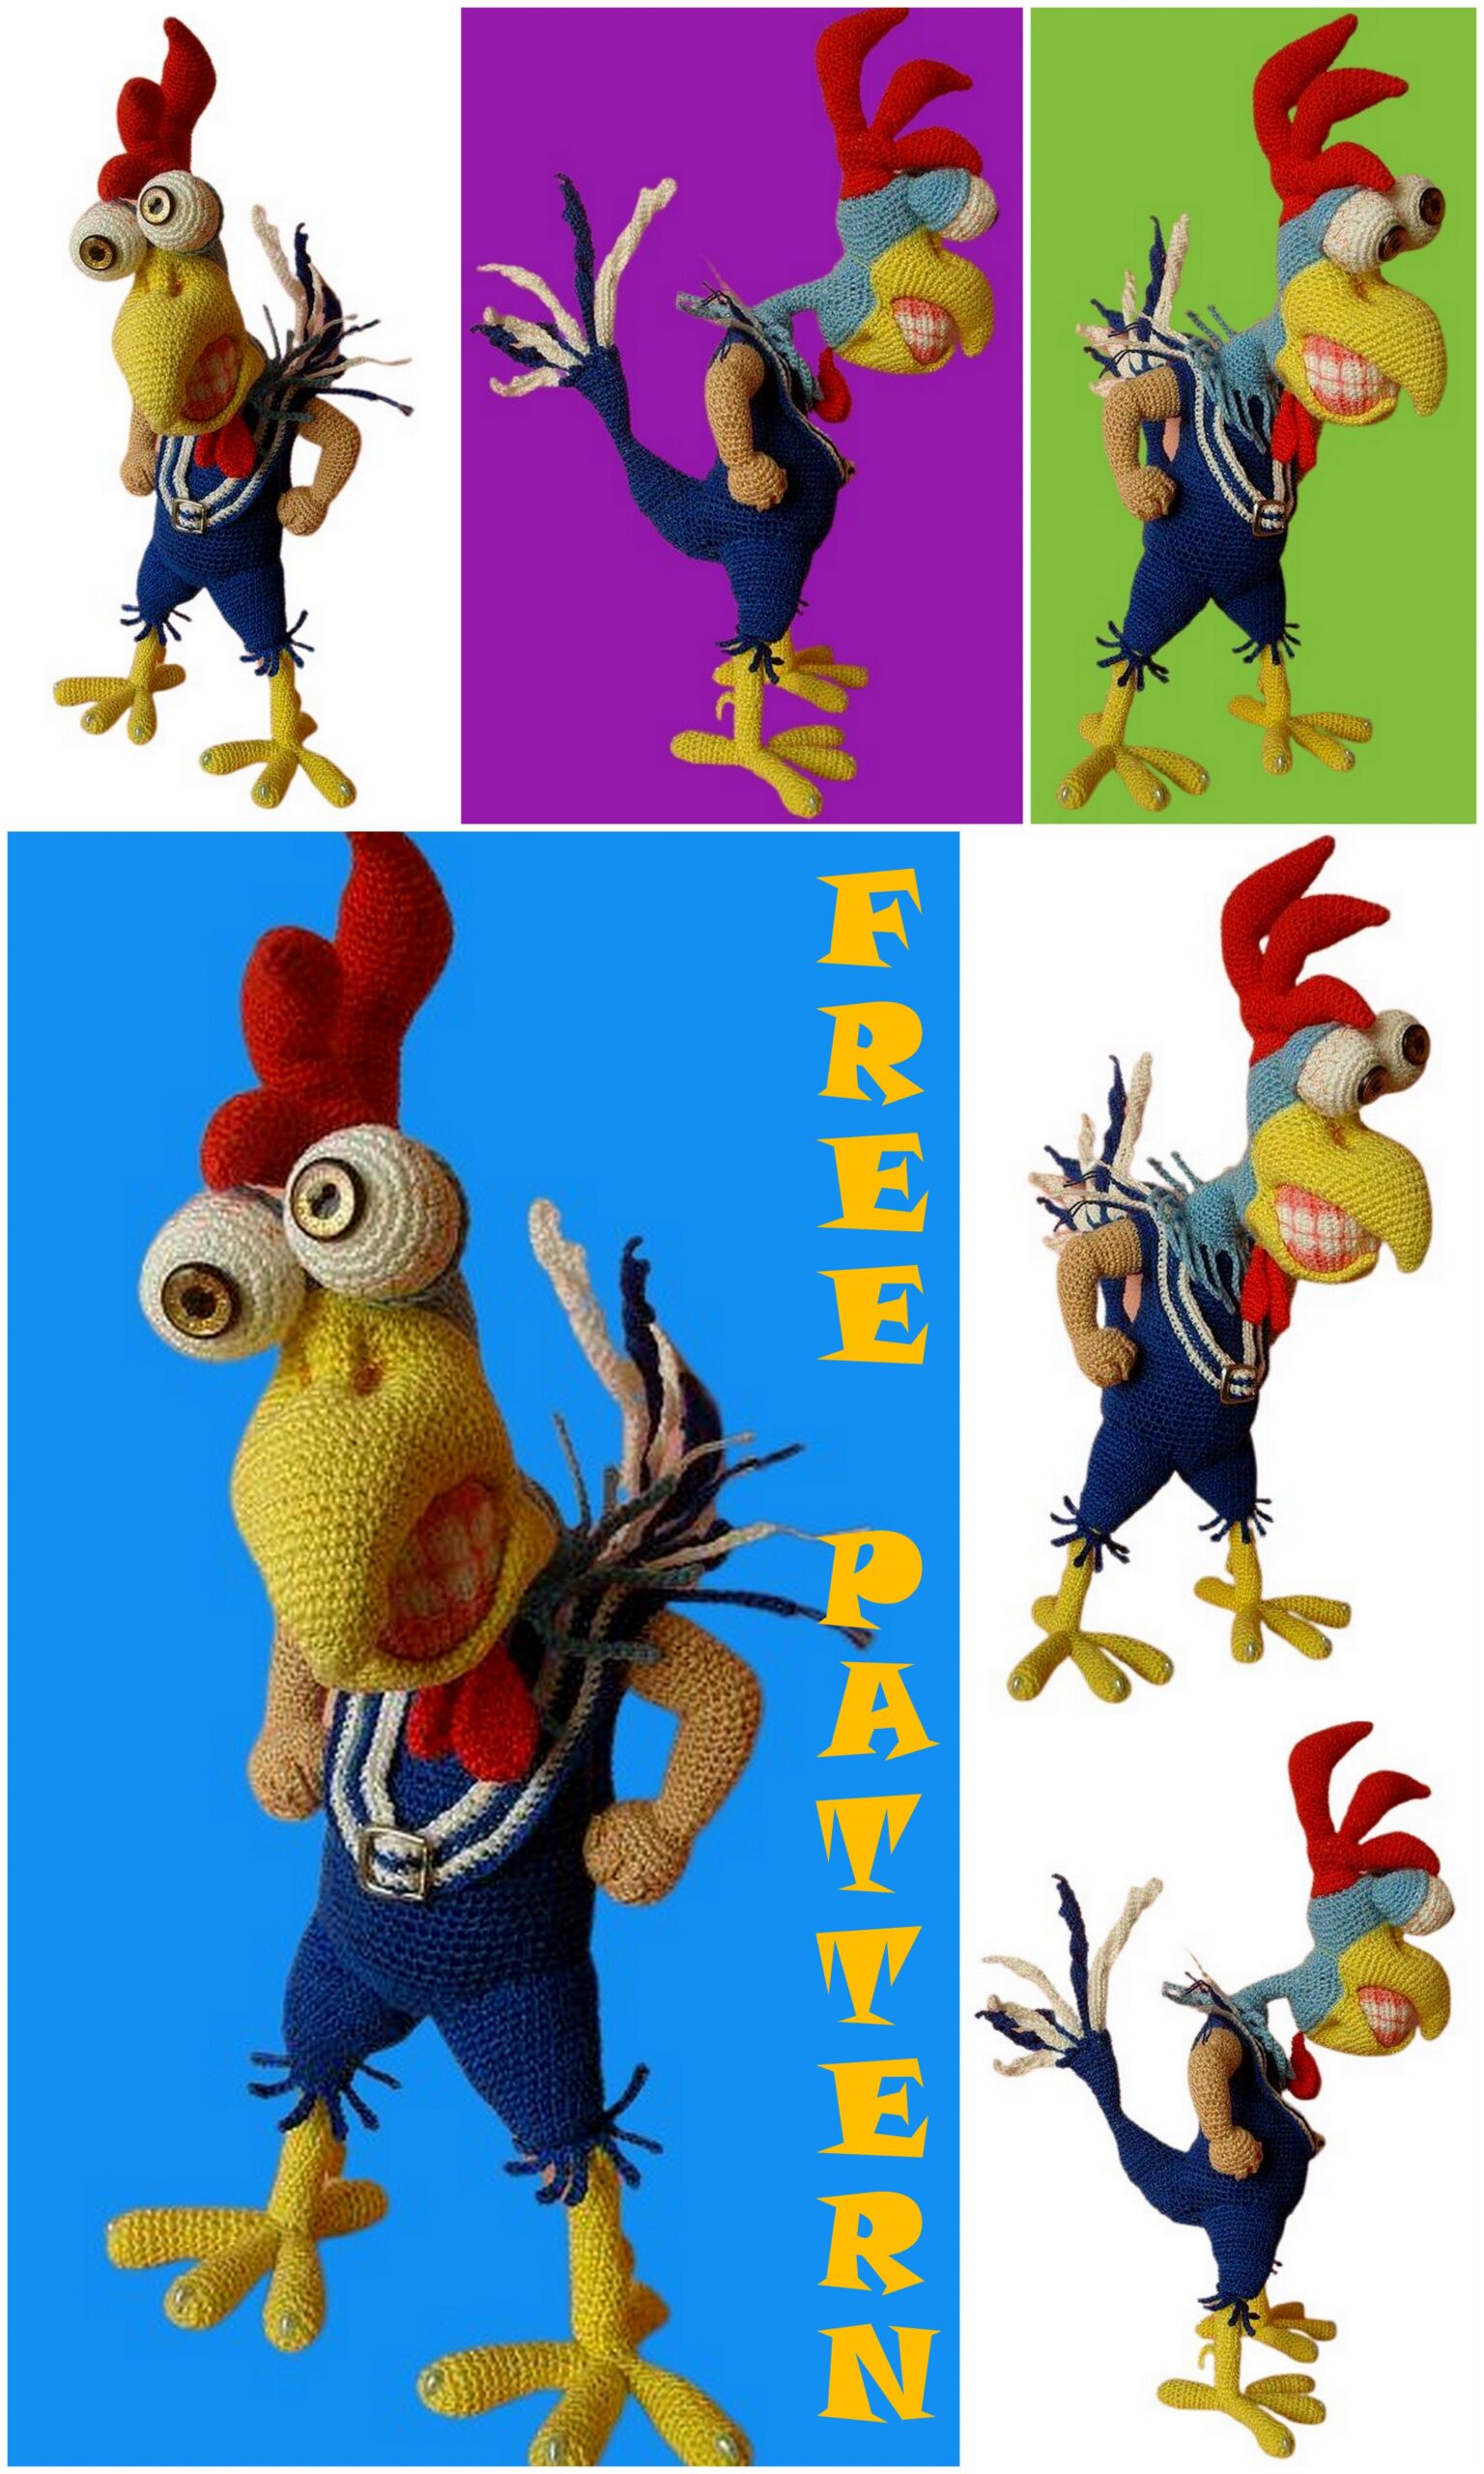
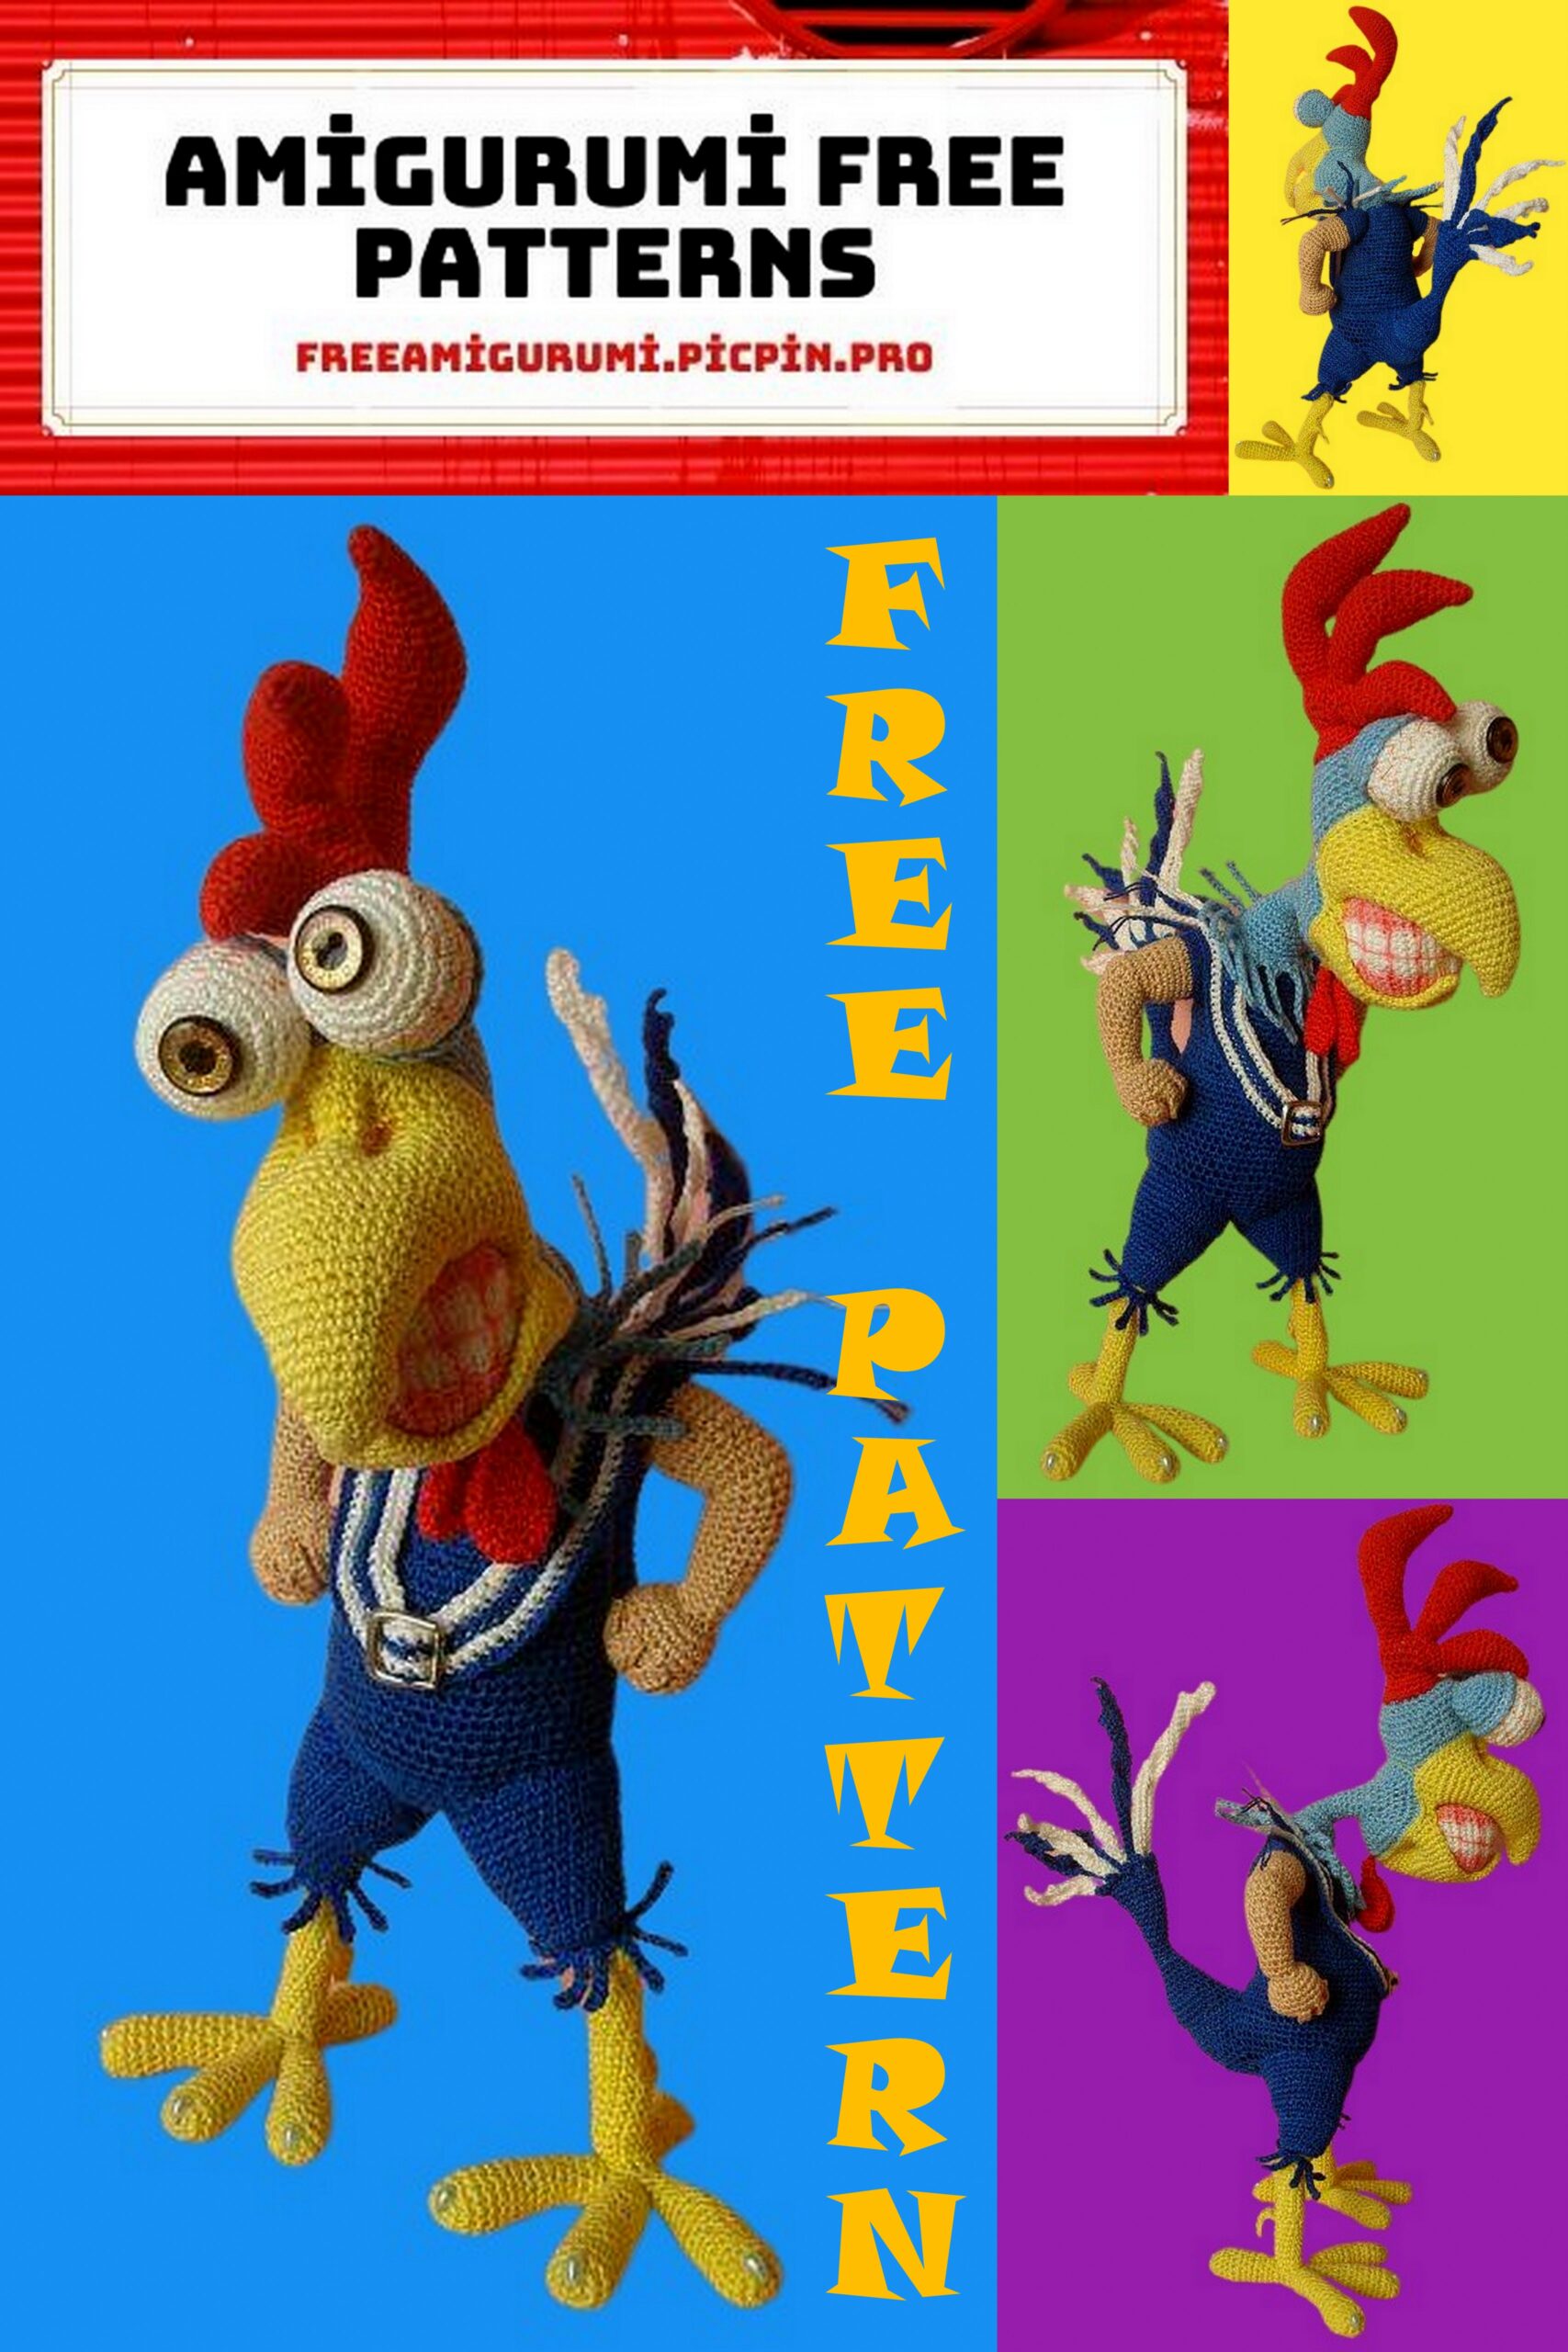
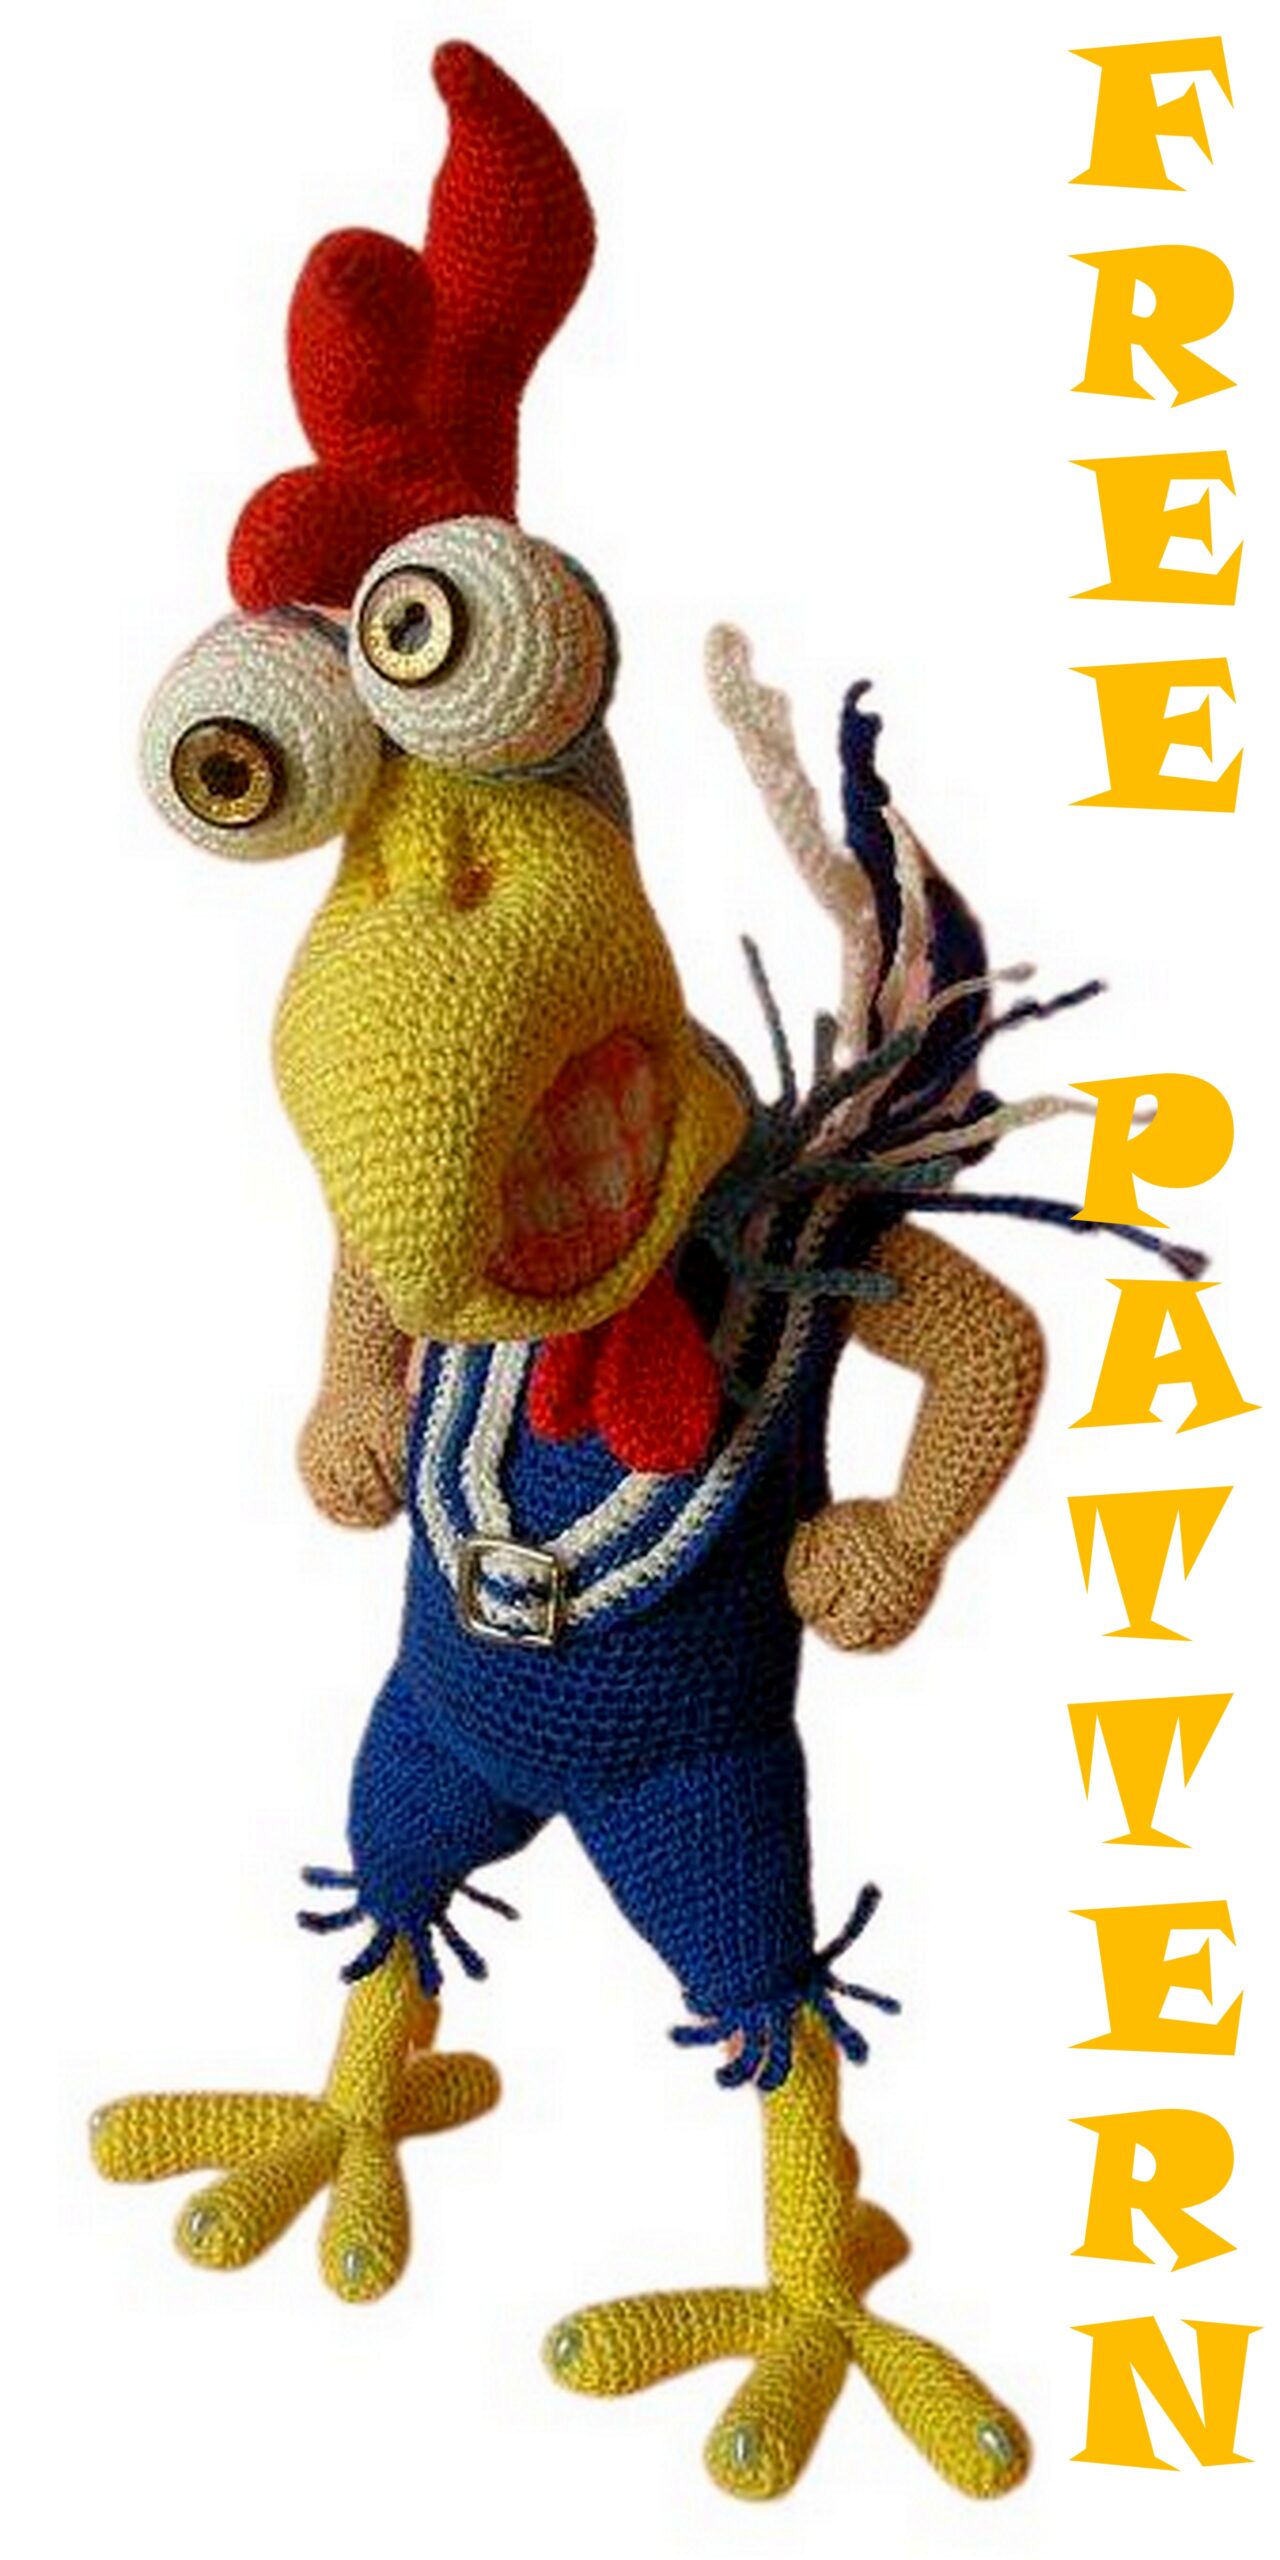
Cock Peter Amigurumi Free Crochet Pattern
I deliver unique samples of wonderful amigurumi animal patterns to you free of charge. Amigurumi cock peter pattern with you.
Peter, height about 40cm.
Materials.
– Thread “Narcissus” (100g / 395m), color white, flesh, blue, lemon, blue, red
– Hook Kr # 1.75 Clover.
–Sintepon.
– Wire for the frame. The toy is shaped, the head is large – this requires an absolutely rigid frame for the legs – the steel wire is poorly bendable, in the photo with the frame it is blue. Thick wire for the torso, thinner for the arms and tail. We carefully consider the photo with the frame.
– For counterweight of the head in the tail, a small weight (I have several nuts)
–2 buttons and red sewing thread # 40 for eyes.
– Clasp for decoration.
–Semi-droplets for claws and glue for them Moment crystal, universal.
Abbrevations:
ch – chain
sl-st – slip stitch
sc – single crochet.
hdc – half double crochet.
INC – one increase – knit 2sc from 1sc of the previous row.
dec – one decrease – knit 2sc together.
De3c – double decrease – knit 3sc together.
When knitting, the first SC of each row is required.
When typing a chain, the loop on the finger (which is tightened) does not count, but participates in knitting.
When counting loops in a row, the loop on the hook is not included in the count.
If there are no special instructions in the description, then knitting is carried out in a circle (in a spiral – who calls it what, more precisely – without ch and sl-st) and for both half-loops.
I give a general view of the frame. But you rely on your experience with the frame, because the wire can be thin, but hard and difficult to tell. The wire in the beak must be stiff to keep the beak arch.
Jaw.
We knit as usual, and at the end we turn it inside out, it’s easier, and the teeth will be more convex and even.
1row) pink thread, Into magic ring 6sc = 6
2row) 6INC = 12
3row) (INC, 1sc) x6 times = 18
4row) (INC, 2sc) x6 times = 24
5row) (INC, 3sc) x6 times = 30
6row) (INC, 4sc) x6 times = 36
7row) (INC, 17sc) x2 times = 38
8row) = 38
9row) white thread, behind the front loop 38sc = 38
10-15row) for both loops 38sc = 38, (6 rows)
16row) pink thread, behind the front loop 38sc = 38
17-18row) for both loops 38sc = 38
19row) (17sc, DEC) x2 times = 36
20row) (4sc, DEC) х6 times = 30, (see f1)
21row) (3sc, DEC) x6 times = 24
22row) (2sc, DEC) x6 times = 18
We turn knitting inside out (see f2), stuff it and continue to knit from the inside
23row) (1sc, DEC) x6 times = 12
24row) 6dec = 6, pull off.
We embroider teeth.
The initial tail is at the bottom and we embroider 8 teeth (3sc each), we pick up the thread from the half loops to get a bend. Next, we embroider, dividing the teeth into upper and lower, and at the same time we fix the vertical threads (see f3.4).
The beak is the lower part.
1row) lemon thread, Into magic ring 6sc = 6
2row) (INC, 1sc) = 9
3row) = 9
4row) (INC, 2sc) x3 times = 12
5-6row) = 12
7row) (INC, 1sc) x6 times = 18
8-9row) = 18
10row) (INC, 2sc) x6 times = 24
11row) = 24
12row) (INC, 3sc) x6 times = 30
13row) = 30
14row) (INC, 4sc) x6 times = 36
15row) = 36
16row) (INC, 5sc) x6 times = 42
17p = 42
18row) (INC, 6sc) x6 times = 48
19row) = 48
20row) (INC, 7sc) x6 times = 54
21p = 54
22row) (INC, 8sc) x6 times = 60
23row) = 60, leave thread for sewing.
The beak is the upper part.
1row) lemon thread, Into magic ring 6sc = 6
2row) (INC, 1sc) = 9
3row) = 9
4row) (2sc, INC) x3 times = 12
5row) (3sc, INC) x3 times = 15
6row) 4sc, INC, 10sc = 16
7row) 5sc, INC, 10sc = 17
8row) 6sc, INC, 10sc = 18
9row) 5sc, INC, (1sc, INC) x2 times, 8sc = 21
10row) 6sc, INC, (2sc, INC) x2 times, 8sc = 24
11row) (3sc, INC) x5 times, 4sc = 29
12row) = 29
13row) (4sc, INC) x5 times, 4sc = 34
14row) = 34
15row) 16sc, INC SC INC, 15sc = 36
16row) 11sc, INC, (6sc, INC) x2 times, 10sc = 39
17row) = 39
18row) 12sc, INC, (3sc, INC) x4 times, 10sc = 44
19row) = 44, adjust the Mark of the beginning of the row to the middle of the front – we are guided by the increments in the 11th and 13th rows (I tied 2sc, you have your own)
20row) 39sc, DEC, 3sc = 43, DEC is the place of the nostrils
21row) 3sc, DEC, 6sc, INC, (4sc, INC) x4 times, 11sc = 47
22row) 40sc, 3DEC, 1sc = 44
23row) 1sc, 3DEC, 4sc, INC, (5sc, INC) x4 times 8sc = 46
24row) 43sc, INC, 2sc = 47
25row) 2sc, INC, (6sc, INC) x6 times, 2sc = 54
26row) 3sc, INC, 50sc = 55
27row) 4sc, INC, (7sc, INC) х6 times, 2sc = 62
28row) 30sc, 1sl-st, row is not complete, leave thread for sewing.
Sew on the lower part of the beak (see file 7,8,9,10). Sew on 30sc adjacent to the jaw. We have 60-30 free = 30sc left.
Sew on the upper part of the beak (see f11,12,13,14, 15). Sew on 20sc, and 62-20 = 42sc remains free. When sewing on the first and last sc stitch, connect to the lower part of the beak. The jaw is roughly divided into the same visible and invisible parts. Fill the upper part of the beak a little.
Head.
We attach the lemon thread in the center of the lower part of the beak and along the free sc
1row) 15sc \ along the lower part of the beak \, 6sc \ along the upper part of the beak \, 12ch, skip 30sc, 6sc \ upper part of the beak \, 15sc \ lower part of the beak \
2row) blue thread, behind the back loop 21sc, 12sc \ along the chain \, behind the back loop 21sc = 54 (see f16, 17)
3row) for both loops (7sc, DEC) x6 times = 48
4row) (6sc, DEC) x6 times = 42
5row) (5sc, DEC) x6 times = 36, here it is convenient to make a binding on a row of color change.
We fasten the lemon thread at the junction of the hemispheres and knit SL-ST in each sc (filling half loops) in the 2nd row, pick up the working thread from below (see form 18, 19), tying it to the next joint – leave the thread (I left 1 meter) for the next strapping of this connections. I twisted the thread into a ring and put it behind the synthetic winterizer (see f20) and continue to knit
6row) (4sc, DEC) x6 times = 30
7row) (3sc, DEC) x6raz = 24 (see f21)
8row) (2sc, DEC) x6 times = 18
9row) = 18
10row) (1sc, DEC) x6 times = 12 leave the loop with the working thread cut off. Those who want to knit the torso separately and sew it on (and this is easier), here they can fasten and cut the thread, and then dial a chain of 12ch for the neck and knit according to the description. We turn to knitting the back of the head.
The back of the head.
1row) blue thread, fasten the thread in the middle of a 12ch chain, 6sc \ along the chain \, behind the back loop 30sc \ along the beak \, 6sc \ along the chain \ = 42
2-3row) = 42, here it is convenient to continue tying a row with a color change.
We knit with the left lemon thread, at the end we fasten the thread. This thread can be used to sew the lower part of the beak to the teeth, while grabbing the padding! To make it denser, we fix the thread and cut it off (see 22,24,25).
4-5row) = 42
6row) (5sc, DEC) x6 times = 36
7row) = 36
8row) (4sc, DEC) x6 times = 30
9row) (3sc, DEC) x6 times = 24
10row) (2sc, DEC) x6 times = 18, insert the frame (must be rigid, it bends the beak around the jaw) through the neck to the tip of the upper part of the beak, do not fill it tightly (otherwise the wire will not be able to hold it)
11row) = 18
12row) (1sc, DEC) x6 times = 12, pull the front loop, cut off the thread (see f26).
Crest.
The ridge consists of 3 teeth – a small tooth, a medium tooth, a large tooth, which are located on a common base.
Small tooth.
1row) red thread, Into magic ring 6sc = 6
2row) 5sc, INC = 7
3row) 6sc, INC = 8
4row) 7sc, INC = 9
5row) 8sc, INC = 10
6row) (4sc, INC) x2 times = 12
7row) 11sc, INC = 13
8row) 5sc, INC, 6sc, INC = 15
9row) = 15
10row) 6sc, INC, 6sc, Y = 15
11row) = 15
12row) 7sc, INC, 5sc, DEC = 15
13row) DEC, 11sc, DEC = 13
14row) 7sc, INC, 3sc, DEC = 13
15row) 11sc, DEC = 12
16row) 7sc, INC, 2sc, DEC = 12
17row) = 12, finish 1sl-st, leave thread to sew on, not tight.
Medium tooth.
We knit from row 1 to row 8, like a small clove.
9row) 14sc, INC = 16
10row) 6sc, INC, 8sc, INC = 18
11row) = 18
12row) 7sc, INC, 10sc = 19
13row) DEC, 7sc, INC, 9sc = 19
14row) DEC, 8sc, INC, 8sc = 19
15row) DEC, 9sc, INC, 7sc = 19
16row) DEC, 10sc, INC, 6sc = 19
17row) De3c, 10sc, INC, 5sc = 18
18row) DEC, 16sc = 17
19row) De3c, 9sc, INC, 4sc = 16
20row) DEC, 14sc = 15
21row) De3c, 2sc, INC, 9sc = 14
22row) DEC, 3sc, INC, 8sc = 14
23row) De3c, 3sc, INC, 7sc = 13
24row) DEC, 11sc = 12
25row) = 12, finish 1sl-st, leave thread to sew on, not tight.
Big tooth.
We knit from row 1 to row 11, like an average clove.
12row) 7sc, INC, 9sc, INC = 20
13row) 19sc, INC = 21
14row) 8sc, INC, 11sc, INC = 23
15row) = 23
16row) DEC, 7sc, INC, 13sc = 23
17row) DEC, 8sc, INC, 12sc = 23
18row) DEC, 9sc, INC, 11sc = 23
19row) DEC, 10sc, INC, 10sc = 23
20row) De3c, 10sc, INC, 9sc = 22
21row) DEC, 20sc = 21
22row) De3c, 9sc, INC, 8sc = 20
23row) DEC, 18sc = 19
24row) De3c, 8sc, INC, 7sc = 18
25row) DEC, 16sc = 17
26row) De3c, 2sc, INC, 11sc = 16
27row) DEC, 14sc = 15
28row) De3c, 1sc, INC, 10sc = 14
29row) DEC, 2sc, INC, 9sc = 14
30row) DEC, 12sc = 13
31row) DEC, 11sc = 12
32row) = 12, DO NOT cut the thread, not very tight.
Build the comb.
We consider the teeth and sew them together (see diagram 1, f29,30, 31), so that the tip of each is directed forward!
1row) 4sc \ large tooth \, 3sc \ medium \, 9sc \ small \, 3sc \ medium \, 5sc \ large \ = 24, you have your own red numbers, but in total it is 9
2row) = 24, put the Mark of the beginning of the row in the back and in the middle
3row) 4hdc, 4sc, 8sl-st, 4sc, 4hdc = 24
4row) 4hdc, 2DEC, 1sc, 6sl-st, 1sc, 2DEC, 4hdc = 20
5row) 2hdc, DEC, 3sc, 6sl-st, 3sc, DEC, 2hdc = 18
6row) 2hdc, 3sc, 9sl-st, 4sc = 18, fill, not very tight (but it’s for your taste)
7row) 4INC, 12sc, 2INC = 24
8row) = 24, also tie 3sc, 1sl-st is the middle at the back, leave the thread for sewing.
Eye (2pcs).
1row) white thread, Into magic ring 6sc = 6
2row) 6INC = 12
3row) (INC, 1sc) x6 times = 18
4row) (2sc, INC) x6 times = 24
5row) 1sc, INC, (3sc, INC) х5 times, 2sc = 30
6-10row) = 30, (∑ 5 rows)
11row) (3sc, DEC) x6 times = 24
12row) blue thread, behind the back loop 24sc = 24
13row) for both loops 24sc = 24
14row) = 24
15row) (2sc, DEC) x6 times = 18
16row) = 18
17row) (1sc, DEC) x6 times = 12, fill
18row) 6DEC = 6, pull off, cut the thread.
Harness – blue thread, squirrel to itself, for the remaining 24sc loop, cut off the thread. Sew on the eyes in the center – buttons and embroider the veins with a thin red thread (see f32,33,34,35).
Feathers on the neck.
Blue thread, 30ch, sc 1sc, (12ch, sc 9sl-st, 2sc, 2sc \ in a chain \) – repeat to the end of the chain We get 15 feathers (see # 36) .Later we tie them to the neck.
Tail.
The tail consists of a base and feathers – white and blue – only 7 pieces.
Base.
1row) blue thread, 30ch, close in a ring 30sc = 30
2row) 4INC, 9sc, 4U (this is the place to attach to the back), 9sc = 30
3row) 17sc, 2DEC, 9sc = 28
4row) = 28
5row) (DEC, 5sc) x4 times = 24
6row) = 24
7row) (DEC, 4sc,) x4 times = 20
8row) = 20
9row) (DEC, 3sc) x4 times = 16
10row) = 16
11row) (DEC, 2sc) x4 times = 12
12row) = 12
13row) (DEC, 1sc) x4 times = 8
14-16row) = 8, (3 rows)
17row) (3sc, INC) x2 times = 10
18row) = 10
19row) (4sc, INC) x2 times = 12
20row) = 12
21row) (5sc, INC) x2 times = 14
22row) = 14
23row) (6sc, INC) x2 times = 16
24row) = 16
25row) (7sc, INC) x2 times = 18
26row) = 18
27row) (8sc, INC) x2 times = 20
28row) = 20, (see f39, 40)
We make the harness: (Pico from 3ch, 2sc) – so we knit to the end of the row, 1sl-st, leave the thread for sewing feathers. You can do the harness in the opposite direction (it’s up to your taste).
Pen number 1.
Knit in pivoting rows for the back loop (see f41, 42.43).
1row) blue thread, 18ch sc 17sc, 1ch, turn
2row) 15sc, 1ch, turn
3row) 15sc, 1ch, turn
4row) 12sc, 1ch, turn
5row) 6sc, together with the first row for both loops 6sc (the row that we knit – towards ourselves), cut the thread. In the same way we knit 1 white feather.
Feather number 2.
We knit in twisting rows for the back loop.
1row) white thread, 22ch sc 21sc, 1ch, turn
2row) 19sc, 1ch, turn
3row) 19sc, 1ch, turn
4row) 16sc, 1ch, turn
5row) 8sc, together with the first row for both 8sc loops (the row that we knit – towards ourselves), cut the thread.
Feather number 3.
We knit in twisting rows for the back loop.
1row) blue thread, 26ch sc 25sc, 1ch, turn
2row) 23sc, 1ch, turn
3row) 23sc, 1ch, turn
4row) 21sc, 1ch, turn
5row) 11sc, together with the first row for both loops 10sc (the row that we knit – towards ourselves), cut the thread.
Feather number 4.
We knit in twisting rows for the back loop.
1row) white thread, 30ch sc 29sc, 1ch, turn
2row) 27sc, 1ch, turn
3row) 27sc, 1ch, turn
4row) 24sc, 1ch, turn
5row) 12sc, together with the first row for both loops 12sc (the row that we knit – towards ourselves), cut the thread.
Feather number 5.
We knit in twisting rows for the back loop.
1row) blue thread, 34ch sc 33sc, 1ch, turn
2row) 31sc, 1ch, turn
3row) 31sc, 1ch, turn
4row) 28sc, 1ch, turn
5row) 14sc, together with the first row for both loops 14sc (the row that we knit – towards ourselves), cut the thread.
Feather number 6.
We knit in twisting rows for the back loop.
1row) white thread, 38ch sc 37sc, 1ch, turn
2row) 35sc, 1ch, turn
3row) 35sc, 1ch, turn
4row) 32sc, 1ch, turn
5row) 16sc, together with the first row for both loops 16sc (the row that we knit – towards ourselves), cut the thread.
In the long 2 feathers there is a thin wire (then it is attached to the ridge), and in it is a loop made with a skewer. Sew the feather with a stitch to this loop so that there is no mixing (see f44). We sew all the feathers tightly together, and then insert them into the base, make a plane and sew them through together (f. 45).
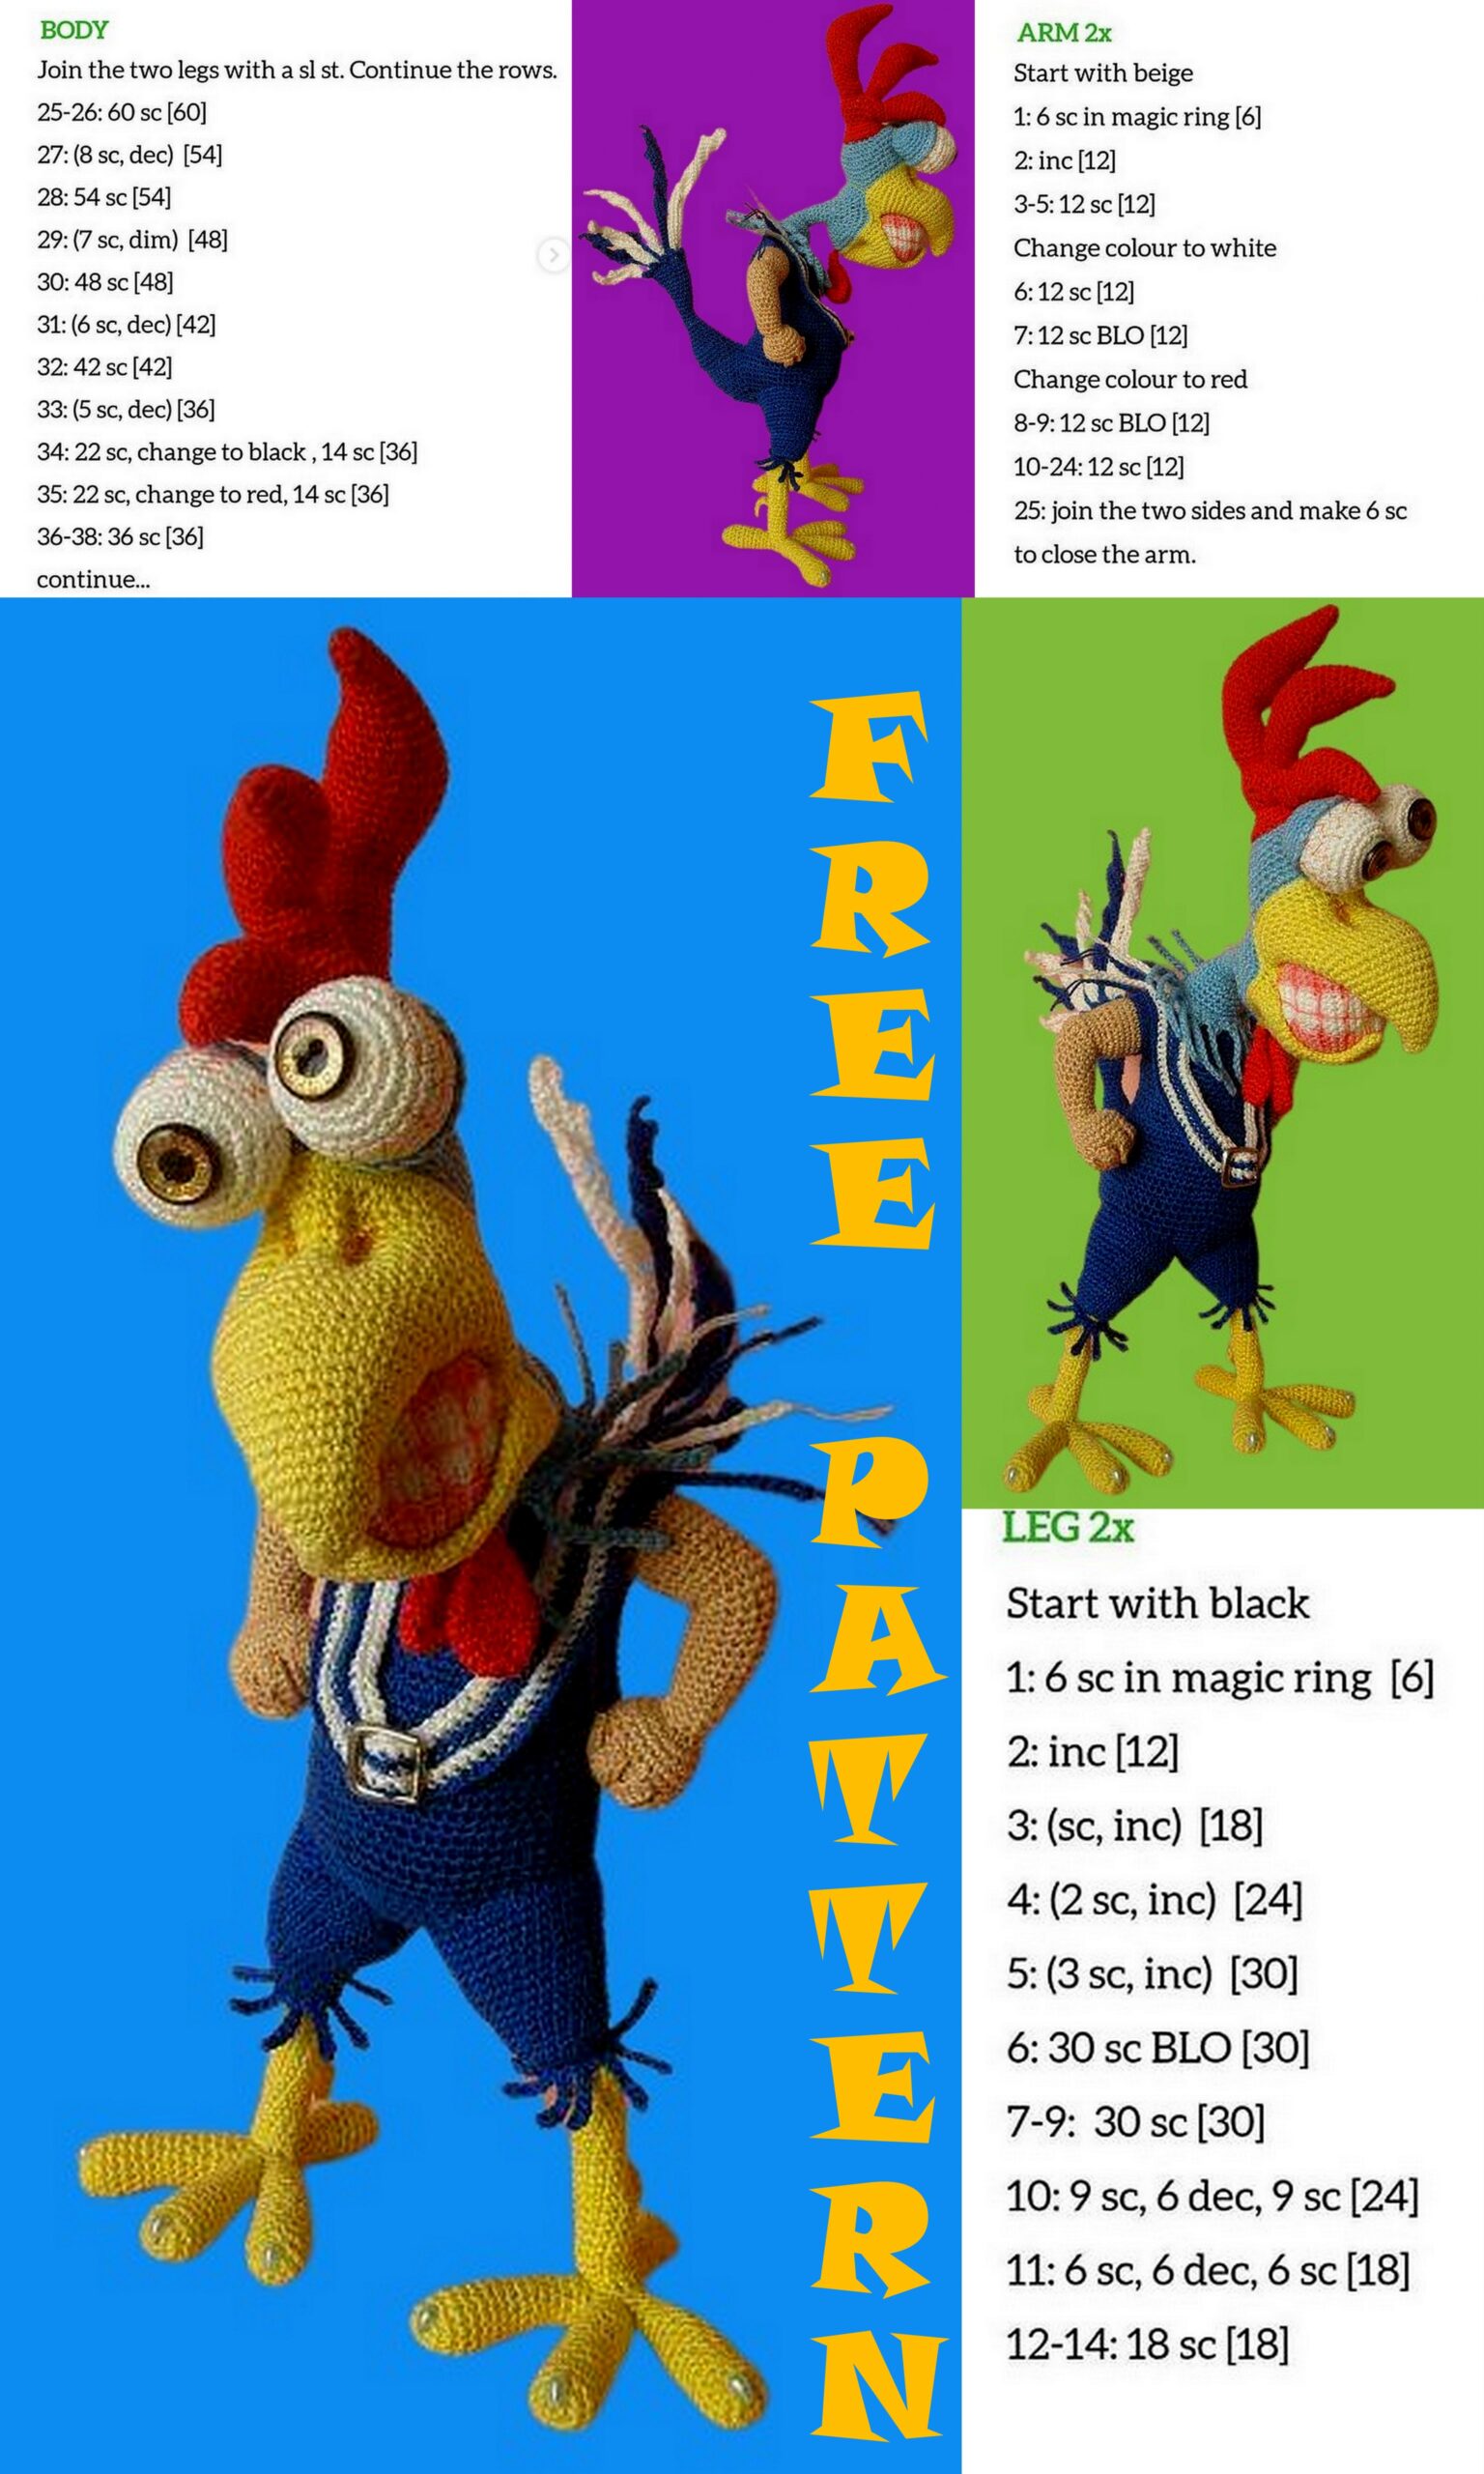
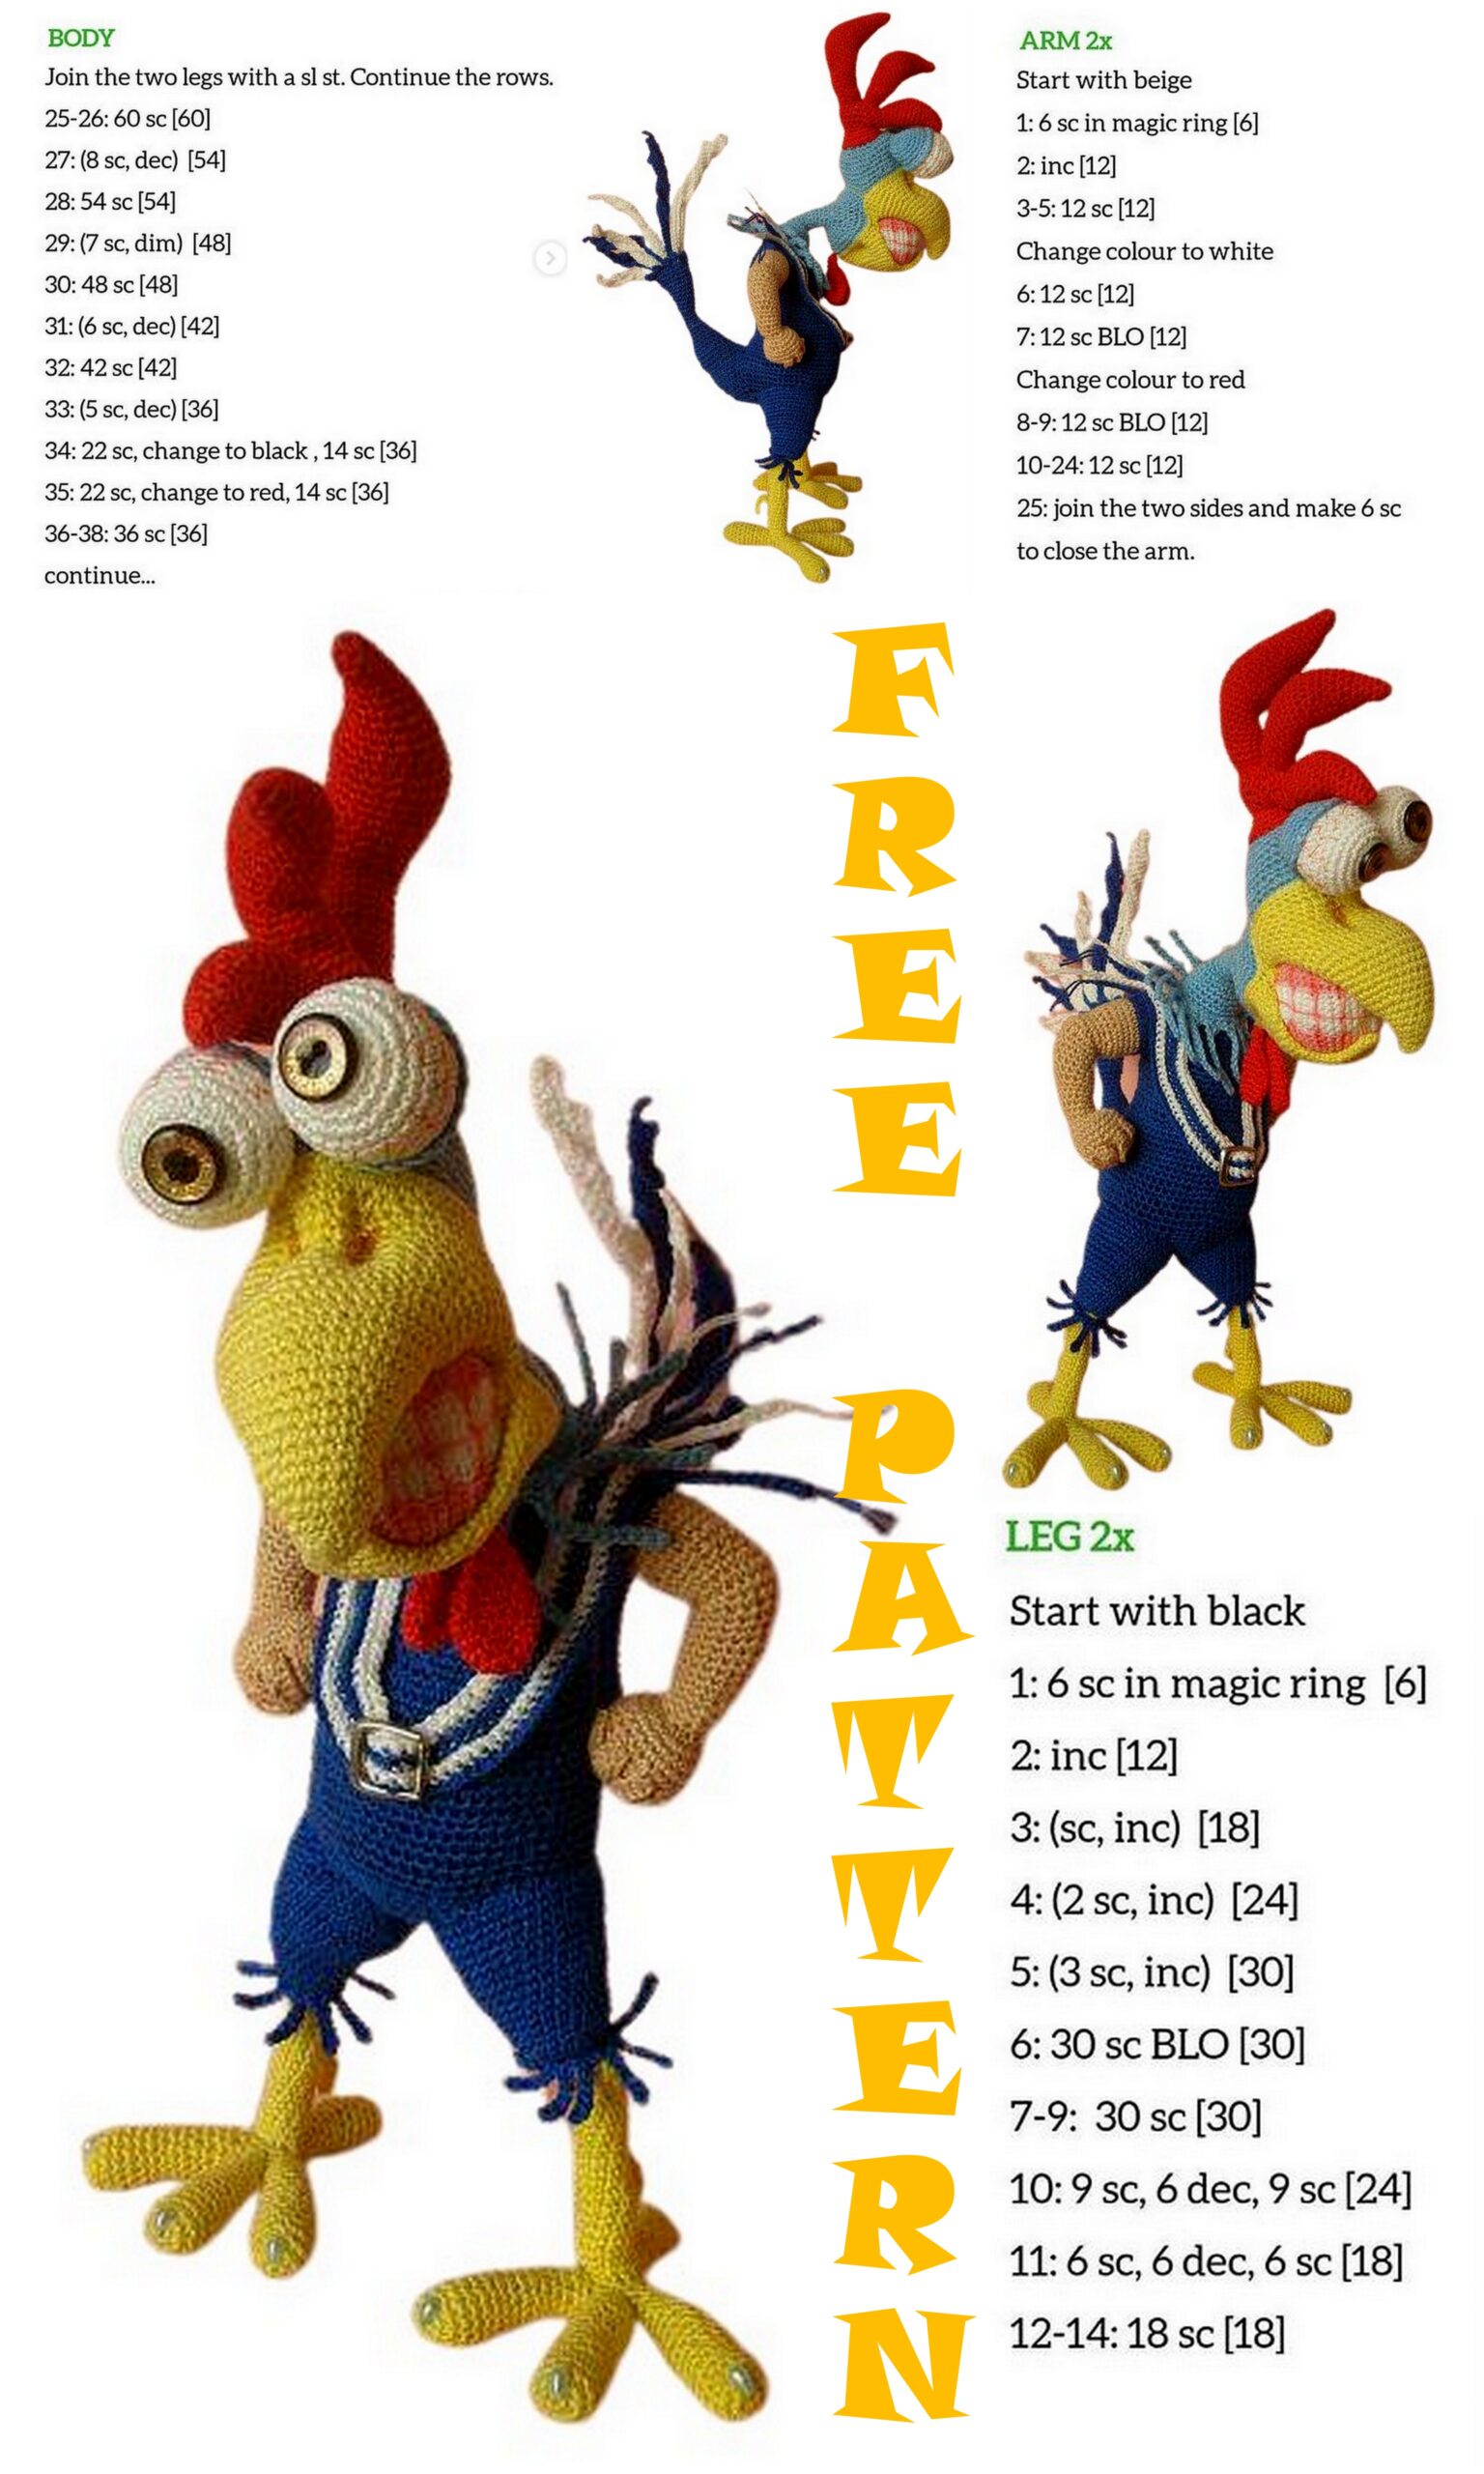
Right hand.
The hands differ in the location of the thumb, so looking at the photo of both hands – it will be clearer.
1row) blue thread, Into magic ring 6sc = 6
2row) 6INC = 12
3row) (1sc, INC) x6 times = 18
4-6row) = 18, (3 rows)
7row) 2sc, INC, 8sc, INC, 6sc = 20
8row) = 20
9row) 3sc, INC, 9sc, INC, 6sc = 22
10row) beige thread, behind back loop 22sc = 22
11p -12row) for both loops 22sc = 22
13row) (DEC, 9sc) x2 times = 20
14row) = 20
15row) (DEC, 3sc) x4 times = 16
16row) = 16
17row) 6sc, 4INC, 4sc, 2sl-st = 20
18row) 3sl-st, 12sc, 5sl-st = 20
19row) 5sl-st, 2sc, 4DEC, 3sc, 2sl-st = 16
20row) 3sl-st, 13sc = 16
21-22row) = 16
23row) 2sc, INC, 7sc, DEC, 4sc = 16
24row) = 16
25row) 10sc, DEC, 4sc = 15
26row) = 15
27row) 9sc, DEC, 4sc = 14
28row) = 14
29row) 8sc, DEC, 4sc = 13
30row) = 13, insert the wire – it goes into the initial hole, fill gradually (see f54)
31row) 7sc, DEC, 4sc = 12
32row) 6sc, DEC, 4sc = 11
33row) 5sc, DEC, 4sc = 10
34row) 10INC = 20
35row) (4sc, INC) x4 times = 24
36-37row) = 24
38row) 1sc, (7ch, sc 1sc, 5hdc, 3sc \ in the base \) x4 times, 2sc, 7ch, sc 1sc, 5hdc, 9sc \ in the base \, see f47, 48, 49, 50, 51
39row) 1sc, (skip 1sc – which is with a finger, 2sc) x4 times, 2sc, skip 1sc – which is with a finger, 4sc, DEC, 2sc = 18
40row) = 18
41row) (1sc, DEC) x6 times = 12
42row) 6DEC = 6, cut the thread longer, pull off, thread into the needle and sew each finger to the center of the fist (see f51, 52, 53).
Left hand.
Knits up to row 37 inclusive on the right hand.
left38row) 7sc, 7ch, sc 1sc, 5hdc, 3sc \ into the base \, 2sc, (7ch, sc 1sc, 5hdc, 3sc \ into the base \) x4 times (see q55.56.57)
left39row) 2sc, DEC, 3sc, skip 1sc – which is with a finger, 2sc, 2sc, (skip 1sc – which is with a finger, 2sc) x4 times = 18
Next, we knit like the right hand. (see f58.59)
The torso.
We return to the neck, tie a blue thread to the left working loop
1row) 12sc = 12
2row) (4sc, DEC) x2 times = 10
3-4row) = 10
5row) (INC, 4sc) x2 times = 12
6row) = 12
7row) (INC, 5sc) x2 times = 14, gradually fill the neck
8row) (INC, 6sc) x2 times = 16
9row) (INC, 7sc) x2 times = 18
10row) (INC, 8sc) x2 times = 20
11row) (INC, 9sc) x2 times = 22
12row) (INC, 10sc) x2 times = 24
13row) (INC, 11sc) x2 times = 26
14row) (INC, 12sc) x2 times = 28
15row) (INC, 13sc) x2 times = 30, leave a long thread for knitting 30sl-st
16row) blue thread, behind back loop 30sc = 30
17row) for both loops 30sc = 30
18-20row) = 30, then we tie our finished Feathers on the neck to a color change row. See photo 37.38. We apply blue feathers on row 15 (color change) and, starting from the front, knit 30sl-st (we pick up the working thread from the body) – this is how we attach the feathers to this row. Fasten the thread and hide it inside. Correct the Mark of the beginning of the row in the middle of the back, I tied 4sc (you have your own), and changed the marker thread to orange – this is more visible (see f60)
21row) = 30
22row) 10sc, (INC, 1sc) x6 times, 8sc = 36
23-25row) = 36, (3 rows)
26row) 13sc, (INC, 1sc) x6 times, 11sc = 42
27-28row) = 42, adjust the Mark of the beginning of the row (I added 3sc, you have your own)
29row) 14sc, (INC, 1sc) x6raz, 10sc, DEC, 4sc = 47, we fasten the arms, the wire enters the torso between 3 and 4 rows of blue, 15sc between the arms (see f61, 62), we only fill the area where the wires are connected ! Next we knit without stuffing
30row) 4sc, DEC, 41sc = 46
31row) 41sc, DEC, 3sc = 45
32row) 4sc, DEC, 8sc, (INC, 2sc) x6 times, 13sc = 50
33row) 46sc, DEC, 2sc = 49
34row) 4sc, DEC, 8sc, (INC, 3sc) x6 times, 11sc = 54
35row) 51sc, DEC, 1sc = 53
36row) 4sc, DEC, 8sc, (INC, 4sc) х6 times, 9sc = 58
37row) 56sc, DEC = 57
38row) 4sc, DEC, 51sc = 56
39row) = 56
40row) (1sc, INC) x2 times, 52sc = 58
41row) = 58
42row) 2sc, INC SC INC, 53sc = 60
43row) 2sc, attach the tail and knit together 6sc, the tail is located towards itself from the hook, long feathers at the back of the rooster, 52sc = 60 (see f63.64)
44row) 2sc \ along the body \, 24sc \ along the tail \, 52sc \ along the body \ = 78
45row) = 78, screw the wire from the tail to the ridge
46row) [(DEC, 10sc) x3 times, 3sc] x2 times = 72, we look – there are decreases – 3 in front and 3 behind, that is, the second decrease in each group of three – looks exactly backward, and the other – looks exactly ahead, if you are wrong, then for beauty, transfer the Mark of the beginning of the row so that it becomes according to the description (I’m fine)
47row) = 72
48row) [(DEC, 9sc) x3 times, 3sc] x2 times = 66
49row) = 66
50row) [(DEC, 8sc) x3 times, 3sc] x2 times = 60
51row) [(DEC, 7sc) x3 times, 3sc] x2 times = 54
52row) = 54
53row) [(DEC, 6sc) x3 times, 3sc] x2 times = 48
54row) (DEC, 5sc) x2 times, DEC, 4sc, 3ch, skip 3sc, 1sc, (DEC, 5sc) x2 times, DEC, 1sc, 3ch, skip 3sc, 4sc – leg holes turned out – now they can be checked and changed at necessary (see f65.66)
55row) 17sc, 3sc \ arc \, 15sc, 3sc \ arc \, 4sc = 42
56row) [(DEC, 4sc) x3 times, 3sc] x2 times = 36
57row) [(DEC, 3sc) x3 times, 3sc] x2 times = 30, insert 2 long pencils into the leg holes. The pencils should almost reach the attachment of the hands, and now we are filling the body – tightly with padding polyester! Synthepukh will not work !!! Further, after dense stuffing, it is more convenient to knit, covering the synthetic winterizer with a black knitted cloth. I often knit dark toys and stuff them in black knitwear
58row) [(DEC, 2sc) x3 times, 3sc] x2 times = 24
59row) [(DEC, 1sc) x3 times, 3sc] x2 times = 18
60row) (4DEC, 1 sc) x2 times = 10, pull off the front half-loops, cut off the thread and hide.
Leg (2pcs).
Finger (3pcs. For 1 leg)
1row) lemon thread, Into magic ring 6sc = 6
2row) 6INC = 12
3row) (5sc, INC) x2 times = 14
4-7row) = 14, (4 rows)
8row) (DEC, 5sc) x2 times = 12
9-11row) = 12, (3 rows)
12row) (DEC, 4sc) x2 times = 10
13-16row) = 10, (4 rows), finish 1sl-st, leave the thread for sewing. Do NOT knit at the last finger 1sl-st and DO NOT cut the thread
Sew fingers together, grabbing 3 sc from each finger (see f69)
and after that we knit
1row) 3sc \ 1-finger \, 2sc \ 2-finger \, 7sc \ 3-finger \, 2sc \ 2-finger \, 4sc \ 1-finger \ = 18
2row) (7sc, DEC) x2 times = 16
3row) 3sc, 3ch, we make a frame (see f70) on the toes, then + the length of the leg is about 2 more toes and + what will be inside the torso (you can already determine by the torso you linked) – each has its own length. We put the frame, fill in and continue to knit: skip 3sc, 2sc, DEC, 4sc, DEC
4row) 3sc, 2sc \ arc \, 3sc, DEC, 1sc, DEC = 11
5row) 9sc, DEC = 10
6-7row) = 10
8row) (4sc, INC) x2 times = 12, (see f71.72)
9-10row) = 12
11row) 4sc, INC, 5sc, INC, 1sc = 14
12-15row) = 14, (∑ 4 rows)
16row) (DEC, 5sc) x2 times = 12, fill
17row) 6DEC = 6, pull off, cut the thread, hide.
We turn to knitting the leg itself
1row) lemon thread, cast around the wire 12 sc, start to cast from behind and behind the legs sc (see f73.74)
2-3row) = 12
4row) DEC, 10sc = 11
5-6row) = 11
7row) DEC, 9sc = 10
8-9row) = 10, (see f75.76)
10row) take an additional thread, attach and knit from 2 threads 1sc, 7ch, sc 4sl-st, 2sc, 1sc \ in the leg \, cut off the additional thread, 8sc = 10
11-13row) = 10, (3 rows)
14row) DEC, 8sc = 9
15-18row) = 9, (4 rows)
19row) 1sc, 3INC, 1sc, 4sl-st = 12
20row) 8sc, 4sl-st = 12, (see f77)
21row) 1sc, 3DEC, 5sc = 9
22-23row) = 9
24row) blue thread, behind back loop 9sc = 9
25row) for both loops 9INC = 18
26-27row) = 18
28row) (2sc, INC) x6 times = 24
29-32row) = 24, (4 rows)
33row) (3sc, INC) x6 times = 30
34-37row) = 30, (4 rows)
38row) (4sc, INC) x6 times = 36
39-41row) = 36, (3 rows)
42row) 18sc, 1sl-st, leave thread for sewing.
Feathers on the knee
(1pc. For 1 leg).
1row) blue thread, leave the initial tail for the tie, 9ch – let’s call this base, sc 1sc, (7ch, sc 6sl-st, 1sc \ at the base \) – repeat to the end of the row, leave the tail for the tie (see f79, 79a , 80). We put it on the knee, drag the 1 ponytail into the first sc of feathers and tie the tails into a knot.
Sew on the legs.
We take the torso and check how our pencils move, I could take out the pencil and carefully insert it back to the same depth. We take out the pencil and insert the frame of the leg into it (I repeat that the frame is rigid, like a pencil, it fits well), we fill in the remaining space with a synthetic winterizer using a wooden skewer. We sew on the leg, then we also sew on the second leg (see f81.82.83).
Feathers on the shoulders
(see f84.85.86.87.88.89.90.91). (the score is not very important)
1row) blue thread, we gain weaker (so that knitting does not tighten) 90ch, sc 10sl-st, 68sc, 10sl-st, cut off the thread. Sl-st hinges are loose ends.
2row) white thread, 10ch, join the blue strip behind the back loop 68sc, 11ch, turn
3row) sc 10sl-st, behind back loop 5sc, INC, 18sc, DEC, 16sc, DEC, 18sc, INC, 5sc, 10sl-st, thread cut
4row) blue thread, 10ch, behind the back loop 68sc, 11ch, turn
5row) sc 10sl-st, behind the back loop 5sc, INC, 18sc, DEC, (4sc, DEC) x3 times, 18sc, INC, 5sc, 10sl-st, cut the thread
6row) white thread, 10ch, rear loop 66sc, 11ch, turn
7row) sc 10sl-st, behind the back loop 5sc, INC, 18sc, DEC, (3sc, DEC) x3 times, 18sc, INC, 5sc, 10sl-st, cut the thread
Hang the threads on the edge without tails, like a brush on a scarf.
Beard (2pcs).
1row) red thread, Into magic ring 6sc
2row) 6INC = 12
3row) (5sc, INC) x2 times = 14
4-5row) = 14
6row) (DEC, 5sc) x2 times = 12
7row) (DEC, 4sc) x2 times = 10
8row) (DEC, 3sc) x2 times = 8
9row) (DEC, 2sc) x2 times = 6, (see f92.93)
10-11row) behind the front loop 6sc = 6, cut the thread, AND ON the second leave for sewing. Sew in place. I sewed them so that they hang freely on one thread – wherever they want – I like it (but it’s a matter of your taste)
Registration.
– Sew the Comb on the head, it ended at 24sc, so I sewed it onto a row of 24sc heads.
– Beak tightening.
It is simple, we take a long needle (it is longer than my beak, a knot was tied at the end, we put it inside the lower beak, the thread was fixed there) and draw it out at point 1. See photos 94,95,96,97. We correct the beak, do the jaw as we like, insert it into t1 – bring it into t2 (t2 is the right nostril), pulled it up – this immediately fixes all the parts together, and the nostril appears. Next, we enter into t2 – we output to t3 (this is the left nostril), we enter into t3 – we output to t4, we enter into t4 – we output to t5, we enter into t5 – we output to t6 – this makes a small hump of the beak, we fix the thread, that’s it.
Can be stitched 2 times. I painted the grooves of the nostrils with a brown pencil.
– Sew on the Eyes. I sewed them in 2 points for the blue part, and they can change position a little – it’s interesting.
– Sew on – Feathers on the shoulders – in 3 places. Stitch around the buckle, and 2 stitches on the shoulders.
– We glue the claws – they are from half droplets
So that is all!!! We can admire and give!