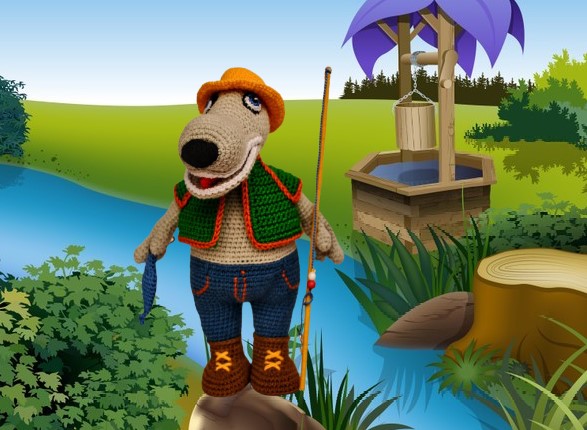
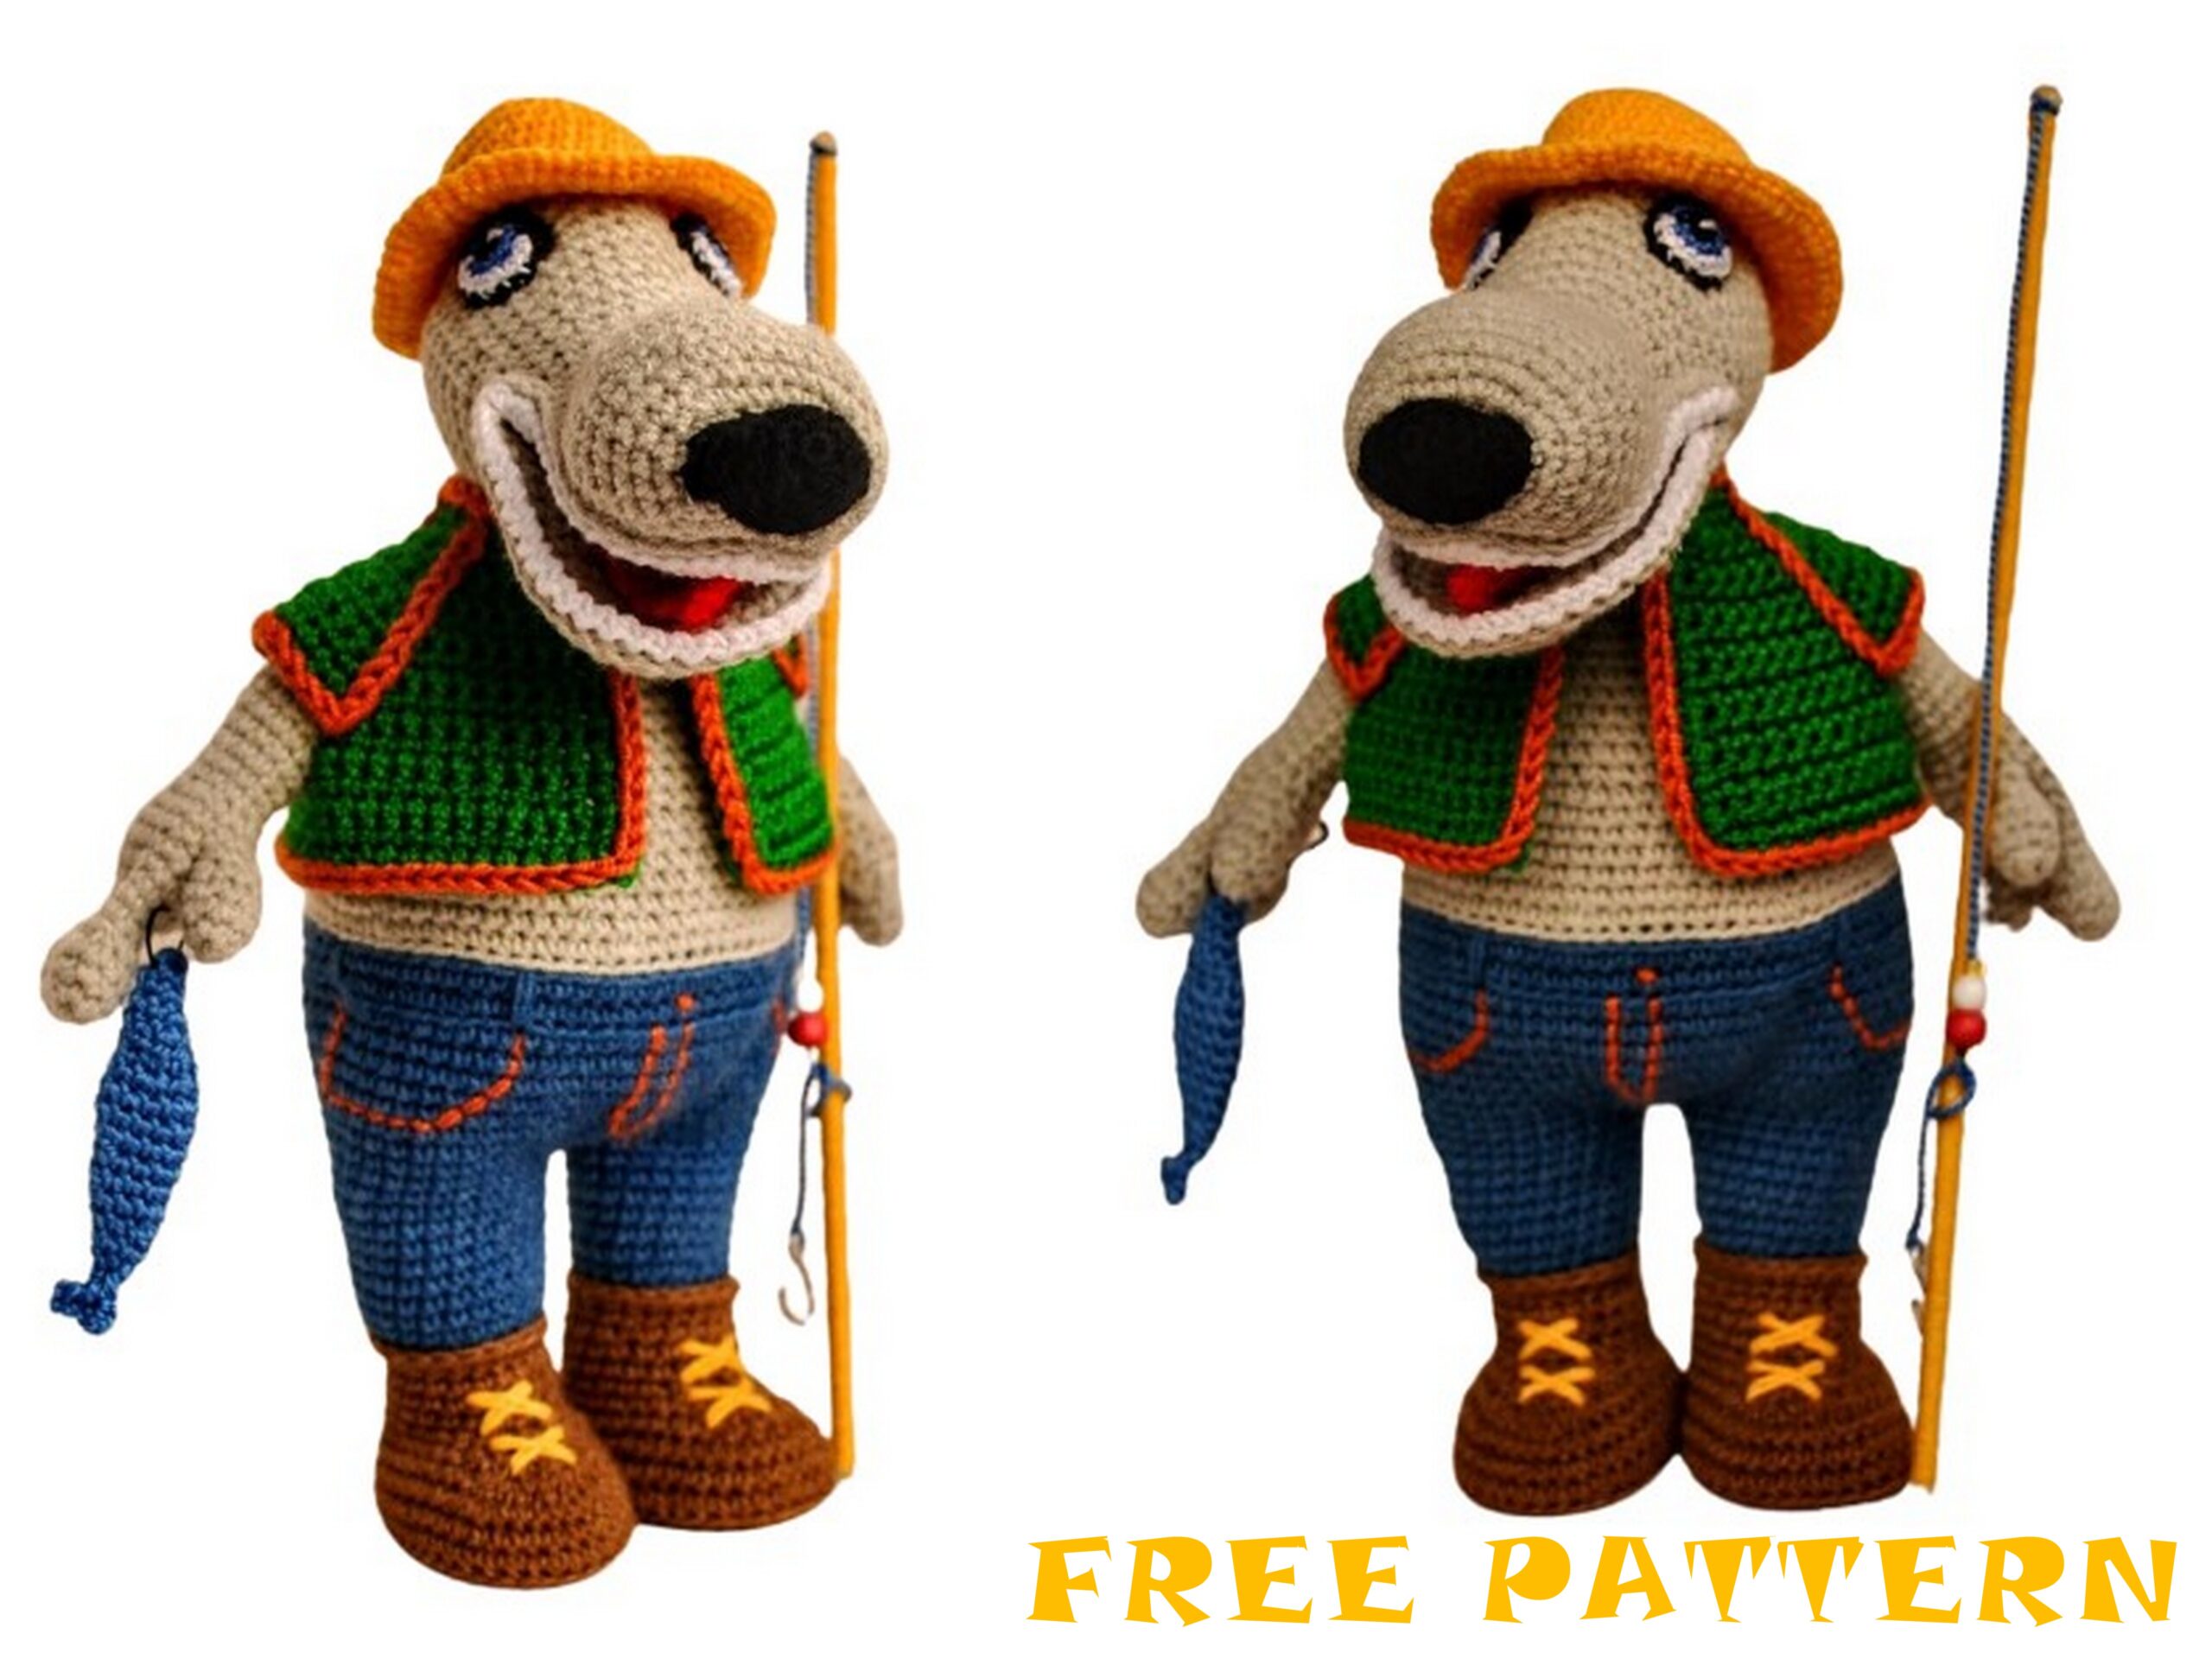
Mr. Wolf Fisherman Amigurumi Free Crochet Pattern
I am sharing the amigurumi animal patterns that are not available anywhere for free for you. Mr. Wolf Fisherman amigurumi pattern with you.
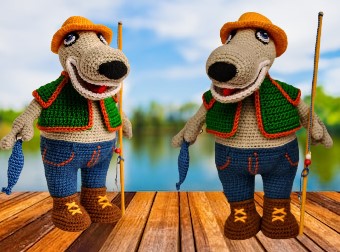
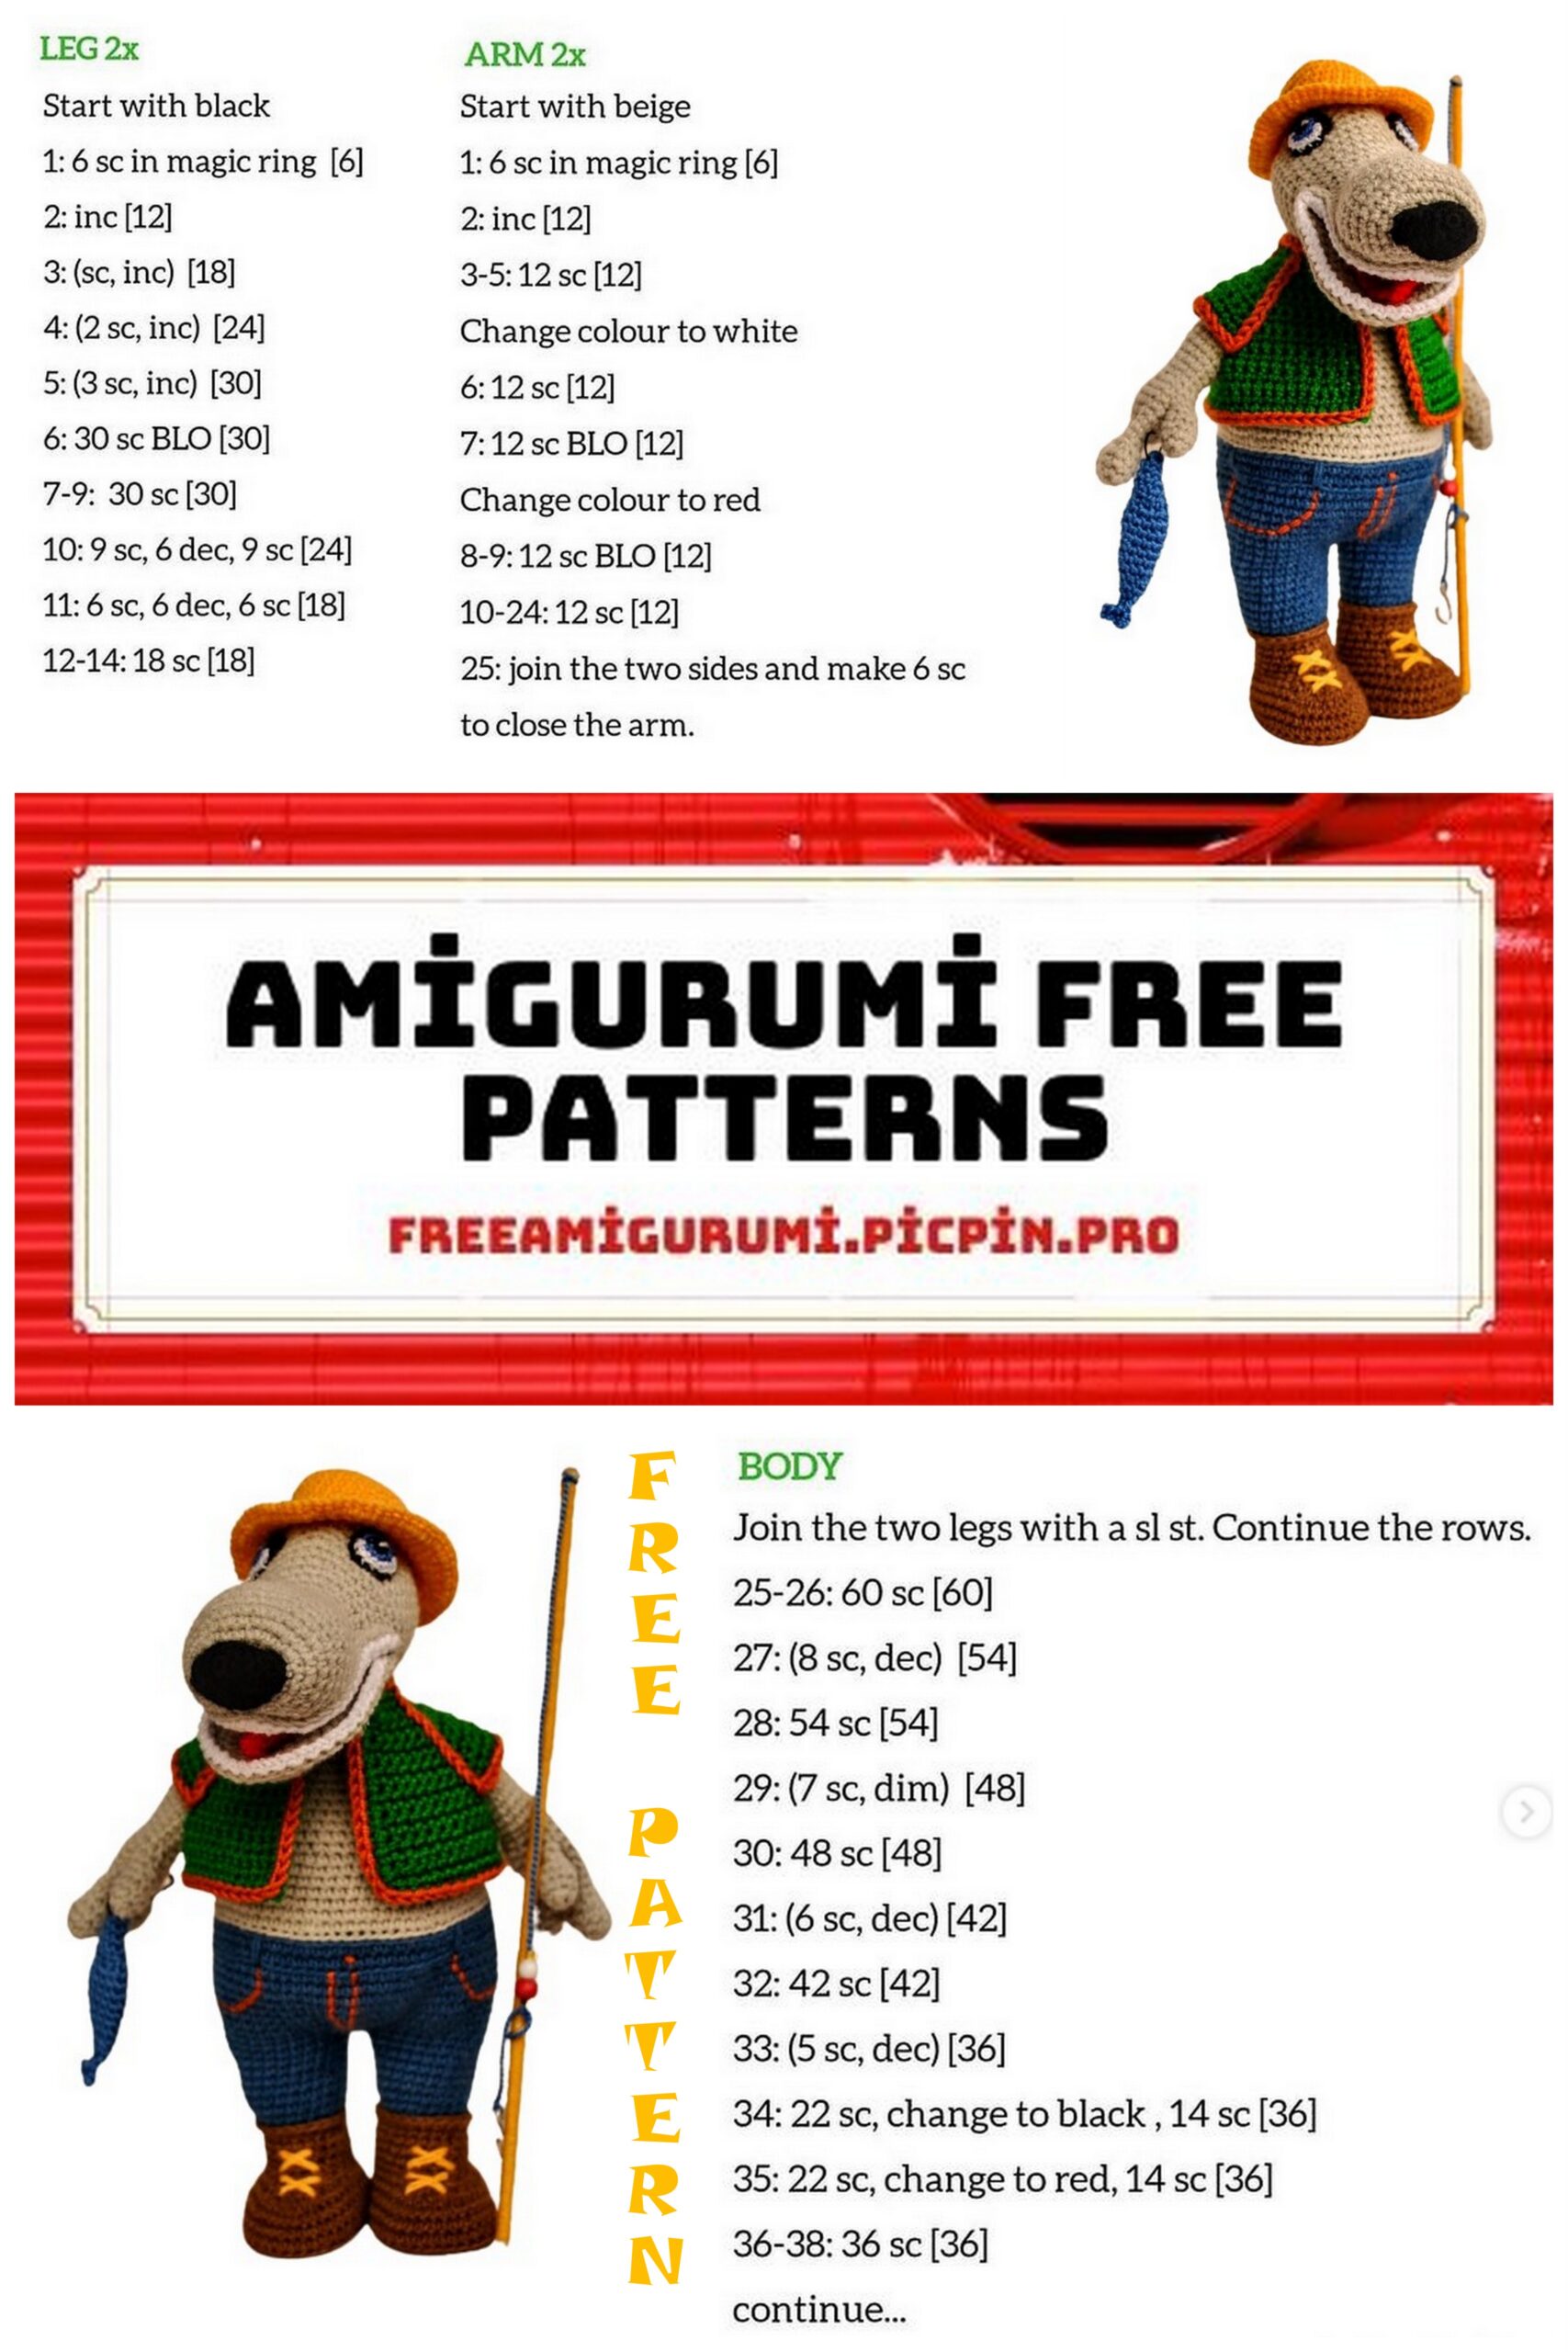
Mr. Wolf Fisherman
The finished size of the doll is 17 cm.
The Wolf is dressed in a jeans and boots (this outfit is not removed). The toy is very stable due to its wide feet. He is a good Wolf, although he has a huge mouth, but it’s smiling.
The pattern also includes Wolf’s clothing ( a jacket and a hat) and pattern for the crocheted eyes.
For the work you will need:
Yarn for Head, Arms and Body
Acrylic or cotton:
grey – 120 -150 m
any color for outfit (pants and boots) – about 90 m
black for nose- a little bit
Crochet hook 1.75 mm (or any other size that fit to your yarn)
Eyes:
Plastic eyes or embroidery threads
For crocheted eyes : any thin yarn (black, white, blue or green colors)
Filler of your choice
Piece of plastic or cardboard for insoles (5 cm x 6 cm)
Yarn Needle
Scissors
Disappearing mark pen or sewing thread for marking
Pins
A row marker or a safety pin
Abbreviations
(US terminology)
st, sts – stitch(es)
ch – chain(s), chain stitch
sl st – slip stitch
sc – single crochet
hdc – half double crochet
dc – double crochet
inc – increase(s)
dec – decrease(s)
sk st – skip a stitch
mr – a magic ring
BLO – crochet into back loops only
FLO – crochet into front loops only
[sc, inc]*2 – repeat 2 times [sc, inc]
Note: Unless indicated otherwise, parts are worked in continuous rounds.
Use a contrasting thread or a row marker in order to attach the legs together and the arms to the Body properly. Do not remove the markings just after finishing the details!
The sequence of making doll: first you need to crochet Wolf’s arms, then make his body.
The arms are attached to the body in the process of its crocheting. Then you have to crochet a few details of Wolf’s head and join them together. The eyes and the ears can be made before or after sewing together the Head and the Body.
Arms, make 2
use gray yarn
First crochet 4 fingers
Finger (2 x 4 ps.)
1. 6 sc in magic ring
2. [sc, inc] around (9)
● fasten off and cut short the begin tail
3. 9 sc
4. 7 sc, dec (8)
5. 3 sc, dec, 3 sc (7)
6. dec, 5 sc (6)
● For the 1st, 2nd and the 3rd fingers : cut off the thread, for the last (the 4th) finger:
don’t cut off, we will join the fingers in palm
Hand
● fill the fingers a little
7. (joining 3 fingers) 3 sc along the 4th finger, apply the 3rd finger, make 3 sc into the stitches of the 3rd finger, apply the 2nd finger, make 6 sc into sts of the 2nd finger, 3 sc into the rest sts of the 3rd finger, 3 sc into the rest sts of the 4th finger (18) (the 1st finger will be a thumb, we will join it later) tie together the tails of the finger yarn with a knot, cut them short and push inside the 2nd finger
8. [4 sc, inc, 4 sc] around (20)
9-10 (2 rounds altogether): sc around (20)
11. for the 1st Arm: 1 sc, apply the Thumb and make 3 sc cross the stitches of both details, 16 sc (20)
for the 2nd Arm: 7 sc, apply the Thumb and make 3 sc cross the stitches of both details, 10 sc (20)
12. for the 1st Arm: 1 sc into the sts of the Hand, 3 sc into the rest sts of the Thumb, 16 sc into the sts of the Hand (20)
for the 2nd Arm: 7 sc into the sts of the Hand, 3 sc into the rest sts of the Thumb, 10 sc into the sts of the Hand (20)
● fasten and shorten the finish tail of the Thumb, push it inside the Thumb
13. [sc, dec] repeat 6 times, dec (13)
14-15 (2 rounds altogether): sc around (13)
● fill a little the Hand
16: 4 sc, inc, 8 sc (14)
17: 12 sc, inc, sc (15)
18-19 ( 2 rounds altogether): sc around (15)
20: inc, 7 sc, inc, 6 sc (17)
21-23 ( 3 rounds altogether): sc around (17)
● add filler
24: 15 sc, dec (16)
25: 6 sc, dec, 8 sc (15)
26: 3 sc, dec, 10 sc (14)
27: 9 sc, dec, 3 sc (13)
28: 2 sc, dec, 3 sc, dec, 2 sc, dec (10)
● fill a little the top part of the arm
29: 10 sc
30. 6 sc (in order to move the finish of the detail to inner side of the Arm))
● don’t remove the row marking after the finish


Body
First make 2 legs, start from a boot
Boot and Leg (Pants)
use any color yarn of your choice
1. 7 ch, make 5 sc start from the 2nd from the hook, 3 sc into the last st., 4 sc, inc (14)
2. inc, 4 sc, 3 inc, 4 sc, 2 inc (20)
3. sc, inc, 4 sc, [sc, inc]*3, 4 sc, [sc, inc]*2 (26)
4. inc, 6 sc, [inc, 2 sc]*3, 4 sc, [inc, 2sc]*2 (32)
5. 3 sc, inc, 4 sc, [3 sc, inc]*3, 4 sc, [3 sc, inc]*2 (38)
fasten the begin tail, make 2 insoles
6. BLO: 38 sc
7. 38 sc
8. 38 sc
9. 13 sc, 5 dec, 13 sc, dec (32) (put the insole inside)
10. 10 sc, 5 dec, 10 sc, dec (26)
11. 7 sc, 5 dec, 9 sc (21)
12-15: 21 sc
● change yarn to color of Pants
Attention:
● don’t cut off the brown (boots) thread just now, leave it outside the detail. After completing the 17th row, make sc-round into the front loops of the 15th round:
20 sc, inc (22);
● cut off the brown thread, leaving a long tail, sew the last st. of this row to the first st., hide the tail inside the boot.
16. BLO: sl st ard (21)
● fasten off and shorten the begin blue (pants) tail, fill the boot
17. BLO: [6 sc, inc]*3 (24)
18-26: 24 sc
For the 1st Leg cut off the yarn, but don’t remove the row marker
For the 2nd Leg make additionally 7 sc, don’t cut off the yarn
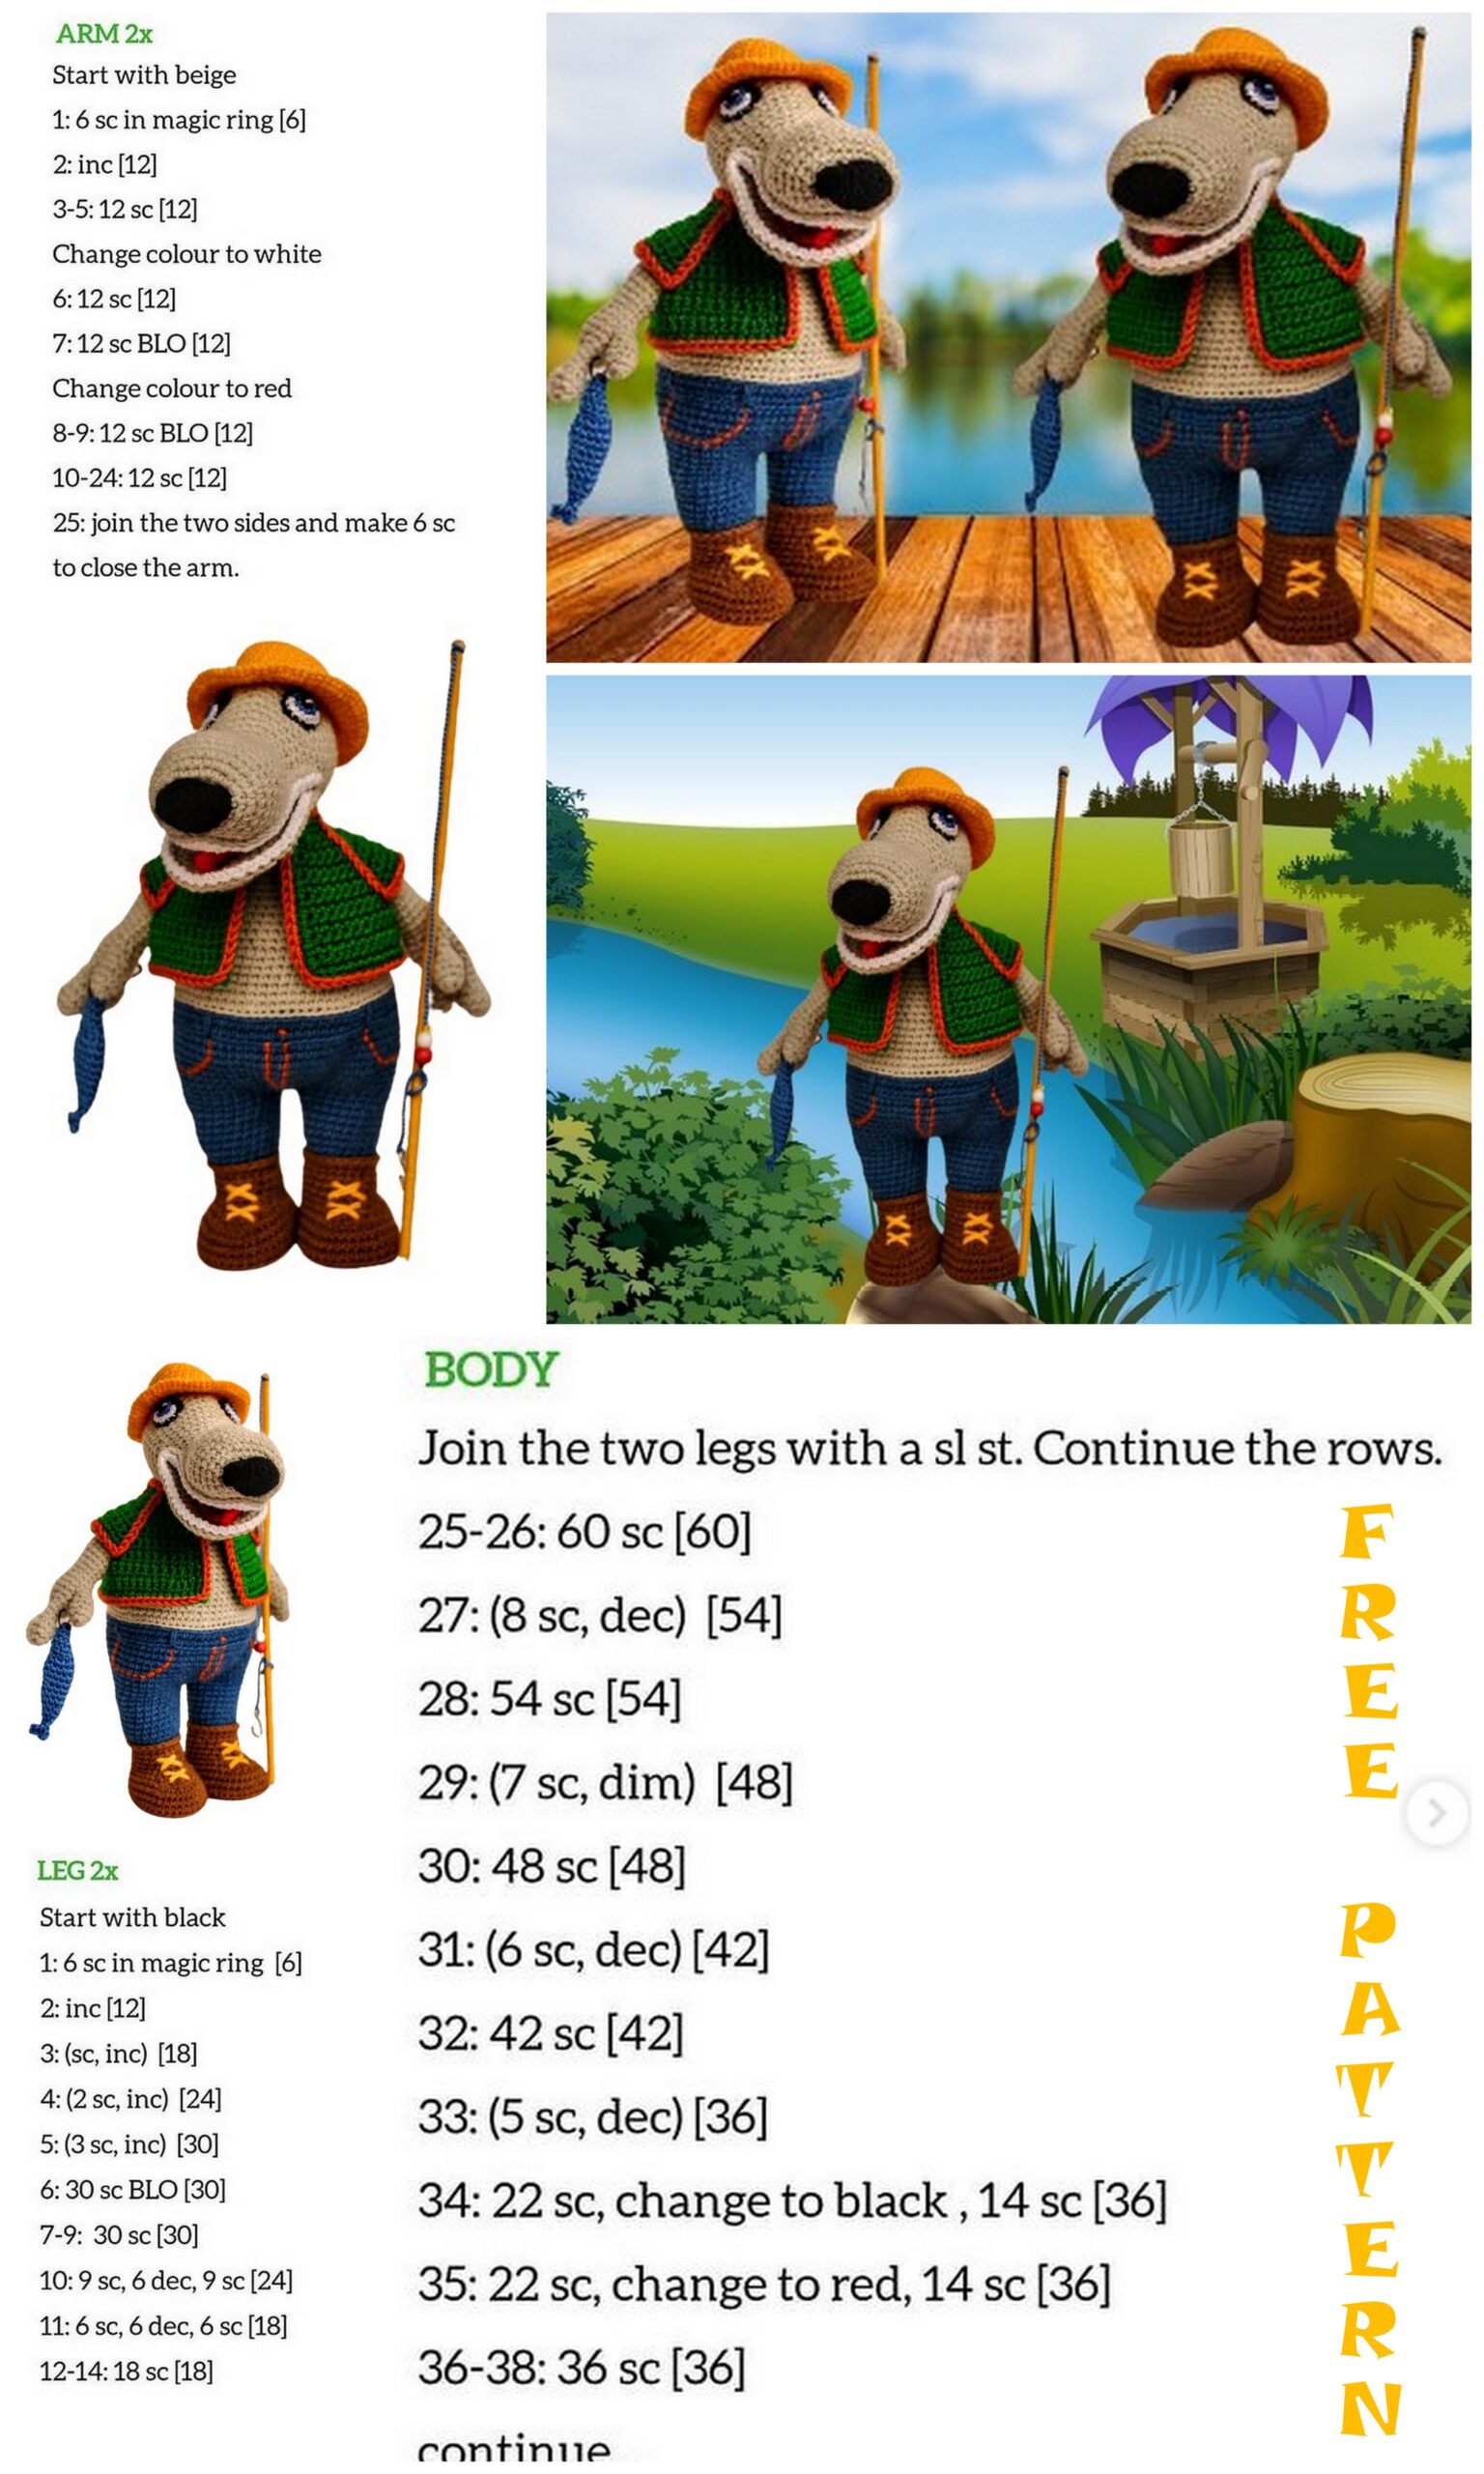
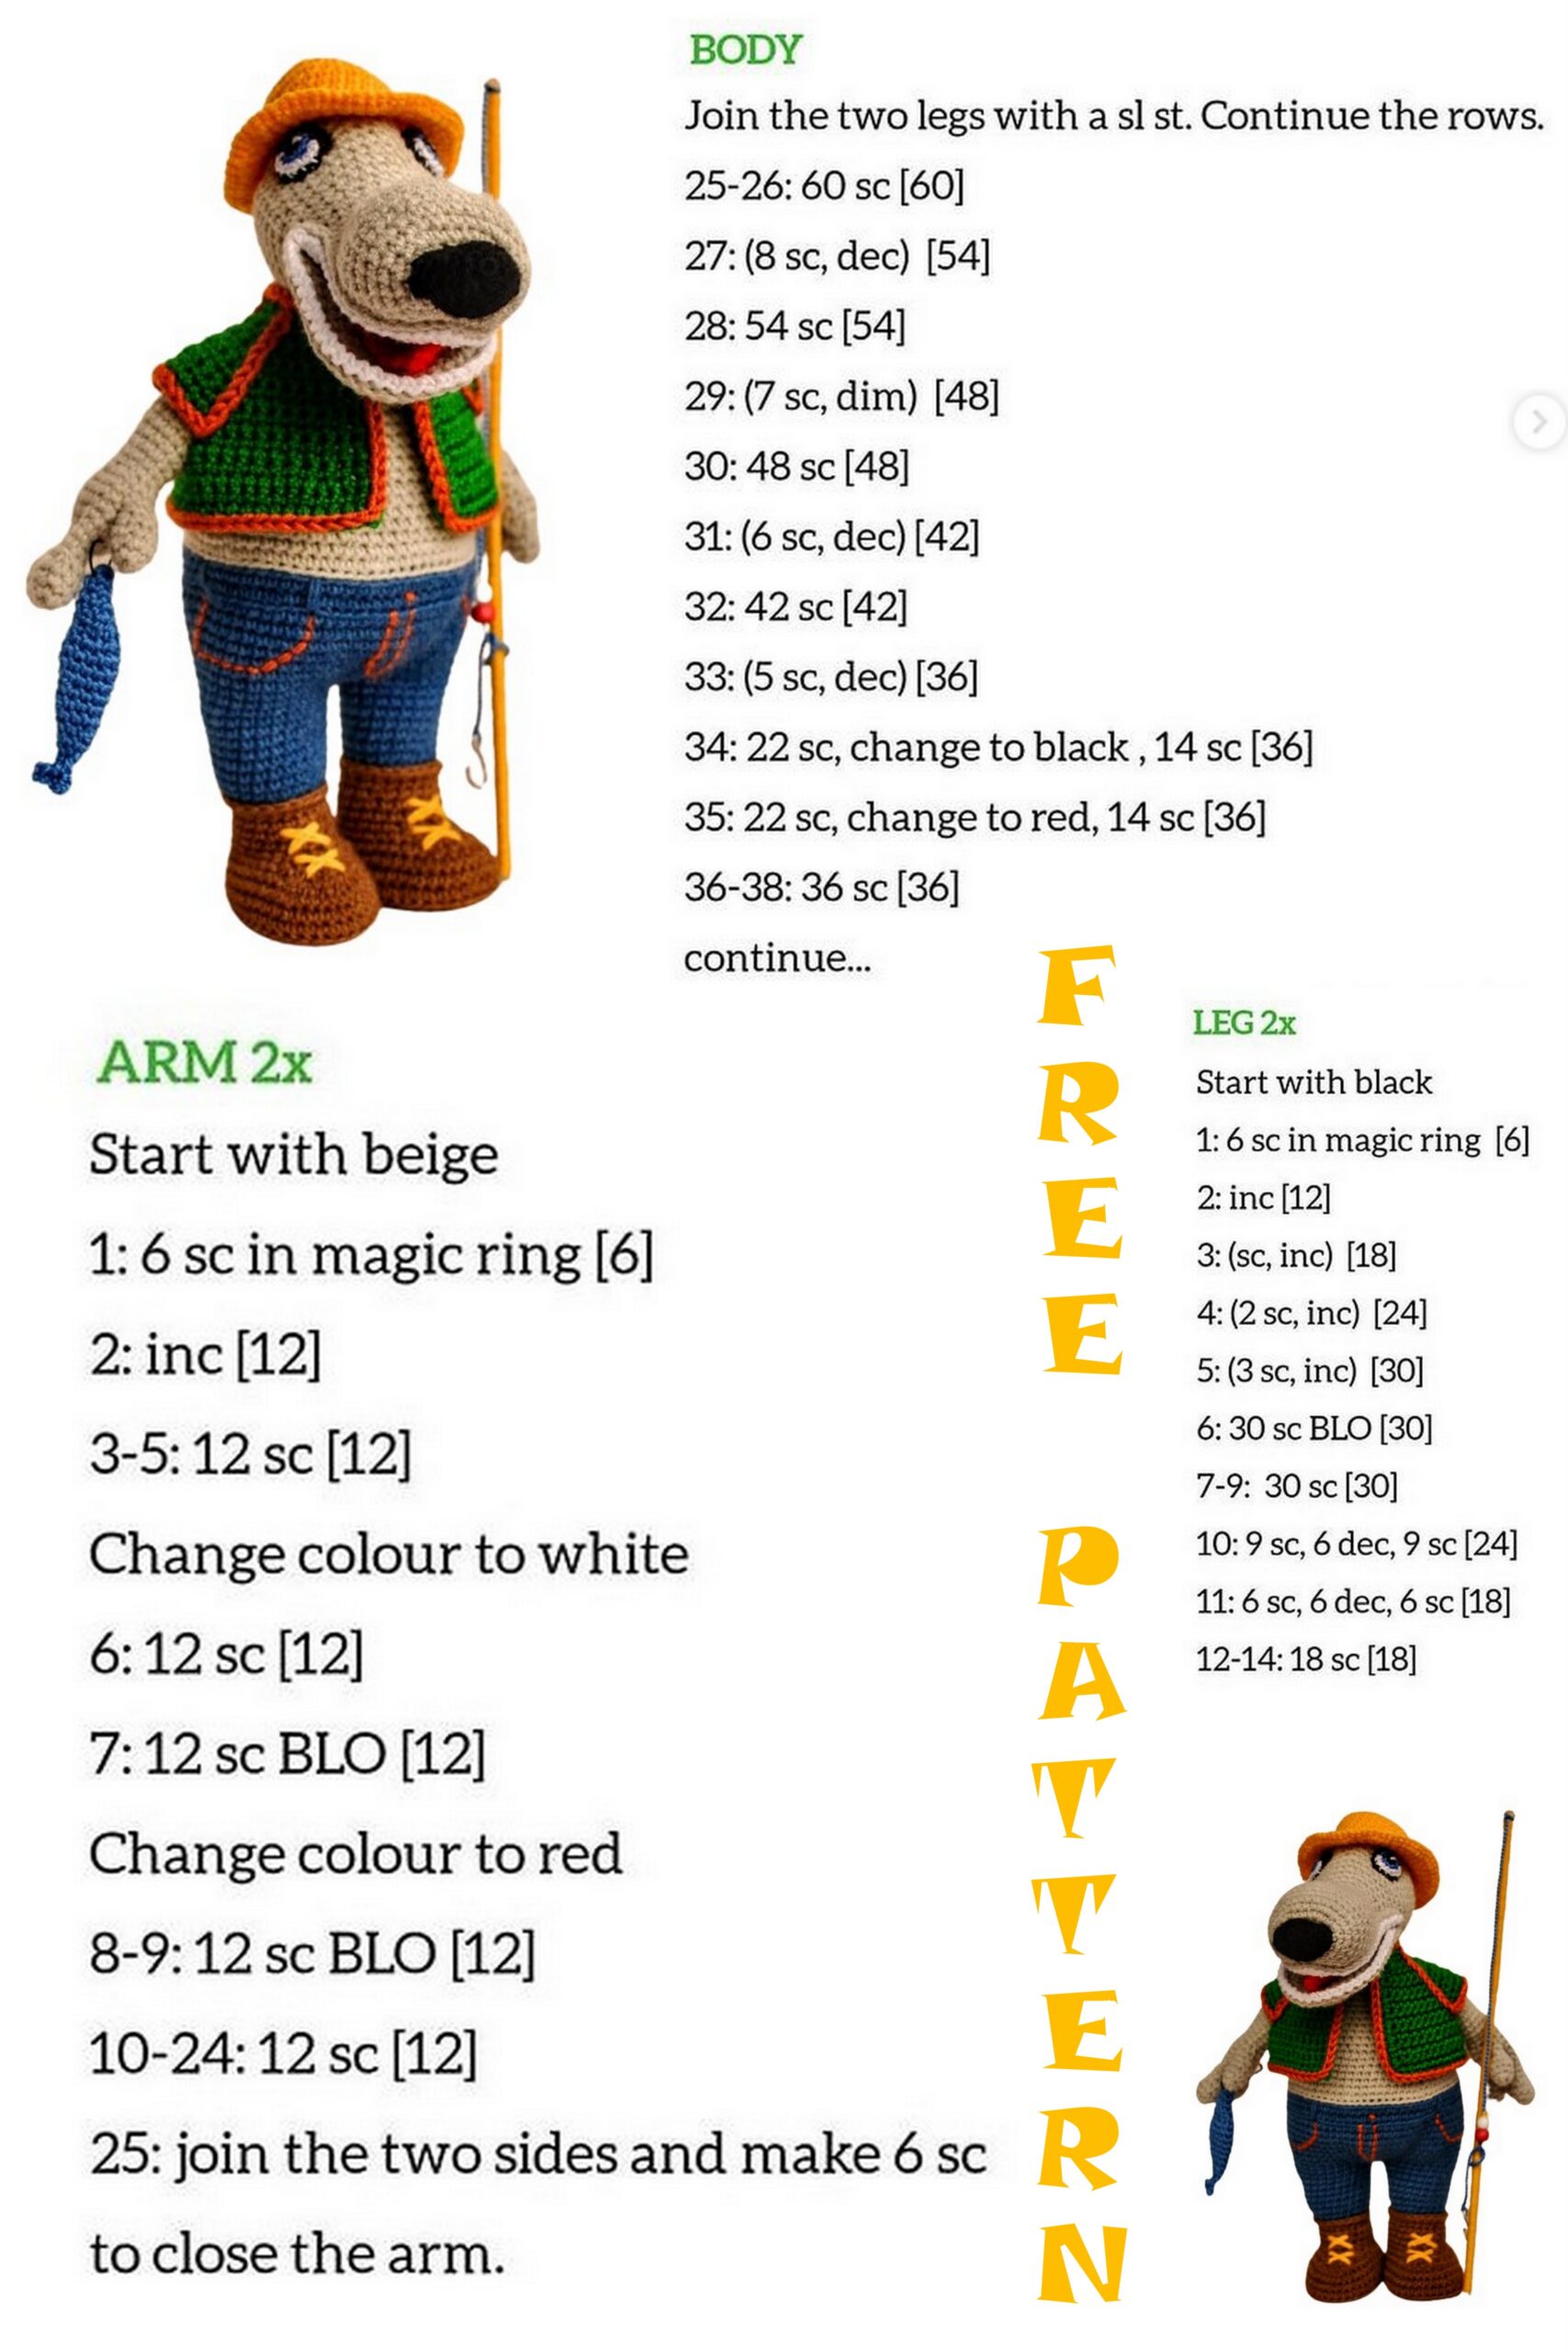
Joining of the Legs, Body
Round 1:
Apply the 1st Leg, make 24 sc into the stitches of the 1st Leg starting from the 22th st.
Continue crocheting along the 2nd Leg, make 23 sc, mark the next stitch with the row marker. It will be the begin for the following rounds (at the center of the back).
2. [3 inc, 21 sc]*2 (54) (this way we form the Wolf’s fat belly at the joining of the Legs)
3. [{sc, inc} repeat 3 times, 21 sc]*2 (60)
4. [{inc, 2 sc} repeat 3 times, 21 sc]*2 (66)
5. [inc, 10 sc] around (72)
● sew up the hole between the Legs
6-10: sc around (72)
11: BLO: sc around (72)
12: sc around (72)
● change yarn color to grey
13. BLO: sl st around (72)
● cut off the blue yarn, tie the blue tail and the begin grey tail with a knot, shorten them
14. BLO: sc around (72)
15. [dec, 10 sc] ard (66)
16. [2 sc, dec, 7 sc] ard (60)
17. sc ard (60)
18. [4 sc, dec, 4 sc] ard (54)
19-20. sc ard (54)
● fill the Legs firmly
21. [dec, 7 sc] ard (48)
22-23. sc ard (48)
24. [3 sc, dec, 3 sc] ard (42)
25-26. sc ard (42)
27. [5 sc, dec] ard (36)
28-29. sc ard (36)
30. [2 sc, dec, 2 sc] ard (30)
● fill the Body firmly
31-32. (attaching the Arms):12 sc, make 5 sc across the sts of the Body and the left Arm (for the Arm start into the 10th st.) joining both details, 10 sc, make 5 sc across the sts of the Body and the right Arm (for the Arm start into the 8th st.) joining both details (you finish the joining into the 3rd st. of the 32th round), 10 sc into the st of the Body, 5 sc into the rest st. of the left Arm, 10 sc into the st. of the Body, 5 sc into the rest sts of the right Arm., 5 sc into the sts of the Body
Note: You have to finish the 32th round at the center of the back. The next stitch will be the begin of the next several rounds.
33. [dec, 3 sc] ard (24)
34. sc ard (24)
35. [6 sc, dec] ard (21)
36. sc ard (21)
● cut off the yarn, leaving a long tail for sewing the Head
Head
Make Tongue
Use red yarn
Make chain of 13 loops, work
back-and-forth
Rows 1-2 (2 rows altogether): 12 sc
(make ch and turn at the end of each row)
Row 3: dec,8 sc, dec (10)
Row 4: dec, 6 sc, dec (8)
Rows 5-8 (4 rows altogether) : 8 sc
Row 9: dec, 4 sc, dec (6)
Rows 10-11 (2 rows altogether): 6 sc
Row 12: dec, 2, dec (4)
Rows 13 -14 (2 rows altogether): 4 sc
Row 15: 2 dec (2)
Row 16: 2 sc
Row 17: sc, 2 ch, sl st
● Fasten off and cut the yarn. Weave and fasten the tails on the wrong side.
Bottom jaw (BJ)
use grey yarn
Round 1: 6 sc in magic ring
Round 2: [inc] around (12)
Round 3: [sc, inc] around (18)
Round 4: [inc, 2 sc] around (24)
● close the magic ring, leaving a small hole for crocheting 1 sc inside. Fasten off and shorten the begin tail
Rounds 5-12 ( 8 rounds altogether): sc around (24)
Round 13: [inc, 3 sc] around (30)
Round 14: sc around (30)
Round 15: [2 sc, inc, 2 sc] around (36)
● don’t cut off the yarn, remove the row marker into the 19th stitch of the last round
Make the contour line row
Make 1ch, make 1 sc using the vertical loop between the 36th and the 1st sts of the 15th round. The next sts make under the vertical loops along the bending edge, 14sc altogether.
Make the central stitch into the hole of the magic ring. Insert your hook inside the hole and output into the 1st round above (see the next photo). Make 14 sc along the opposite side.
Make 1 slip stitch into the 19th st. of the 15th round (the marked stitch). Don’t cut off the yarn!
The contour line row (made of color yarn for visibility)
Attaching the Tongue
Make 1 ch, 3 sc across the opposite sts of BJ. Apply the Tongue to the BJ the frontside up.
Attach the Tongue crocheting 12 sc across both sides of BJ and the Tongue. Make 3 sc into the opposite sts of the BJ (18 sc altogether). Cut and fasten off the yarn, hide the tail inside.
Note: The Bottom Jaw isn’t filling.
The Bottom Jaw with the Tongue
Top jaw (TJ)
Begin from the nose with black yarn
Note: Don’t use the black yarn that is thicker than the grey yarn.
Round 1: 6 sc in magic ring
Round 2: [inc] around (12)
● Tighten well the magic ring, fasten off and shorten the begin tail
Rounds 3-4 (2 rounds altogether): sc around (12)
Round 5: [sc, inc] around (18)
Round 6: sc around (18)
● Change yarn colour to gray
Round 7: BLO: sc around (18)
● cut off the black yarn, tie with a knot the begin grey and black finish tails
Round 8: [2 sc, inc] around (24)
Round 9: [sc, inc, 2 sc] around (30)
Round 10: [4 sc, inc] around (36)
Rounds 11-14 ( 4 rounds altogether): sc around (36)
Round 15: [dec, 4 sc] around (30)
Rounds 16-17 (2 rounds altogether): sc around (30)
Round 18: [dec, 3 sc] around (24)
Rounds 19-22 ( 4 rounds altogether): sc around (24)
Round 23: [inc, 3 sc] around (30)
Round 24: sc around (30)
Round 25: [2 sc, inc, 2 sc] around (36)
Don’t cut the yarn!
Top jaw at this step
Making a contour line row on
TJ
Keep crochet with your TJ thread
Marking the contour of BJ on TJ:
Fill a little TJ. Apply BJ to TJ ( your TJ thread have to be at the left, look at the next photo), align the crocheting edges. Mark the contour line on TJ with a disappearing mark pen along the pins (or do it with sewing thread as shown on the right photo).
Marking the contour line
Make 1 ch and crochet the contour line row along the marking, how to do this – see the next photo tutorial.
Making the contour line row (in color for visibility)
Photo 1: For the begin insert the hook into the first hole along the marking. And output the hook through the next hole. Catch the thread and pull a loop.
Photo 2: Now insert the hook into the hole, where the yarn get out, and output it through the next hole along the marking.
Photo 3: Pull out the second loop and draw it through the first one.
Photo 4: Repeat this way along the marking line to the end of the marking. It should look like this:
If you have a problem with this crocheted row, do not be upset. Just make a chain embroider stitches (seam) by hand using with a needle.
Complete the row into the 19th st of the 25th round of TJ (check, please: between the opposite ends of the contour row have to be exactly 18 st. for attaching the Bottom Jaw).
Don’t cut the TJ yarn thread.
Joining the top and the bottom jaws
Round 1: Mark the next st. with a row marker, it will be the first st. for all follow rounds.
Make 18 sc along outer side of TJ. Put together TJ and BJ, make 18 sc joining BJ and the inner side of TJ.
Photo 9: View of the inner side of the Wolf’s mouth
Round 2: [2 sc, inc, 3 sc] around (42)
Round 3: sc around (42)
Make the Wolf’s teeth
Save (fasten with a safe pin or a row marker) your work loop of the grey thread. We will continue after making the teeth.
Make first the decorative slip stitch-row under the sts of the contour row. Use an additional grey thread (if you have only one skein, use the yarn end from inside the skein). It’s too hard to see this row on the grey yarn, so look at the photo with color yarn.
Photo 10 : the green sts over the hook are the contour row, the light color stitches are the decorative row (it’s a detail of other doll, but the same way of crocheting)
Crochet around, start on BJ and finish on TJ. Pull the tails of the thread inside the Head, tie them with a knot.
Use a white yarn to make the teeth into the back loops of the contour row. Start on BJ, first make slip st., then crochet [sl st, ch] into each stitch of the contour row. Make slip stitch into the last st. of BJ and the 1st st. of TJ, then continue crocheting [sl st, ch] along TJ. Make slip stitch into the last stitch of the TJ contour row. Cut off the yarn and pull the tails inside the Head, tie them with a knot.
Photo 11: The decorative row and the teeth
Continue crocheting the Head
4. 10 sc, 2 inc, 30 sc (44)
Note: These 2 increases are exactly at the center of the Wolf’s face. Otherwise you have to change the number of sc before the increases for the 4th, 5th and 6th rounds. Install the safety eyes (if you plan to use them) on both side from the increases, at the distance 1-3 st. from the nearest increase.
5. 10 sc, inc, 2 sc, inc, 30 sc (46)
6. 12 sc, 1 inc, sc, 1 inc, 31 sc (48)
7. – 8: sc around (48)
9. [3 sc, dec, 3 sc] around (42)
10. [5 sc, dec] around (36)
11. [2 sc, dec, 2 sc] around (30)
12. [3 sc, dec] around (24)
● fill the head not too tightly, leaving a free space for the sculpting in the eyes area (if you use safety eyes, fill the Head well, it’s too difficult to make sculpting for this option)
13. [dec, 2 sc] around (18)
14. [sc, dec] around (12)
15. [dec] around (6)
● Cut the yarn, weave it through the remaining stitches, pull well to close the hole, hide the tail inside the head.
Photo 12: The Head with safety eyes
Sculpting for crochet and embroidered eyes
Find 2 increases in the 4th round at the center of the face. Use the same grey yarn for the sculpting. Insert the needle into the 4th st. on the right side from the increases, output it into the 4th st. on the left side. Make a sewing stitch on the Head, skipping 2 (or 3) rounds toward above and 1 stitch to the left. Output the needle to the right side of the face, skipping 2 (3) rounds toward above the first point. But don’t move to the right.
Photo 13: Sculpting the eyes
Tie the tails with a knot tighten well. Hide the knot and the tails inside the Head.
Eye
Iris yarn or any very thin yarn, a crochet hook 1.25 mm
1. black yarn: 6 sc in mr (6)
2. blue yarn: 6 inc (12)
3. white yarn: [inc, sc]*3; change yarn to black: [inc, sc]*3 (18)
● pull well the begin black tail, tie together the begin black and the begin blue tails, shorten them
● cut off the blue yarn, pull well, tie with a knot and shorten the finish blue and the beginning white tails
● cut off the white thread, living a long tail; use it to embroider a light fleck, pull it to wrong side, fasten off and shorten
continue with the black yarn
4. BLO: [sc, dec]*6 (12)
5. BLO: 12 sc
6. 6 dec, sl st (6)
Cut off the yarn, leaving a long tail. Weave the front loops of the rest stitches with the tail, pull well. Input the needle inside the Eye and output into the edge between the black and the white part of the 3rd round (see the next photo)
Photo 14a, b: The ready Eyes
Sewing the Eyes
Flatten the Eyes (first they look like a crochet ball) and put them into the sculpting hollows.
Align both eyes using the border between the black and the white parts (the white part is the bottom). Attach the Eyes using with pins. Sew the bottom part of the Eye into the first black row, use the 2nd black row for sewing the top part.
Photo 15: The Head with
crocheted Eyes
Ears, 2 piece
use gray yarn
Round 1: 4 sc in magic ring
Round 2: inc, 3 sc (5)
Round 3: inc, 4 sc (6)
Round 4: [inc, sc] around (9)
Round 5: sc around (9)
Round 6: inc, 8 sc (10)
Round 7: inc, 9 sc (11)
Fasten off, leave a long tail
Sculpting the Nose
As well use the needle and the yarn to turn the nose up. Insert the needle near to the front teeth inside the mouth (at the center of the Top Jaw), get it out through the last black round (look at the next photo). Make a few sewing stitches, tighten the thread well. Leave the tail inside the mouth, tie them with a knot and hide inside the Head.
Photo 16 a, b: Sculpting the
Nose
The result should be something like this
Photo 17: The ready Head
Sewing the Head to the Body
1. First you need to mark a sewing circle on the bottom part of the Head. I use a coin for this work. The coin size have to be fit to the neck hole. Place your coin on the head and mark the sewing circle (see the next photo). You can use a disappearing marker pen or a sewing thread.
2. Then attach the Head to the neck with pins and check that the Head is located properly. Sew it with the yarn tail of the Body. Before completing the seam, make sure that the neck is filled firmly, add filler if necessary. How to stitch such details is well shown in this video tutorial .
Photo 18: Marking sewing circle
Make a tail.
Tail:
use gray yarn, the hook 1.75 mm
Round 1: 6 sc in magic ring
Round 2: [sc, inc] around (9)
Round 3: sc around (9)
Round 4: [2 sc, inc] around (12)
Rounds 5: sc around (12)
make [sc] to wished length, fill it the last round: [sc, dec] around (6)
Sew the tail at the back
Hat
Round 1: 6 sc in a magic ring
Round 2: [inc] around (12)
Round 3: [sc, inc] around (18)
Round 4: [2 sc, inc] around (24)
Round 5: sc around (24)
Round 6: [3 sc, inc] around (30)
Round 7-10: sc around (30)
Round 11: [4 sc, inc] around (36]
Round 12: sc around (36)
Round 13: [2 sc, inc] around (48)
Round 14. [inc, sc] around (72)
Jacket
1. 24 ch, 23 sc, ch+turn
2. inc, 2 sc, inc, 3 sc, inc, 7 sc, inc, 3 sc, inc, 2 sc, inc, ch+turn
3. 4 sc. inc, 4 sc, inc, 8 sc, inc, 4 sc, inc, 5 sc, ch+turn (make increases into the increases of the previous row)
4. 5 sc, inc, 5 sc, inc, 9 sc, inc, 5 sc, inc, 5 sc, ch+turn
5. 5 sc, inc, 6 sc, inc, 10 sc, inc, 6 sc, inc, 6 sc, ch+turn
6. 6 sc, inc, 7 sc, inc, 11 sc, inc, 7 sc, inc, 6 sc, ch+turn
7. 6 sc, inc, 8 sc, inc, 12 sc, inc, 8 sc, inc, 7 sc, ch+turn
8. 7 sc, inc, 9 sc, inc, 13 sc, inc, 9 sc, inc, 7 sc, ch+turn
9. 7 sc, inc, 10 sc, inc, 14 sc, inc, 10 sc, inc, 8 sc, ch+turn
10. 8 sc, inc, 11 sc, inc, 15 sc, inc, 11 sc, inc, 8 sc, ch+turn
11. 8 sc, inc, 6 ch, skip 12 st, inc into the next increase of the previous row, 16 sc, inc, 6 ch, skip 12 st, inc into the next increase of the previous row, 9 sc, ch+turn
Photo 19: The jacket after the 11th row
12. 11 sc, 6 sc into the chains, 19 sc, 6 sc into the chains, 10 sc, ch+turn
13. 5 sc, inc, 16 sc, inc, 6 sc, inc, 17 sc, inc, 5 sc, ch+turn
14. 2 sc, inc, 23 sc, inc, 3 sc, inc, 23 sc, inc, 2 sc, ch+turn
15. 61 sc
16. 61 sc, 1 sc into the same stitch, crochet sc into each row along the front side and the neck hole
You can make sleeves to the jacket: crochet 3 sc-rounds (about 22 sc in each row) along the sleeve hole. Work with additional yarn thread.
Make decorative color slip stitch row along the sleeve holes, the front and neck edge.