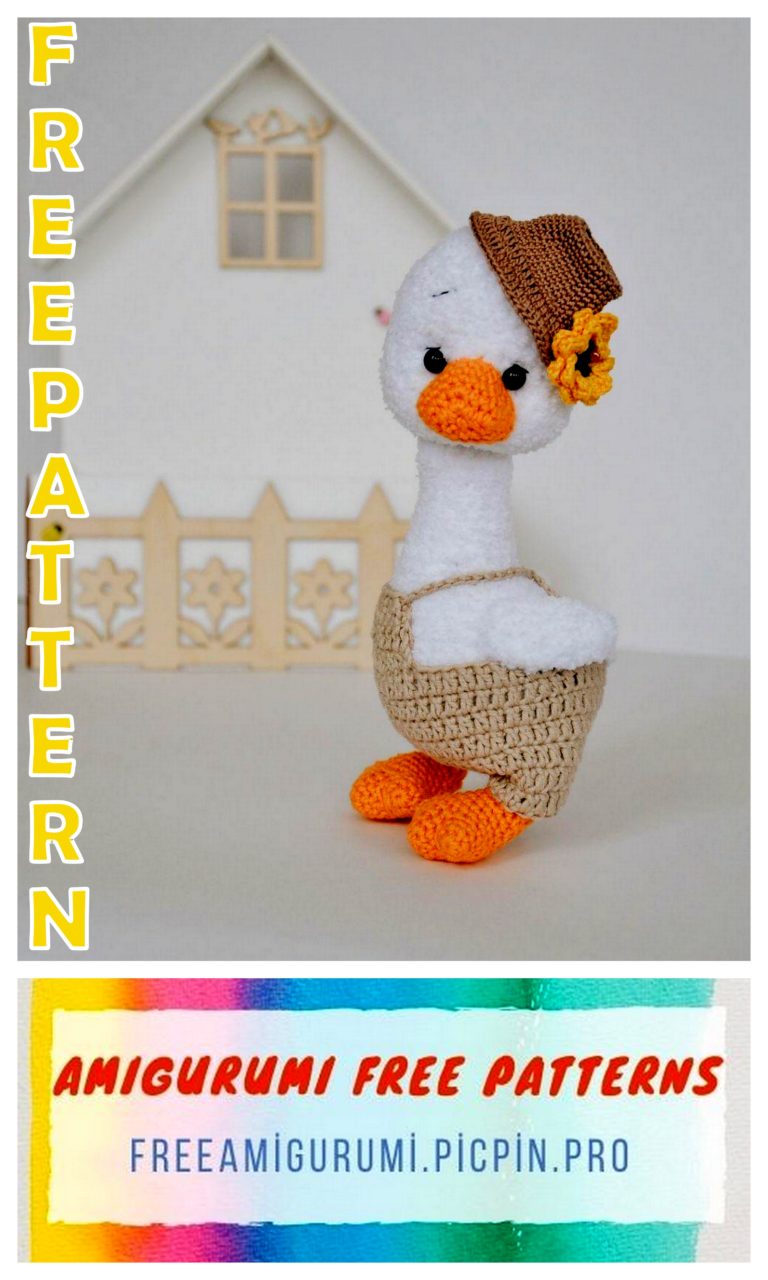
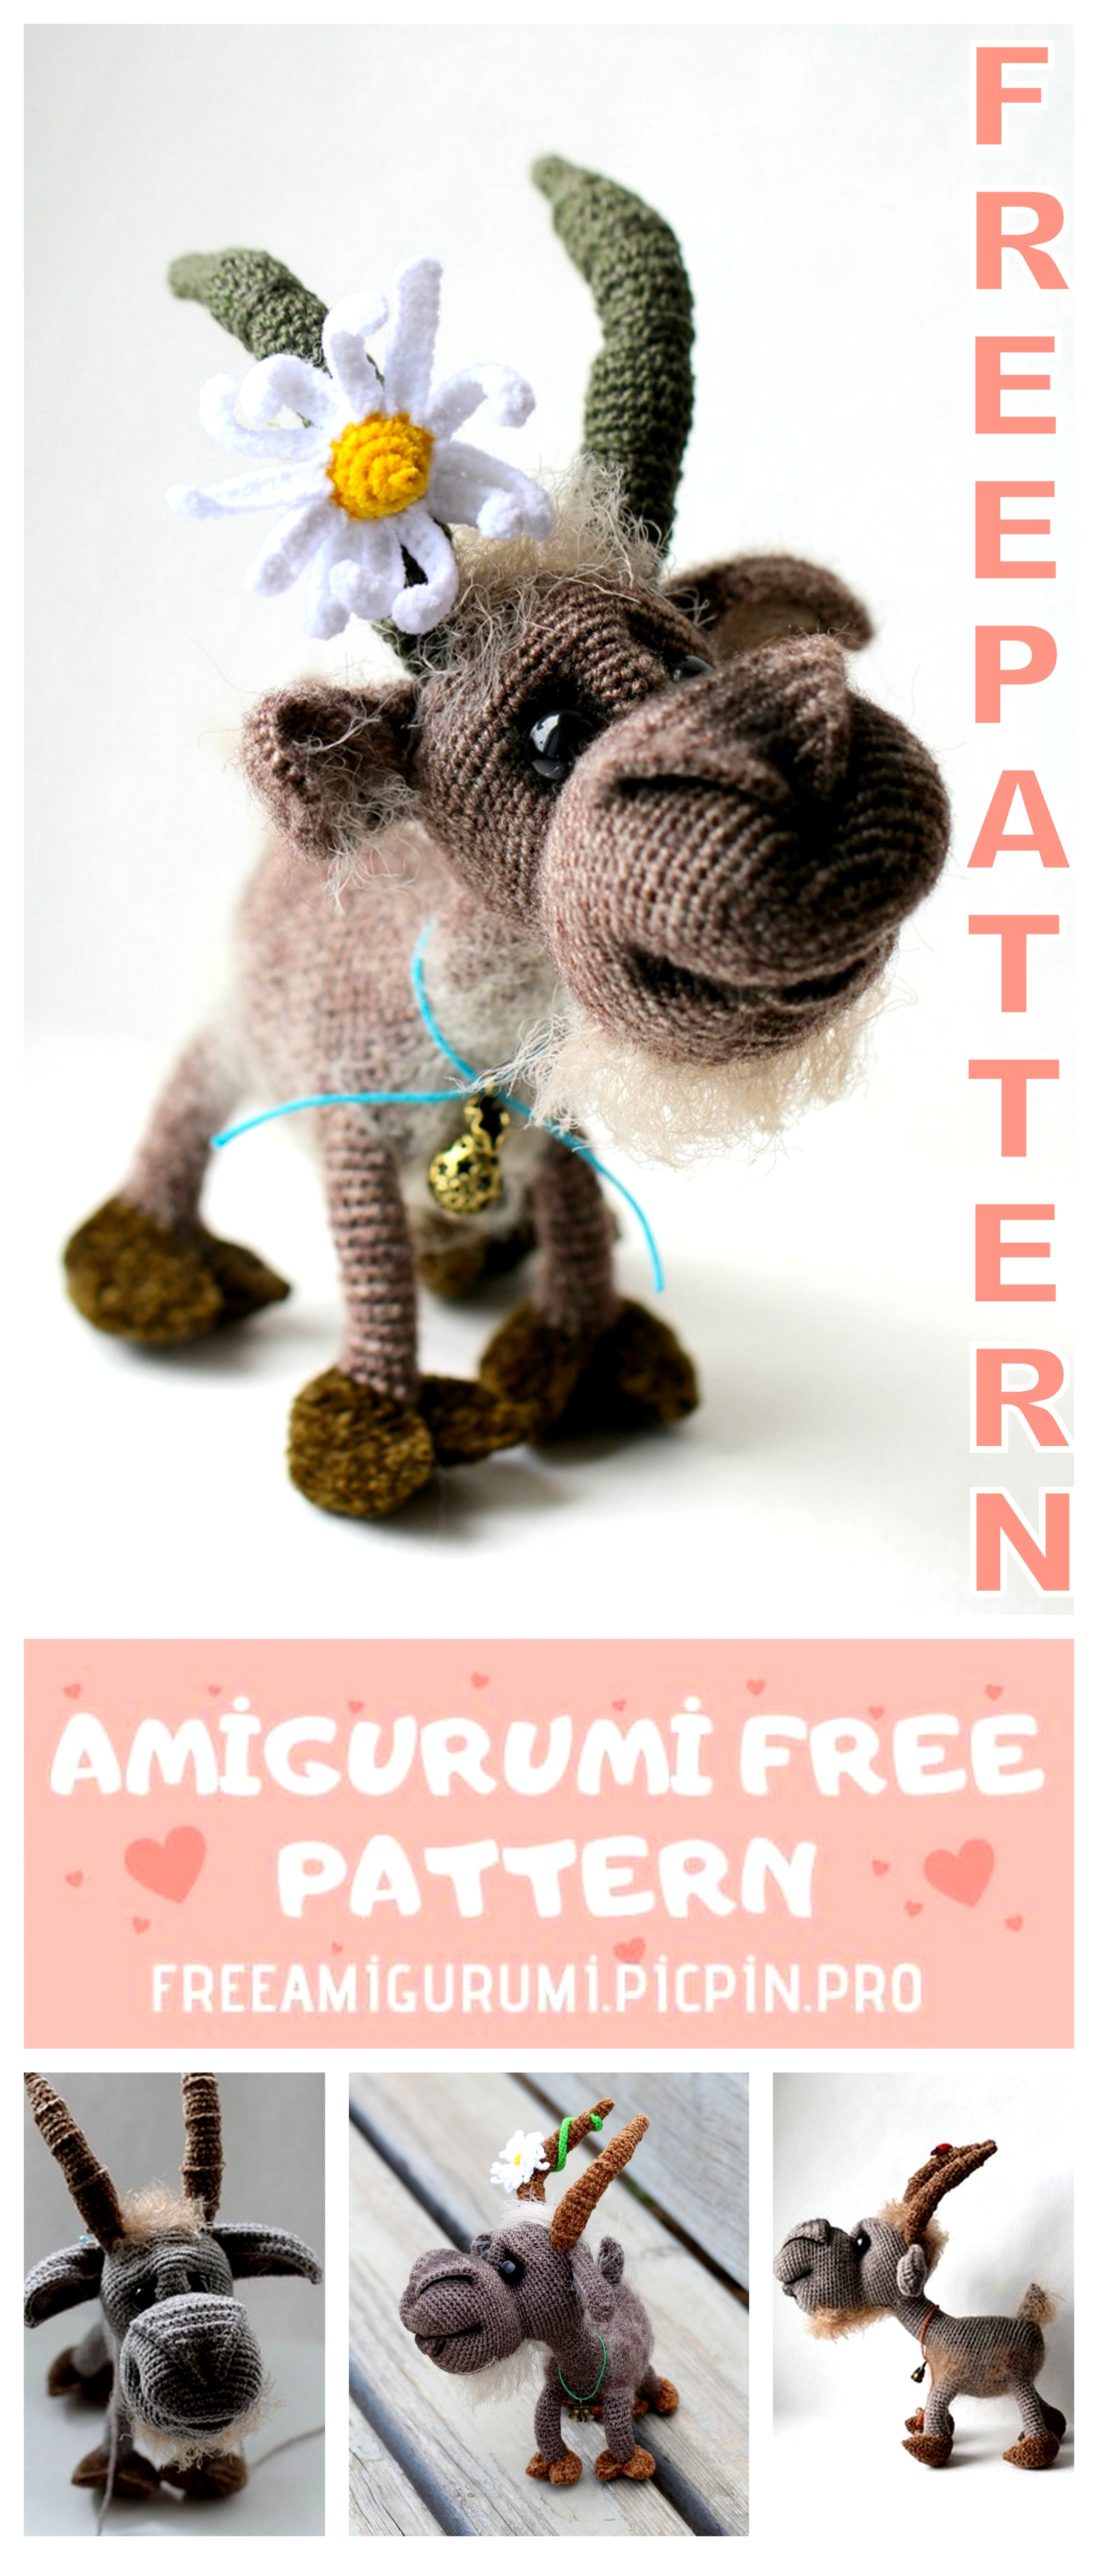
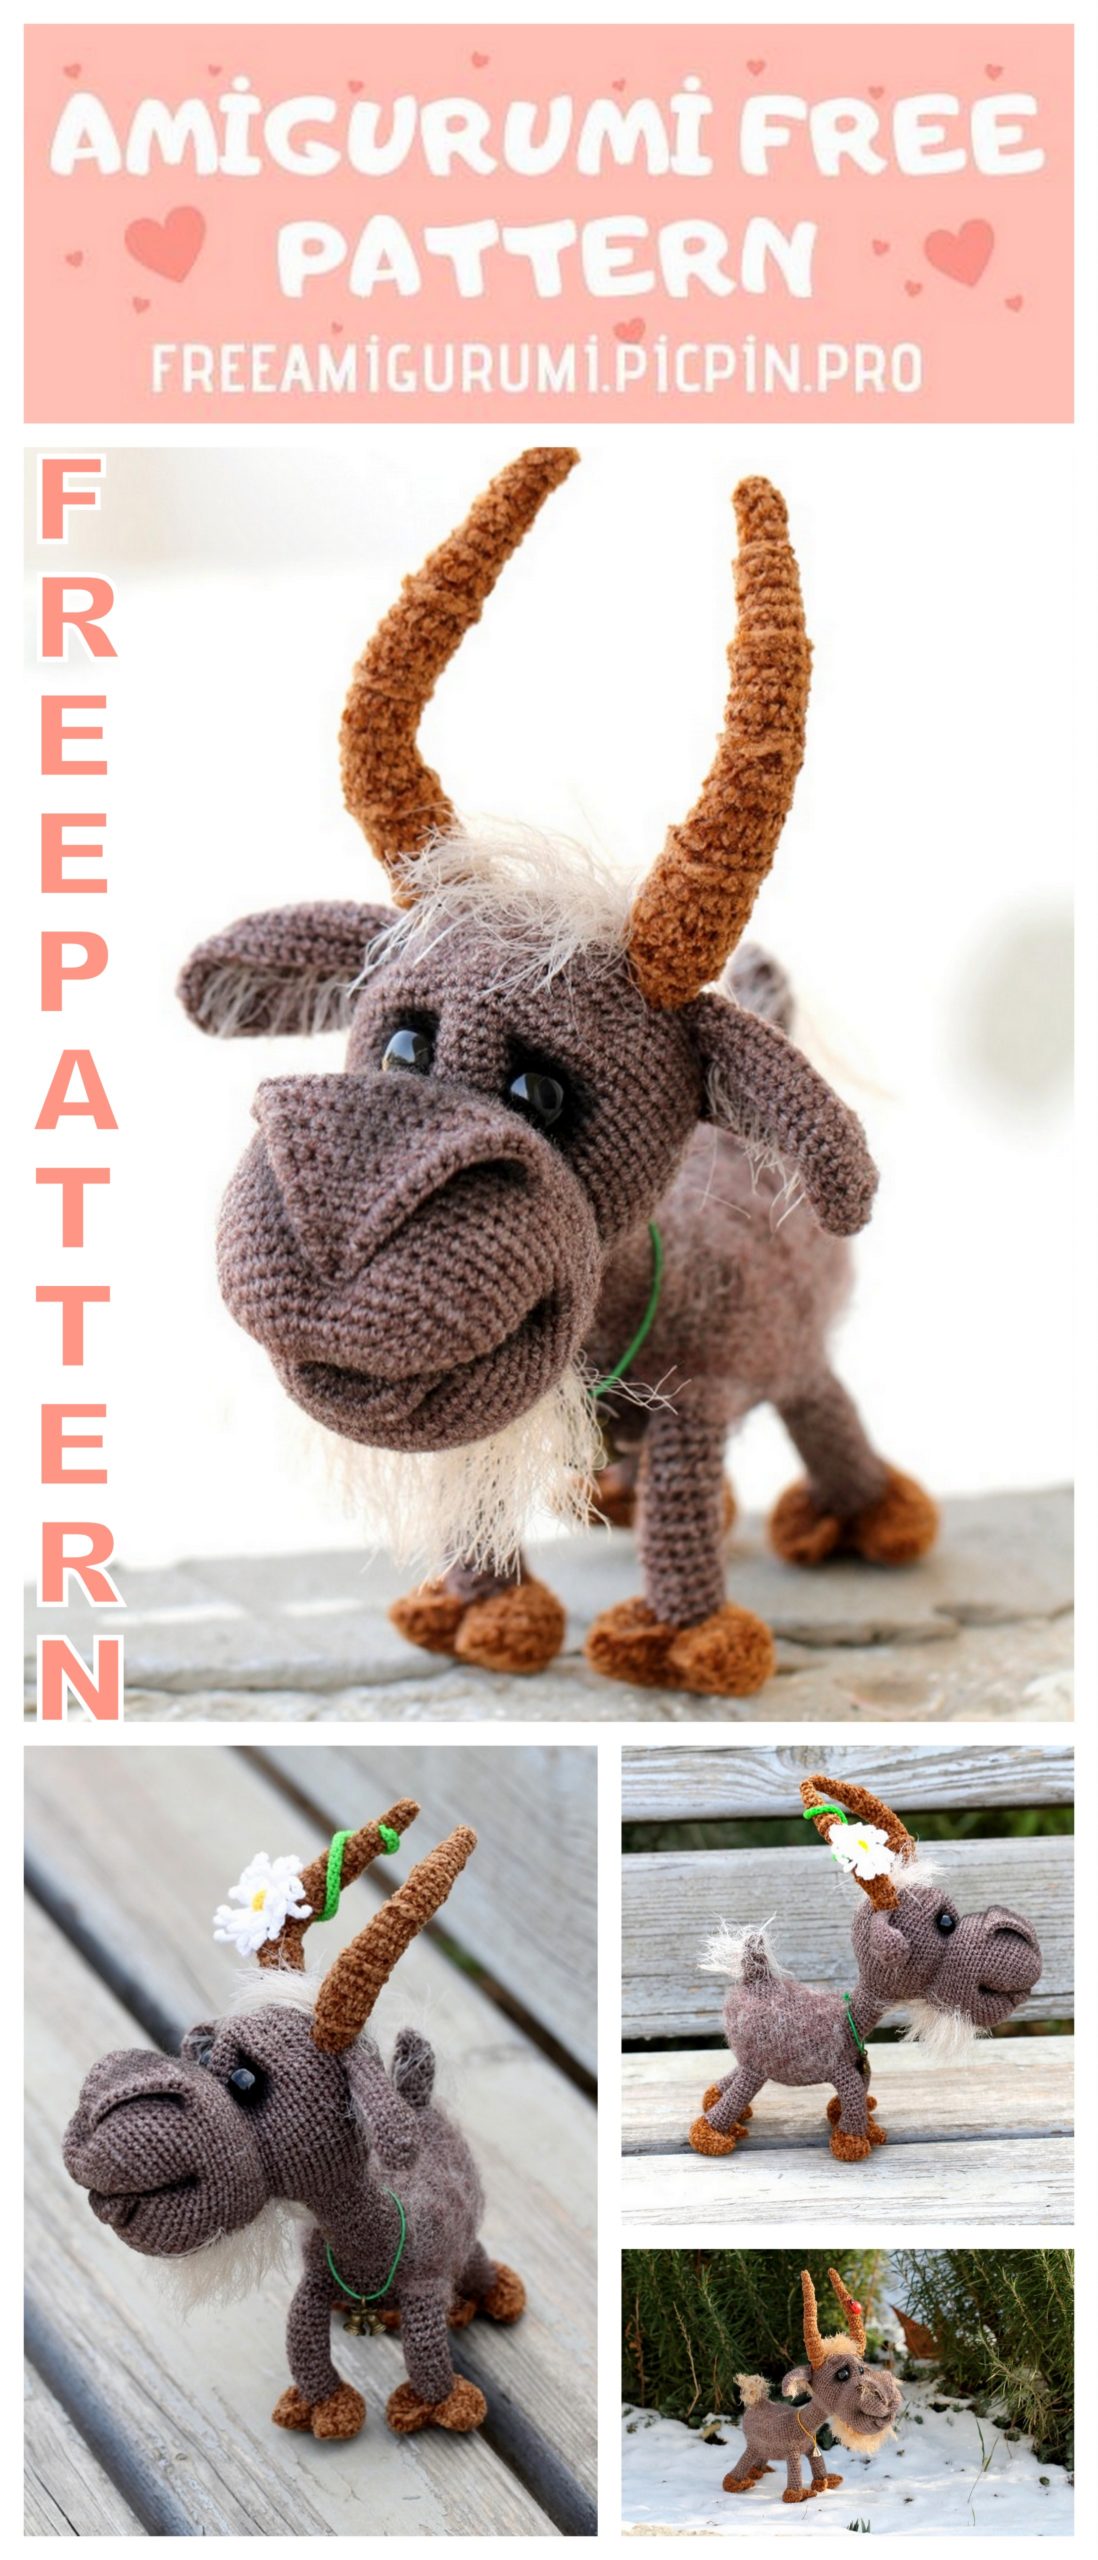
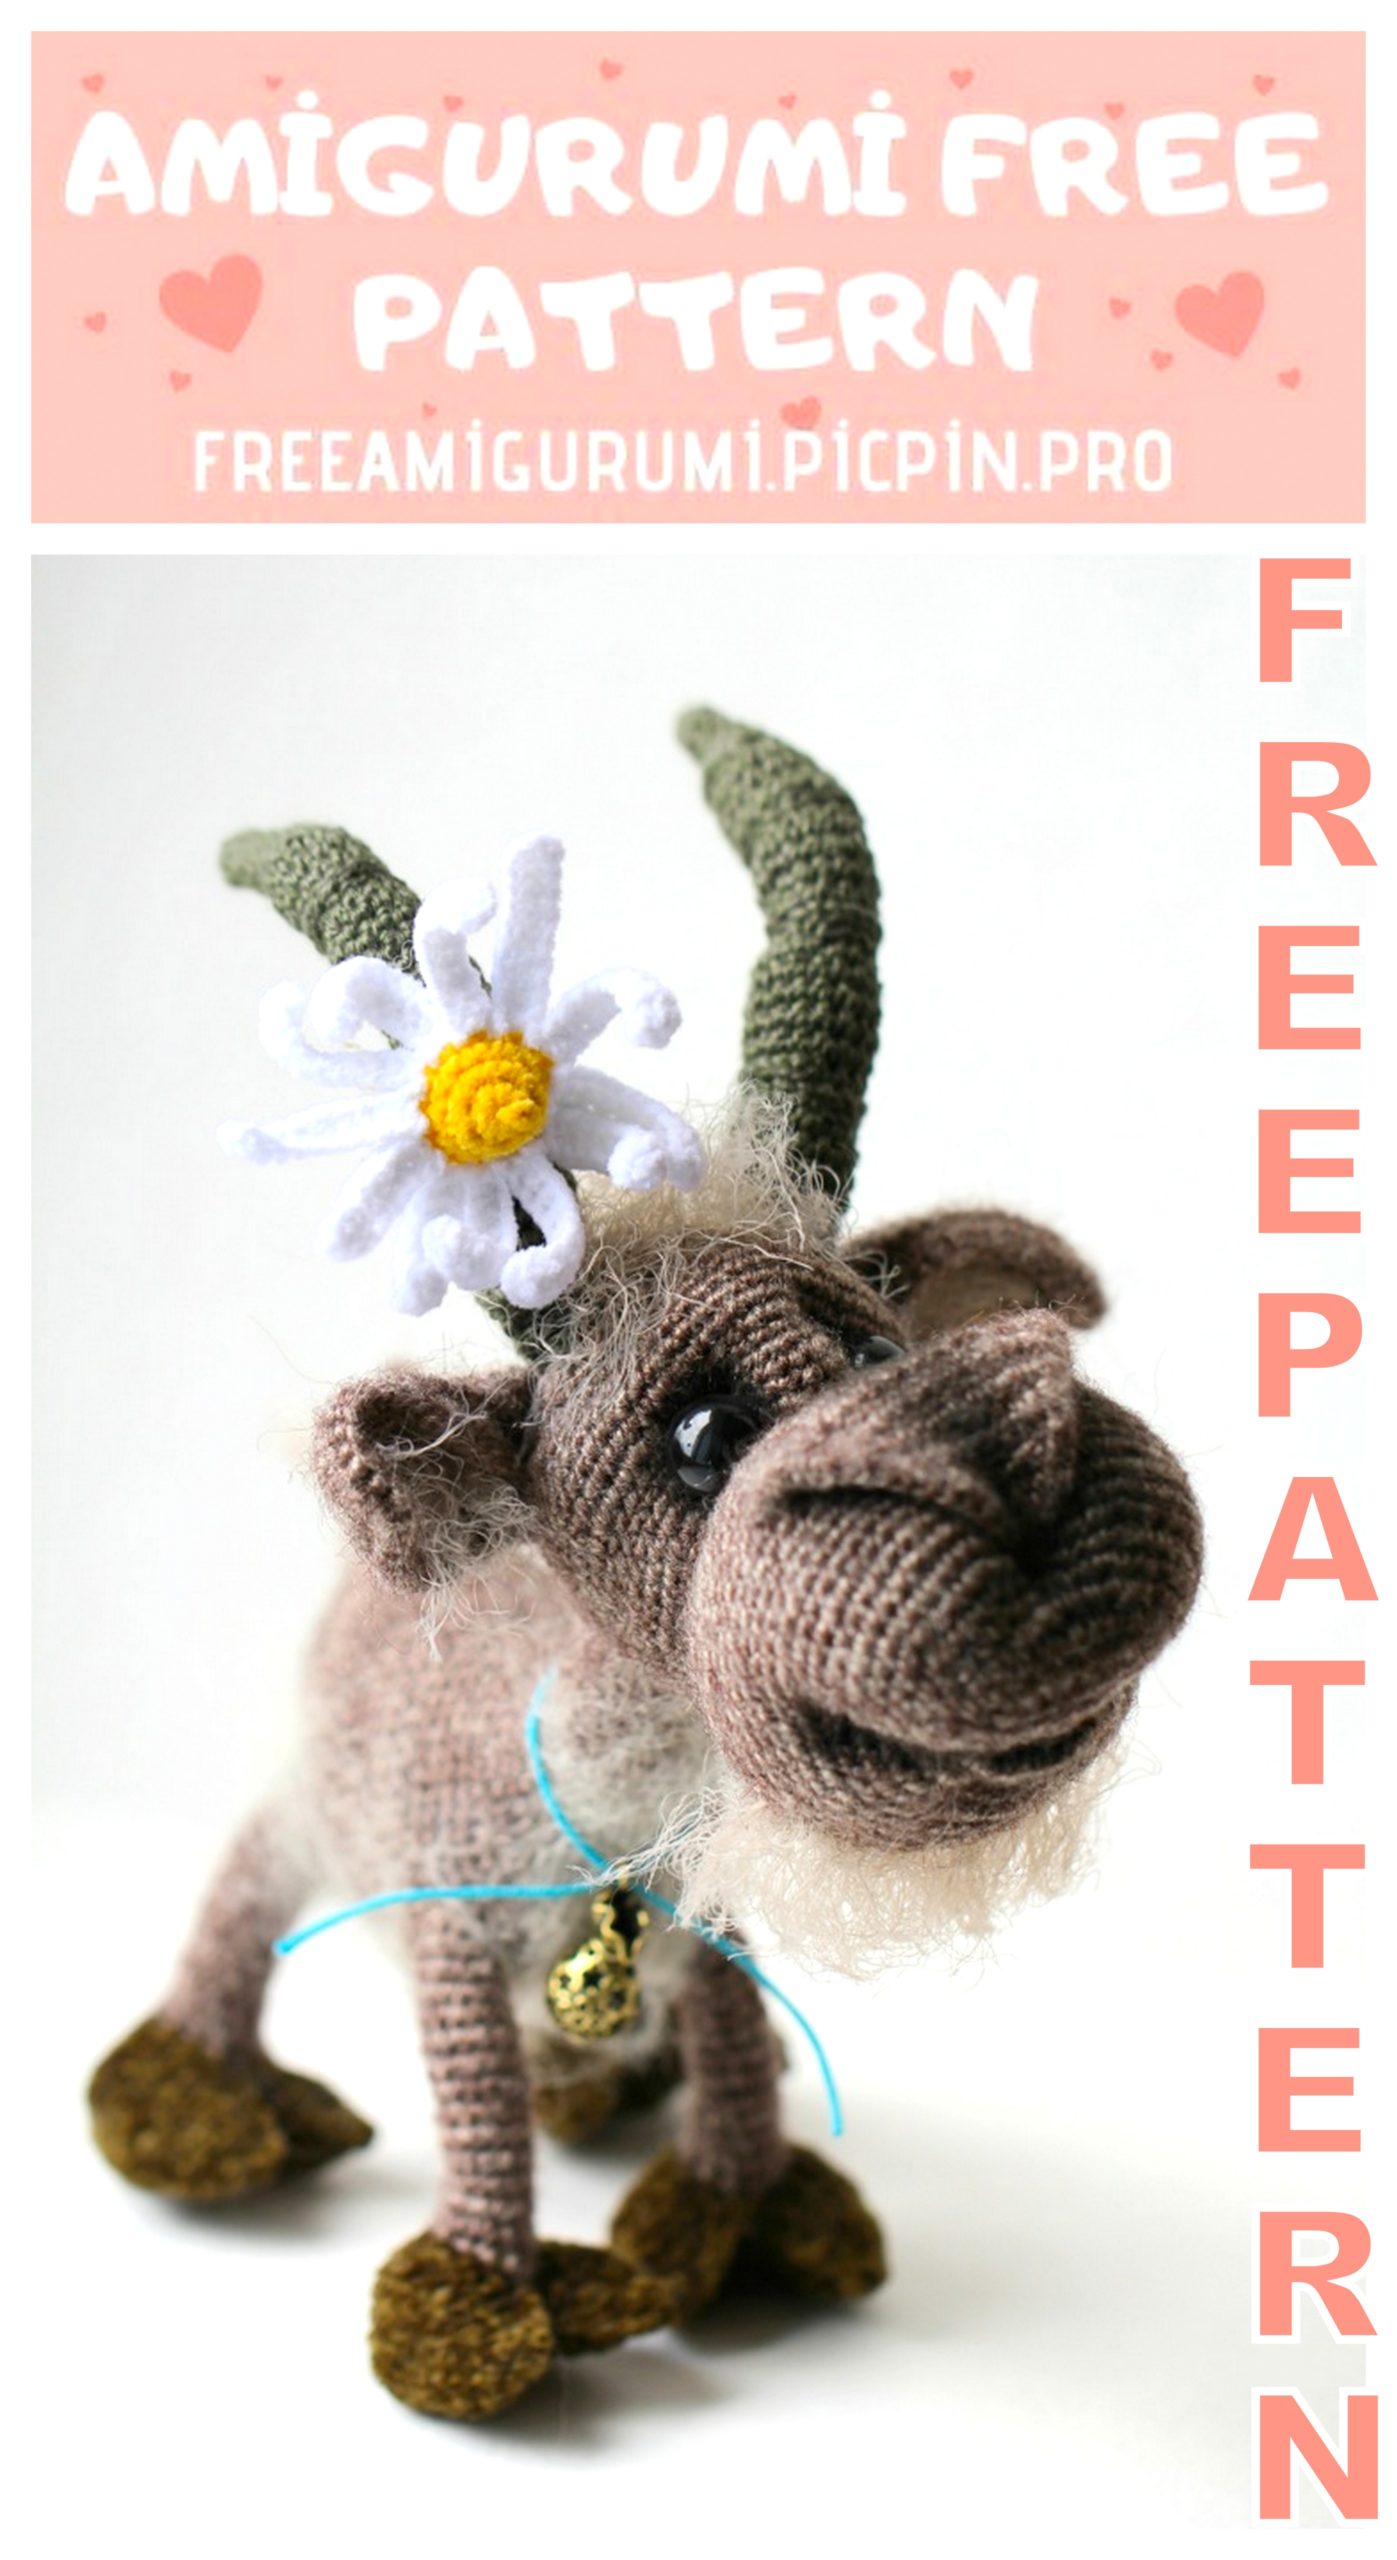
Amigurumi Goat Billy Free Crochet Pattern
Welcome to our website where you can find the most beautiful and highest quality samples of Amigurumi patterns. All the amigurumi patterns you can’t find are available on our website. Every day we continue to share new amigurumi patterns for you. Stay tuned to reach these amigurumi patterns before anyone else
Goat Billy
Materials and tools
1. Any yarn you would like. For my goat in this crochet pattern I used 390m/100g of
yarn called Lanagold Fine by ALIZE and 1.75 mm steel hook. I took only 40g.
2. Brown yarn for the hooves and the horns. I used 390m/100g of yarn called Lanagold
Fine by ALIZE and 1.75 mm steel hook. I took only 10g.
3. Take a fluffy eyelash yarn for hair. Its consumption is about 5 gr.
4. Polyester toy stuffing.
5. The stuffing material (e.g. steel or glass pellets).
6. About 1,5m of a wire for a skeleton.
7. An insulating tape or sticking plaster for wrapping the wire.
8. Plastic buttons for making eyes. I used buttons of 10 mm.
9. Thread and needle for tightening.
10. Pastel and paintbrush for tinting.
11. Wool for felting (wool roving) and a felting needle.
12. Accessories for toys decorating
Finished size approx.
20-22 cm high.
Skill levels – upper
intermediate.
Abbreviations
• ch – chain
• sc – single crochet
• ss – slip stitch
• dec- decreasing
• inc – increasing (2 sc in 1 st)
• x 6 times – to repeat six times
• sc3tog – single crochet three together
• +1 sc – 1 sc of the next Rnd (shift stitches), move the beginning of the Rnd after the
last worked st
• BPsc – Back post single crochet
• 12 – Please crochet the specified number of loops adding the eyelash yarn. We
crochet from the right side and apply the eyelash yarn in front of you on the main
yarn
• MR – Magic ring
• Rnd – Round
• Tbl – Through back of loop
• Tfl – Through front of loop
• * – (1 sc, 2 ch st, 1 sc) in 1 sc

Head (make 1)
Marker of the row beginning must be on the left side of your work.
We crochet with the main thread.
Rnd 1. – 9 ch
Rnd 2. – 1 sc in the 2nd st of the chain, 6 sc, 3 sc in 1 st, we work in rounds on the other
side of the chain 6 sc, 1 inc =18sts
Rnd 3. – 1 inc, 6 sc, 3 inc, 6 sc, 2 inc =24sts
Rnd 4. – (3 sc, 1 inc) х 6 times =30sts
Rnd 5. – (4 sc, 1 inc) х 6 times =36sts
Rnd 6. – (2 sc, 1 inc) х 12 times =48sts
Rnd 7. – (3 sc, 1 inc) х 12 times =60sts
Rnd 8.-15.- 1 sc in each stitch around =60sts
Now we shall crochet with applying the eyelash yarn.
I make it by applying the eyelash yarn on the main yarn on the front side of the work.
When we reach the point specified in description (marked with pink colour), we lay our
eyelash yarn spreading its nap on the front side of the crocheted fabric, and then
continue to crochet capturing both fluffy yarn and the main loop.
Please do not cut the end of the fluffy yarn!
Every time we reach the marked point in the next row, we must return a fluffy yarn
into the point we started to crochet and repeat all process.
Rnd 16.-17. – 36 sc, 18 sc, 6 sc =60sts
Advice. Due to the different densities of the yarn and crocheted fabric, loops may
shift slightly during the crocheting.
Please, pay attention to the location of the braid in the 18th row; it must be positioned
strictly in the centre of the toy’s muzzle in respect to the initial rows. To align it (if
the displacement has occurred) we need to change the number of loops before and
after the “17 BPsc” in the 18th row.
For example, we may crochet 5sc and 15sc or 9sc and 11sc instead of 7sc and 13sc.
Then continue to crochet according to the description.
Rnd 18. – 7 sc, 17 BPsc, 13 sc, 18 sc, 5 sc =60sts
Rnd 19.-20. – 38 sc, 16 sc, 6 sc =60sts
Rnd 21. – 39 sc, 14 sc, 7 sc =60sts
Rnd 22. – 1 dec, (3 sc, 1 dec) х 6 times, 7 sc, 14 sc, 7 sc =53sts
Rnd 23.-24. – 34 sc, 12 sc, 7 sc =53sts
Rnd 25. – (8 sc, 1 dec) х 2 times, 9 sc, 1 dec, 3 sc, 6 sc, 1 dec, 4 sc, 5 sc, 1 dec =48sts
Rnd 26. – (6 sc, 1 dec) х 4 times, 6 sc, 1 dec, 1 sc, 5 sc, 1 dec =42sts
Rnd 27. – (5 sc, 1 dec) х 4 times, 5 sc, 1 dec, 1 sc, 4 sc, 1 dec =36sts
Rnd 28. – 25 sc, 6 sc, 5 sc =36sts
Now, it’s time cut a fluffy yarn and hide its end.
Rnd 29. – (1 inc, 2 sc) х 12 times =48sts
Rnd 30. – 1 sc, 1 inc, (4 sc, 1 inc) х 5 times, 21 sc =54sts
Rnd 31.-34. – 1 sc in each stitch around =54sts
Rnd 35. – 5 sc, (2 sc, 1 inc) х 3 times, 8 sc, (1 inc, 2 sc) х 3 times, 23 sc =60sts
Rnd 36.-39. – 1 sc in each stitch around =60sts
Rnd 40. – 51 sc, 2 ch st, skip 2 sts, 2 sc, 2 ch st, skip 2 sts, 3 sc =60sts
The holes must be in the middle of the head’s lower part. Through them we shall enter
the wire from the horns to the neck.
Rnd 41. – 51 sc, 2 sc along ch st, 2 sc, 2 sc along ch st, 3 sc =60sts
Rnd 42. – (8 sc, 1 dec) х 6 times =54sts
Fill toy’s head with polyester stuffing using medium density of stuffing (we shall
tighten the head later).
Rnd 43. – 15 sc, 15 sc, 24 sc =54sts
Rnd 44. – 7 sc, 1 dec, 7 sc, 1 dec, 7 sc, 1 dec, 3 sc, 4 sc, 1 dec, (7 sc, 1 dec) х 2 times
=48sts
Rnd 45. – 16 sc, 12 sc, 20 sc =48sts
Rnd 46. – (6 sc, 1 dec) х 2 times, 6 sc, 1 dec, 4 sc, 2 sc, 1 dec, (6 sc, 1 dec) х 2 times
=42sts
Rnd 47. – (5 sc, 1 dec) х 2 times, 1 sc, 4 sc, 1 dec, 2 sc, 3 sc, 1 dec, (5 sc, 1 dec) х 2
times =36sts
Rnd 48. – (4 sc, 1 dec) х 2 times, 2 sc, 2 sc, 1 dec, 2 sc, 2 sc, 1 dec, (4 sc, 1 dec) х 2
times =30sts
Rnd 49. – 12 sc, 18 sc =30sts
Rnd 50. – (3 sc, 1 dec) х 6 times =24sts
Rnd 51. – (2 sc, 1 dec) х 6 times =18sts
At this stage, we should leave a hole in the head. We will finish the last two rounds
after face tightening.
Rnd 52. – (1 sc, 1 dec) х 6 times =12sts
Rnd 53. – 6 dec =6sts
Add stuffing. Fasten off, tie off the hole and hide loose ends.
Nose (make 1)
Now, we fix the thread to the chain of loops we have in the 18th rnd of the toy’s face.
Please crochet in rows.
Row 1. – 17 sc, 1 ch st, turn
Row 2. – 1 dec, 15 sc, 1 ch st, turn
Row 3. – 1 dec, 14 sc, 1 ch st, turn
Row 4. – 1 dec, 13 sc, 1 ch st, turn
Row 5. – 1 dec, 12 sc, 1 ch st, turn
Row 6. – 1 dec, 11 sc, 1 ch st, turn
Row 7. – 1 dec, 10 sc, 1 ch st, turn
Row 8. – 1 dec, 9 sc, 1 ch st, turn
Row 9. – 1 dec, 8 sc, 1 ch st, turn
Row 10. – 1 dec, 7 sc, 1 ch st, turn
Row 11. – 1 dec, 6 sc, 1 ch st, turn
Row 12. – 1 dec, 5 sc, 1 ch st, turn
Row 13. – 1 dec, 4 sc, 1 ch st, turn
Row 14. – 1 dec, 3 sc, 1 ch st, turn
Row 15. – 1 dec, 2 sc, 1 ch st, turn
Row 16. – 1 dec, 1 sc, 1 ch st, turn
Row 17. – 1 dec, 1 ch st, turn
Please crochet toy’s nose around from the wrong side by sc to the place of yarn’s
fixing. Then crochet cc from a wrong side to the other side of the nose and go back
with sc to the nose’s 18th rnd.
Fasten off and hide loose ends.
Body (make 1)
We crochet with the main thread.
Rnd 1. – 6 sc in MR =6sts
Rnd 2. – 6 inc =12sts
Rnd 3. – (1 sc, 1 inc) х 6 times =18sts
Rnd 4. – (2 sc, 1 inc) х 6 times =24sts
Rnd 5. – (3 sc, 1 inc) х 6 times =30sts
Rnd 6. – (4 sc, 1 inc) х 6 times =36sts
Rnd 7. – (5 sc, 1 inc) х 6 times =42sts
Rnd 8. – (6 sc, 1 inc) х 6 times =48sts
Rnd 9. – 1 sc in each stitch around =48sts
Rnd 10. – (7 sc, 1 inc) х 6 times =54sts
Rnd 11. – 1 sc in each stitch around =54sts
Rnd 12. – (8 sc, 1 inc) х 6 times =60sts
Rnd 13. – 12 sc, 4 ch st, skip 6 sts (this will be the tail), 20 sc, Marker, 14 sc, Marker, 8
sc =58sts – We mark the points for attaching hind legs to the body
Rnd 14. – 12 sc, 4 sc along ch st, 10 sc, (4 sc, 1 inc) х 6 times, 2 sc =64sts
Rnd 15. – (4 sc, 1 dec) х 4 times, 40 sc =60sts
Rnd 16. – 9 sc, 1 dec, 3 sc, 1 dec, 44 sc =58sts
Rnd 17.-18. – 1 sc in each stitch around =58sts
Rnd 19. – 9 sc, 1 dec, 3 sc, 1 dec, 42 sc =56sts
Rnd 20.-21. – 1 sc in each stitch around =56sts
Rnd 22. – 9 sc, 1 dec, 3 sc, 1 dec, 40 sc =54sts
Rnd 23.-24. – 1 sc in each stitch around =54sts
Rnd 25. – 8 sc, 1 dec, 3 sc, 1 dec, 4 sc, (6 sc, 1 dec) х 4 times, 3 sc =48sts
Rnd 26.-27. – 1 sc in each stitch around =48sts
Advice. Shift of the loops may be different depending on different thickness of yarn
and density of crocheted fabric. So, before we shall mark points for pulling out the
wire for the front legs, we should check the symmetry of their location relative to the
hind legs. We might need to move these marks’ location on 1-2 sts.
Rnd 28. – 8 sc, 1 dec, 3 sc, 1 dec, 8 sc, (2 sc, 1 dec) х 2 times, Marker, (2 sc, 1 dec) х 3
times, Marker, 2 sc, 1 dec, 1 sc =40sts – Mark the points for attaching front legs to
the body.
Rnd 29. – 21 sc, (1 sc, 1 dec) х 6 times, 1 sc =34sts
Rnd 30. – 21 sc, 6 dec, 1 sc =28sts
After that, it is time to make a wire frame for the legs. To do this, let’s cut two pieces
of a wire 35-40 cm long, and then twist their middles together. The length of the
twisted segment must be about 4 cm. Then we wrap those middles with tape or sticking
plaster and insert the wire into the body, pulling out its ends at the points marked with
markers.
Now, we fill the detail with polyester toy stuffing.
Attention! Please put some stuffing (steel or glass pellets) into toy’s buttocks.
Rnd 31. – 2 sc, 1 dec, 11 sc, (2 sc, 1 dec) х 3 times, 1 sc =24sts
Rnd 32.-44. – 1 sc in each stitch around =24sts
Fasten off, leaving a small tail for sewing.
Now, we shall leave the body until final toy’s assembly. Please do not bend the wire.
Tail (make 1)
We shall crochet the tail adding the fluffy yarn.
Let’s connect the thread to the chain we left in the 13th rnd, and fix it there (see
photo).
Rnd 1. – 4 sc (along ch st), 1 sc (in the corner), 6 sc (along sc rnd 12.), 1 sc (in the
corner) =12sts
Rnd 2. – 6 sc, 5 inc, 1 sc =17sts
Rnd 3. – 1 sc in each stitch around =17sts
Rnd 4. – 2 sc, 1 dec, 13 sc =16sts
Rnd 5. – 2 sc, 1 dec, 12 sc =15sts
Rnd 6. – 1 sc, sc3tog, 10 sc =12sts
Rnd 7. – 3 sc, (1 sc, 1 dec) х 3 times =9sts
Cut the fluffy yarn and hide its end.
Rnd 8. – 3 sc, 3 dec =6sts
Rnd 9. – 1 sc in each stitch around =6sts
Fill toy’s tail with polyester stuffing using medium density of stuffing. Fasten off, tie
off the hole and hide loose ends.
Hooves + legs (make 4)
Take the yarn for hooves, and begin to crochet.
Please leave the thread’s end of about 30 cm in length.
Row 1. – 6 sc in MR, do not close the ring, 1 ch st, turn
Row 2. – 6 inc =12sts, 1 ch st, turn
Row 3. – (1 sc, 1 inc) х 6 times =18sts, 1 ch st, turn
Row 4. – (2 sc, 1 inc) х 6 times =24sts, 1 ch st, turn
Row 5.-12. – 1 sc in each stitch around =24sts, 1 ch st, turn
Row 13. – (2 sc, 1 dec) х 6 times =18sts, 1 ch st, turn
Row 14. – (1 sc, 1 dec) х 6 times =12sts, 1 ch st, turn
Row 15. – 1 sc in each stitch around =12sts
We change the thread to the main, leaving the end of about 30 cm to connect the
hooves, and then continue to crochet in rounds.
Rnd 16.-20. – 1 sc in each stitch around =12sts
Now let’s fold each hoof in halves and crochet over two edges, gripping the upper and
the lower hoof’s parts. We crochet from the hoof’s middle to its edge first one way
and then the other way using alternately ends of the thread we left before.
Please stuff the hooves.
We may use polyester toy stuffing for the front legs. But for the hind legs it is
necessary to use only steel pellets, otherwise our little goat will constantly fall
forward.
Rnd 21.-28. – 1 sc in each stitch around =12sts
Rnd 29. – 9 sc, 1 inc, 1 sc (the middle leg behind), 1 inc =14sts
Rnd 30. – 11 sc, 1 inc, 2 sc =15sts
Fasten off, leaving a small tail for sewing.
Fill toy’s each leg with polyester stuffing using medium density of stuffing.
Ears (make 2)
* – (1 sc, 2 ch st, 1 sc) in 1 sc
Row 1. – Ch 12
Row 2. – 1 sc in the 2nd st of the chain, 9 sc, *, 10 sc, 1 ch st, turn
Row 3. – let’s crochet the specified number of loops adding the eyelash yarn by applying
it on the front side of the work (as described above) – 11 sc, *, 11 sc, 1 ch st, turn
Row 4. – 12 sc, *, 12 sc, 1 ch st, turn
Row 5. – 13 sc, *, 13 sc, 1 ch st, turn
Row 6. – 14 sc, *, 14 sc, 1 ch st, turn
Row 7. – 15 sc, *, 15 sc, 1 ch st, turn
Row 8. – 33 ss
Now we should fold the ear (see photo) and crochet ss over its lower edge.
Note that there must be left and right ears!
Fasten off, leaving a small tail for sewing.
Horns (make 2)
Take the yarn for horns, and begin to crochet.
Don’t forget to stuff the horns.
We must leave the thread’s end of about 30 cm before we start to crochet. We shall
need it for sewing the horns.
Make a foundation chain of 12 ch st. Then close the chain making a ring.
Rnd 1. – 12 sc along ch st
Rnd 2.-3. – 1 sc in each stitch around =12sts
Rnd 4. – (3 sc, 1 inc) х 3 times =15sts
Rnd 5. – into the front loop only of Rnd 4. – 15ss
Advice. To make a strip crocheted with ss more shaped, do not tighten the thread and
crochet ss row very loosely.
Rnd 6. – into the back loop only of Rnd 4. – 15sts
Rnd 7.-11. – 1 sc in each stitch around =15sts
Rnd 12. – into the front loop only of Rnd 11.- 15ss
Rnd 13. – into the back loop only of Rnd 11. – 15sts
Rnd 14. – (3 sc, 1 dec) х 3 times =12sts
Rnd 15.-18. – 1 sc in each stitch around =12sts
Rnd 19. – into the front loop only of Rnd 18. – 12ss
Rnd 20. – into the back loop only Rnd 18. – 12sts
Rnd 21.-24. – 1 sc in each stitch around =12sts
Rnd 25. – into the front loop only Rnd 24. – 12ss
Rnd 26. – into the back loop only Rnd 24. – 12sts
Rnd 27. – (2 sc, 1 dec) х 3 times =9sts
Rnd 28.-30. – 1 sc in each stitch around =9sts
Rnd 31. – into the front loop only Rnd 30. – 9ss
Rnd 32. – into the back loop only Rnd 30. – (1 sc, 1 dec) х 3 times =6sts
Rnd 33.-36. – 1 sc in each stitch around =6sts
Fasten off, tie off the hole and hide loose ends.
Assembly and design
1. Making of toy’s face.
For the beginning, visually divide the head in two halves (the left and the right one) and
mark Point 1 (P1) at the pint of crossing of this line with the tip of the nose (I have it
at the level of the 6th-7th round).
To obtain P2 and P3 we should visually draw a vertical line in the middle of the head at
the level of the first round of the muzzle. P2 and P3 will be on its sides, at the level of
the 11th/12th rounds.
Don’t worry, if your first rows visually slightly shifted in relation to the central lines.
Everything depends on the type of your yarn and on the density of the crocheted
fabric. It won’t be visible after tightening.
Let’s fix the thread in P3 and enter the needle into P2. Then pull it out from the head’s
back and enter it into the P3 again.
Tighten the thread and repeat 2-3 times to fix the tightening.
Next, we must enter the needle into P2 and pull it out from the P3.
To form the lower lip we mark P5 and P6. They are 3-4 rounds lower than the line of
the upper lip‘s tightening. There are about 8-9 loops between these points.
To move to this tightening points we enter the needle from P3 into P2 and pull it out in
P7, which is 3 rounds above P1.
Next, we enter the needle in P1 and pull it our in P6. Now, let’s enter it into P5 and pull
it out in P7.
Tighten the thread and repeat 2-3 times to fix the tightening.
Fasten off and hide loose ends!
2. Making of the eyes.
For the beginning, we mark P8 and P9 in which we shall sew the eyes. We must mark
them on the level of the 32-33 rounds of the head with about 11 loops between them.
Now, let’s mark points P10 and P11 right above the eyes. There we shall make goat’s
eyebrows. We mark them 8 rounds above the eyes’ points with 8 loops between them.
First, we form the eyes pulling P8 and P9 together. Then, we make the eyes’ sockets
entering the needle into the head’s back.
Tightening of the eyebrows. We enter the needle from P8 into P10. Then we step 2
loops back to the face’s middle, enter the needle there and pull it out into P8 again.
Tighten the thread and repeat 2-3 times to fix the tightening.
Now we repeat the same actions on the second eye.
Eyes sewing
For goat’s eyes I used 10 mm buttons.
Enter the needle from the P8 into the P9 gripping the first button’s loop, and then turn
it back gripping the second button’s loop.
Slightly tighten the thread. Repeat one more time, but this time tighten the thread
very strong.
Fasten off and hide loose ends!
After that you may crochet two remaining rows of the head and stuff it if you need.
Rnd 52. – (1 sc, 1 dec) х 6 times =12sts
Rnd 53. – 6 dec =6sts
Add stuffing. Fasten off, tie off the hole and hide loose ends.
3. Assembly of the body.
And now we must apply each leg on each wire end, compare their length and bend all
excesses of wire using pliers. Then we wrap bended wire ends with sticking plaster and
insert the leg on the wire frame. Now, we fix each leg in desired position with the help
of pins and put our body on the table bending the wire ends down. After adjusting legs’
position and length we must add polyester toy stuffing and sew them.
Sewing legs, we must pull up their upper edge well for it will make the seam less visible.
4. Sewing of the head, horns and ears.
We shall enter the wire into the holes made by 2 ch st (for the right and the left horn)
in the 39th row.
So, let’s prepare 2 pieces of the wire about 30 cm long and enter them separately from
the side of the neck into the first and the second hole. We pull them out at the points
of horns’ fixing (I made these points near the forelock). As well as at fixing legs, we
bend the sharp ends of the wire frame using pliers and wrap it with a sticking plaster.
Then we twist two lower ends of the wire together and wrap them with sticking plaster
too.
Now, let’s enter this end of the wire frame into the neck for it to pass along the spine
to the tail.
If our goat falls when we fit its head, it is necessary to add more pellets into its
buttocks. Making sure that now the goat stands firm, we should fasten its head and
neck with pins and then sew the details, stretching the upper edge of the neck well
(this will make the seam less visible).
Sewing of horns and ears. Fix horns on the wire at the top of the head using sewing
pins, then fix the ears under the horns.
If you are satisfied with the result, sew the horns and the ears to the head.
Face tinting
Attention! All works on tinting toy’s face must be carried out at daylight!
Toy’s face must be tinted to give it more expression. You may use for tinting dry
pastel, oil, acrylic paints or any other material convenient to you.
I use dry pastel.
Put some black pastel powder with a brush around goat’s eyes, nostrils and on the upper
part of the muzzle. Tone middle parts of the ears to give them depth.
We can make the bold goat a little bit more fluffy using a needle for felting. To do
this, take and apply several wool pieces (from a wool roving) to the goat’s sides and
punch using the needle.
To complete our goat’s image we can hang the bell on its neck or decorate its
horns.
Here he is! Our goat is ready!