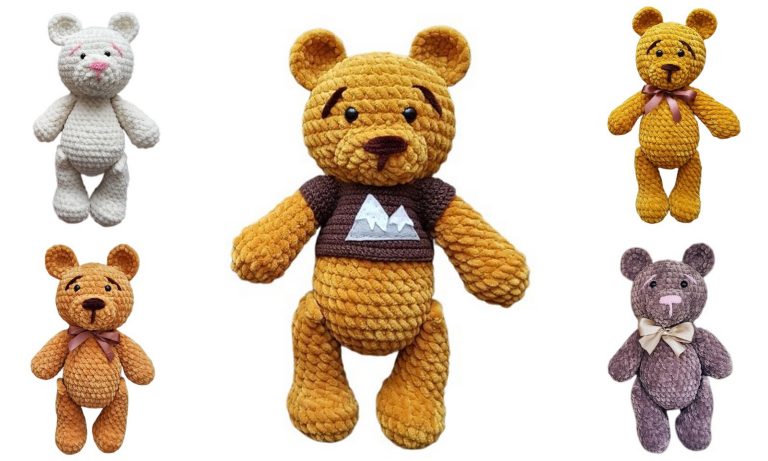
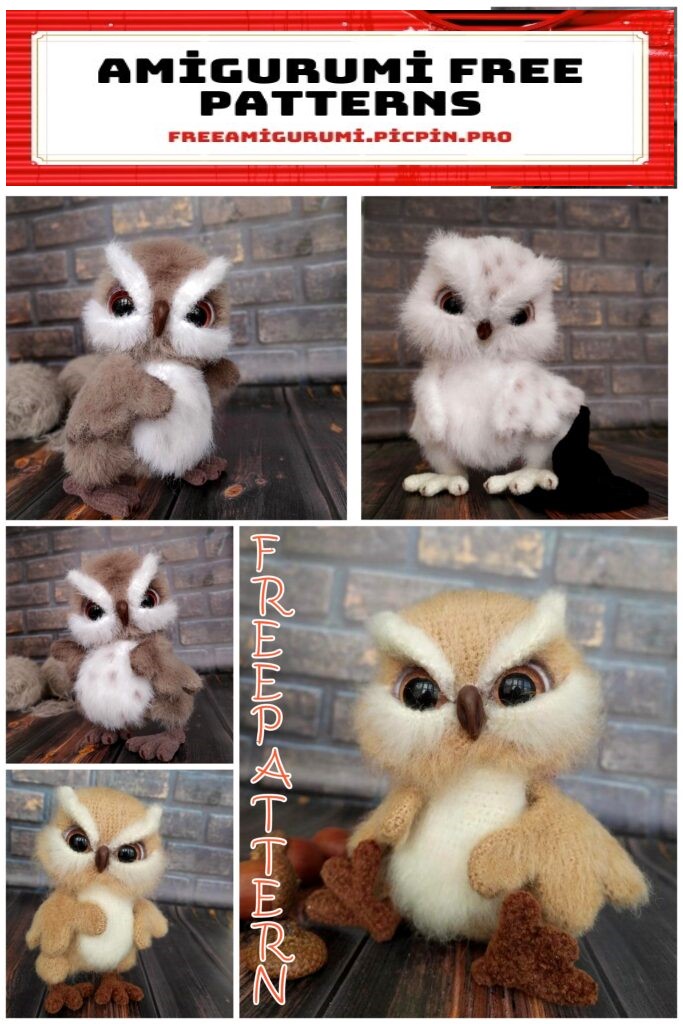
Cute Owl Amigurumi Free Crochet Pattern
The most beautiful free amigurumi patterns on this site. In this article, we shared a wonderful amigurumi owl pattern.
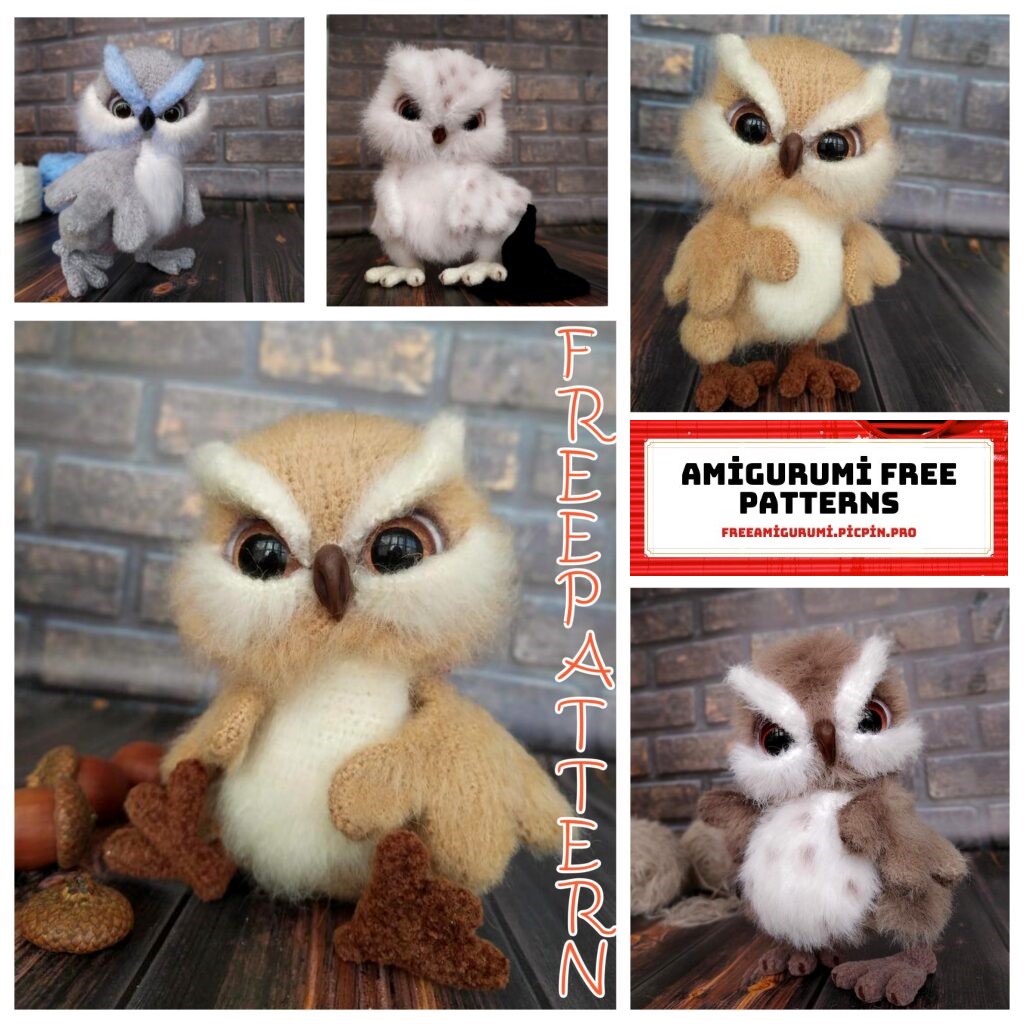
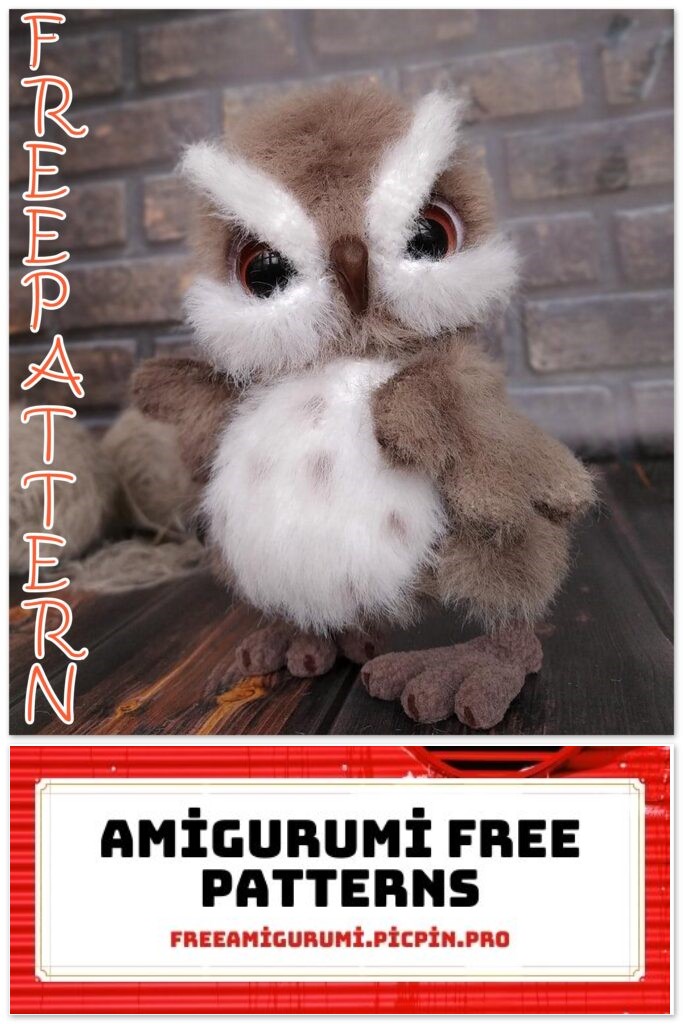
Owl Monya
The size
16-17 cm
My owls are related:
Textured thread Mink footage 700m / 100g in two strands
Angora RAM 500m / 100g
Nubuck / velor 550m / 100g
Materials and tools:
Hook # 1.25 (or any other suitable size for the selected yarn), Hook 1.0 for knitting the feet;
Textured yarn in two contrasting shades, 100g / 500 (550) m. Plus any additional shade for legs of the same footage. Consumption – about 40-45 g
As the main and additional yarn, any textured or mohair-containing thread of the same footage is suitable, you can take Angora PAM, any thin texture. The main condition is that the thread must be combed well.
For the legs, velor or nubuck is suitable for about the same footage as the main thread, it can be slightly thinner, for example 100g / 600m. You can also take a smooth acrylic or cotton thread for the legs.
2 ready-made eyes for toys, suitable size;
Any baked plastic for sculpting a beak,
Filler: holofiber,
Oil or dry pastels a couple of tones brighter (darker) than the main threads;
Fine markers of gray, brown or other shade suitable for threads;
Wire with a cross section of 2.0 about 0.5 m;
Adhesive plaster at least 2 cm wide on a fabric base;
Split pins for head and legs;
Granulate or cabochon for weighting at will;
White felt;
A brush with stiff bristles or Velcro for combing parts;
A toothbrush or brush with stiff bristles;
Glue “Crystal”
Abbrevations:
ch – air loop
sc – single crochet
inc – increase
dec – decrease
HDC – half double crochet
x – number of repetitions
DC – double crochet
At the end of each row, the number indicates the total number of loops in the row.
Increases and decreases are matched with sc unless otherwise noted.
All details are knitted in a circle, counterclockwise – inside out. You can knit all the details.
Head
The marker runs clearly from the side, we follow and align the marker when
necessity. The head turns out to be absolutely equivalent on both sides, the place
for the nose and under the eyes we choose by eye.
1st row: 6 sc into magic ring = 6 sc
2nd row: 6 inc = 12 sc
3rd row: 12 inc = 24 sc
4th row: (1 sc, inc) х12 times = 36 sc
5 row: (5 sc, inc) x6 times = 42 sc
6 row: (6 sc, inc) x6 times = 48 sc
7 row: (7 sc, inc) x6 times = 54 sc
Ral 8: (8 sc, inc) x6 times = 60 sc
9-10 rows: sc in each loop in a circle = 60 sc
11th row: inc, 28 sc, 2 inc, 28 sc, inc = 64 sc
12 row: sc in each loop in a circle = 64 sc
13th row: inc, 30 sc, 2 inc, 30 sc, inc = 68 sc
14th row: sc in each loop in a circle = 68 sc
15th row: inc, 32 sc, 2 inc, 32 sc, inc = 72 sc
Rows 16-23: sc in each loop in a circle = 72 sc
24 row: (10 sc, dec) x6 times = 66 sc
25 row: (9 sc, dec) x6 times = 60 sc
26 row: (8 sc, dec) x6 times = 54 sc
27 row: (7 sc, dec) x6 times = 48 sc
28 row: (2 sc, dec) x12 times = 36 sc
Row 29: (4 sc, dec) x6 times = 30 sc
30 row: (3 sc, dec) x6 times = 24 sc
Very tight, but not stone-filled with filler. The main thing when stuffing is to achieve
symmetrical shape, equal on all sides. At this stage, we put the cotter pin.
31 row: (2 sc, dec) x6 times = 18 sc
32 row: (1 sc, dec) x6 times = 12 sc
33 row: 6 decreases
Decreases to the end, fasten the thread, hide.
Beak.
Use any technique you are familiar with – you can felted out of wool, take a ready-made one, or mold from any plastic.
How do I do it. I use baked plastic, the simplest one. You can take any available one.
I knead the plastic, from a small piece I form an oval about the size of two coffee beans, the lower part I slightly thin out, just rolling it in my palms.
Then, with two toothpicks on the sides of the beak, I simultaneously push the stripes two thirds of the length of the beak – not reaching the top. I further thin the lower edge of the beak by simply clamping it between two hooks.
You can also make the top of the beak – narrow it slightly – if desired.
You can use any means at hand or convenient for you personally.
I slightly bend the beak so that it is a little curved.
I make several different beaks in size, color and shape at once, so that later I can choose the most suitable one for a particular owlet. Don’t worry if there are fingerprints, light scuffs or scratches on the beak, it will look even better.
I cook by dipping it into hot water for about 10-12 minutes. I drain the boiling water and immediately rinse the parts under very cold water. Let it dry. I remove the white coating with sandpaper. If there is no sandpaper, I simply wipe the beak with sour water or vinegar. You can boil for a few minutes in a citric acid solution and wipe well afterwards. The top of the beak can be rubbed well with dry pastels of a darker color to add volume.
Lower eyelids (2 parts)
We do not follow the marker, it is only needed for counting parts. The part is NOT stuffed. We knit with a thread of additional color (I have white)
1st row: 6 sc into magic ring = 6 sc.
2nd row: 2 inc, 4 sc = 8 sc
3rd row: 2 inc, 6 sc = 10 sc
4th row: 2 inc, 8 sc = 12 sc
5 row: 2 inc, 10 sc = 14 sc
6 row: 2 inc, 12 sc = 16 sc
7 row: 2 inc, 14 sc = 18 sc
8-10 rows: sc in each loop = 18 sc
11 row: 2 dec, 14 sc = 16 sc
12 row: 2 dec, 12 sc = 14 sc
13 row: 2 dec, 10 sc = 12 sc
14th row: 2 dec, 8 sc = 10 sc
15 row: 2 dec, 6 sc = 8 sc
16 row: 2 dec, 4 sc = 6 sc
Pull the loops, fasten the thread, leave for sewing.
Align the part, as if flattening it, so that you get a slightly curved bottom edge.
On the bottom (semicircular) edge, knit a row sc (I got 23 sc, maybe a couple of sc more or less) with a thread of the main color.
Then knit a row as follows – start with 4 sc, then knit HDC – in my case – 7 HDC, 3 HDC in one loop, 7 HDC – 4 sc at the end of the row.
And another sc row in each loop. If you want a wider strip of the main color, you can knit this HDC row, starting it and finishing it 4 sc (HDC will be obtained in the middle of the row, WITHOUT increments)
Fasten the thread, hide. We will sew with a thread of an additional color (mine is white).
The detail is well combed from the front side, we do not comb the inner side.
Upper eyelids / eyebrows (2 parts).
We do not follow the marker, it is only needed for counting parts. The part is NOT stuffed. We knit with a thread of additional color (I have white)
1st row: 6 sc into magic ring = 6 sc.
2nd row: inc, 5 sc = 7 sc
3rd row: inc, 6 sc = 8 sc
4th row: inc, 7 sc = 9 sc
5 row: inc, 8 sc = 10 sc
6 row: inc, 9 sc = 11 sc
7 row: inc, 10 sc = 12 sc
8-12 row: sc in each loop = 12 sc
13th row: dec, 10sc = 11 sc
14th row: dec, 9sc = 10 sc
15 row: dec, 8sc = 9 sc
16 row: dec, 7sc = 8 sc
17th row: dec, 6sc = 7 sc
18th row: dec, 5sc = 6 sc
Pull the loops, fasten the thread, leave for sewing.
The detail is well combed, cut neatly so that there are even hairs along the entire length.
Head decoration
We make out the head BEFORE fastening.
The owlet is knitted without pulls, the main thing is to choose the right position of the beak and the eye.
Comb the head well, the lower upper eyelids too – so that they are completely ready for sewing.
Next, we mark the head according to my photo or to your taste.
First, select the place of the beak and put an indicative pin there. My beak is clearly in the middle of my head in about 23-24 rows.
The hardest part is securing the eyelids correctly. Try a few different positions. The main rule is that the inner corners of the lower and upper eyelids should be
clearly on the line of the beak and the lower eyelids must necessarily slightly go beyond the lower edge of the head, sag slightly. We do not pull the lower eyelids during preliminary fixation, but rather form a small pocket under the eyes. The rest can be varied as desired higher, lower, angled or straight.
After you have secured the lower eyelids – attach your eyes and beak, see what happens. The eye should go a third into the pocket formed by the lower eyelid. If you like everything – fix the upper eyelids / eyebrows. I attach it at an angle to make the owl look a little surprised. Do not set the upper eyelids too low – you will get a frightening look, or too high – the head will seem narrow.
When the best position is found, glue the beak and start sewing on the eyelids.
Sew the lower eyelid starting from the inner corner. Sew along the semicircular edge, that is, along the line sc set along the line between the secondary and primary colors. I have a white outline, we sew a colored thread. Sew with just a few stitches, securing the outer and inner corners well.
Important! The upper edge and lower edge of the eyelid (which is attached to the main color) remain unfastened, it should hang freely to the bottom.
Sew the upper eyelids / eyebrows, also starting from the inner corner. We leave the upper edge without sewing half a centimeter. Instead of the last loop, we sew the eyebrow over the edge (we insert the needle from the bottom, top, again from the bottom, fix it in the same place two or three times) so that we get a small unstitched edge hall.
Important! The inner corners of the lower and upper eyelids should fit tightly to each other without leaving any gaps.
Now use a strong pointed tip to gently push the filling onto your cheeks. To do this, place the honey where you intend to glue the eye and create a cheek by pushing the filling obliquely down and to the side, as it were. You don’t need to do this, but I like it more.
Tightening.
When everything is fixed, put on the eyes. If they are too convex, you can squeeze the eyes slightly. To do this, clearly place the pins at the attachment points of the future eyes (points 1 and 2) and from under the head to the sides of the cotter pin (points 3 and 4). The arrows in the figure indicate the position of the thread in tying – the thread on the canvas, down – the thread in the canvas. Cross tightening – we fix the thread at the eye attachment point (point 1), place the needle (thread on top of the canvas) at the same point, pull back from the side of the cotter pin on the opposite side (point 4, thread inside the canvas), insert the needle in the same point (point 4, thread on the top of the canvas) ), we draw one sc aside, at the starting point of the eye (point 1, the thread inside the canvas). We repeat. We fix it.
We do the same for the other eye in mirror image (for points 2 and 3).
We straighten the thread and hide it. You don’t have to tighten, my owls are boring only on Gerda.
…
After all the details are sewn, glue the eyes. It is better if the eyes are larger than necessary, because a third of the eye will hide under the eyelid. I stick to the felt near the inner corner of the eyelid, but you can try other options – put it on, try how your owlet goes better. As soon as you like it, glue the felt, bend the lower edge of the eyelid well so that the glue does not get on it. Likewise, let the eyes dry and stick. Let it dry thoroughly and use a brown or black fine-tipped pen to go over the edge of the felt.
Wings (2 parts)
The wings consist of three parts that are combined and individually tied.
First, knit three separate pieces. In the first two we cut and tighten the thread, not at the last thread – the main part will start from it.
We knit in circular rows, we do not follow the marker in these details, it is only necessary to count the loops.
Two details.
1st row: 6 sc into the magic ring = 6 sc.
2nd row: 6 inc = 12 sc.
3rd row: (1 sc) x6 times = 18 sc
Rows 4-6: sc = 18 sc in each loop Add two more rows of 18 sc for extended wings.
Secure the thread.
Then we knit the main part. 3. detail. He automatically takes the first place.
The pointer moves clearly to the side after transfer (see below)
1st row: 6 sc into the magic ring = 6 sc.
2nd row: 6 inc = 12 sc.
3rd row: (1 sc) x6 times = 18 sc
4-6 rows: sc in each loop = 18 sc
7 row: 18 sc for first part, 18 sc for second (insert) = 36 sc
8 row: sc in each loop = 36 sc
9th row: 9 sc for main part, 18 sc for third part (insert), 27 sc for main part = 54 sc
10 row: (incomplete) 18 sc – put a new mark, it should be clearly next to the sash. We are watching the pointer! More countdown than this marker.
11th row: 2 dec, 46 sc, 2 dec = 50 sc
12 row: sc in each loop = 50 sc
13th row: 2 decs, 42sc, 2 decs = 46x
14 row: sc in each loop = 46 sc
15 row: 2 dec, 38 sc, 2 dec = 42 sc
16 row: 2 dec, 34 sc, 2 dec = 38 sc
17 row: 2 decrement, (3 sc, dec) x3 times, (decr, 3 sc) x3 times, 2 decrement = 28 sc
Row 18: sc in each loop = 28 sc
19 row: dec, (2 sc, dec) x3 times, (dec, 2 sc) x3 times, dec = 20 sc
20 row: dec, 16 sc, dec = 18 sc
Row 21: dec, 14 sc, dec = 16 sc
22 row: dec, 12 sc, dec = 14 sc
23 row: dec, 10 sc, dec = 12 sc
Then the loops can be knitted by folding the edge in half – 6 sc for both edges (so they will be slightly wider at the sewing site), or knit the decreases to the end, as usual. Leave the thread for sewing.
Important! You can leave the loops on and leave the thread longer. When the body is ready, attach the wings to it and, if suddenly the length of the wings is not enough, add the desired number of rows, and then close the loops. This is checked only already in the assembly.
The detail is well combed and trimmed neatly at the ends – so that the feathers are visible.
Feet (2 parts)
The legs are knitted from three initial parts combined into one. For each foot, we need to knit three identical parts. On the third thread we do not break off, it will be the beginning of the foot.
We start with an additional thread for the feet (nubuck, velor, acrylic or cotton)
Hook 1.0
Starter piece (3 pcs for each foot)
1st row: 6 sc into magic ring = 6 sc
2nd row: 6 increments = 12 sc
3-5 row: sc in each loop in a circle = 12 sc
On the first and second parts, fasten the thread, cut it off. We knit the third piece in the same way, but we do not break the thread, we continue to knit further. Automatically, this part becomes the first in knitting the foot, and we count from it further.
The main detail.
We knit according to the part in which we did not break off the thread, it automatically becomes the first.
1st row: 6 sc along the first part, attach the second part -6 sc along the second, attach the third part -12 sc along the third, 6 sc along the second, 6 sc along the first = 36 sc
Row 2: sc in each loop = 36 sc
3rd row: (4 sc, dec) x6 times = 30 sc
4th row: sc in each loop = 30 sc
At this stage, fill in the middle extreme fingers. Don’t stuff your middle finger!
5 row: (3 sc, dec) x6 times = 24 sc
6 row: sc in each loop = 24 sc
7 row: (2 sc, dec) x6 times = 18 sc
8 rows: sc in each loop = 18 sc
9th row: (1 sc, dec) x6 times = 12 sc
10 row: 6 ch (skip in bottom row 6 sc), 6 sc = 12 sc
11 row: 6 sc in sts, 6 sc = 12 sc
12 row: 6 decreases
Decreases to the end, fasten the thread, hide.
Form a loop from the wire, as shown in the photo, wrap it with adhesive plaster, insert the resulting loop into the hole on the foot – right into the middle finger.
Bend the wire to the length of the entire foot, taking into account the protrusion, with pliers clamp the small loop on the back so that it goes to the very tip of the foot. I do not wrap this part with a plaster. You can not do this loop, but this increases stability.
Then we knit around the wire along the 12 sc hole that we knitted in the 10th row.
Fasten the thread in the center of the foot at the back.
Cast on hole 12 sc. Work 5 rows of 12 sc.
Change the foot thread to the fluffy main thread. Change the hook to 1.25 Marker clearly in the center at the back.
1 row: (1 sc, inc) x6 times = 18 sc
2nd row: (2 sc, inc) x6 times = 24 sc
3rd row: (3 sc, inc) x6 times = 30 sc
Row 4-5: sc in each loop = 30 sc
6 row: (4 sc, inc) x6 times = 36 sc
7 row: sc in each loop = 36 sc
Ral 8: (4 sc, dec) x6 times = 30 sc
Cut off the excess wire, calculating the length for both the loop and the height of the foot. You can not do it to the full height, only to the middle, the owlet will stand well with this option.
Bend the upper end of the wire, forming a loop of medium width, wrap with adhesive tape.
9th row: (3 sc, dec) x6 times = 24 sc
After this row, I put the cotter pin in such a way that it fits clearly in the middle of the inner side of the foot. That is, for the left foot it is the sixth loop, for the right foot it is the eighteenth. Fill in the detail medium, so long as the wire is not clearly felt. Do not stuff too much so that it fits snugly to the body.
10 row: (2 sc, dec) x6 times = 18 sc
11 row: 1 sc, dec) x6 times = 12 sc
12 row: 6 decreases
Decreases to the end, fasten the thread, hide.
Detail well comb, trim if necessary.
Body.
We knit in circular rows with a thread of the main color.
The marker runs clearly from the side, follow.
1st row: 6 sc into magic ring = 6 sc
2nd row: 6 inc = 12 sc
3rd row: 12 inc = 24 sc
4th row: (1 sc, inc) х12 times = 36 sc
Row 5-6: sc in each loop = 36 sc
7th row: inc, 16 sc, 2 inc, 16 sc, inc = 40 sc
Back the knit part, secure the head at this point.
8 rails: inc, 18 sc, 2 inc, 18 sc, inc = 44 sc
9 row: sc in each loop = 44 sc
Row 10: inc, 20 sc, 2 inc, 20 sc, inc = 48 sc
11 row: sc in each loop = 48 sc
For a reference point, the increments (triple repetitions) in the following rows pass along the front side of the body – along the belly.
12 row: (7 sc, inc) x3 times, 24 sc = 51 sc
Row 13: (8 sc, inc) x3 times, 24 sc = 54 sc
14th row: (8 sc, inc) x6 times = 60 sc
Stuff the torso while knitting. The packing is dense, you can add granulate or other weighting agent to the belly if you wish.
15th row: sc in each loop = 60 sc
16 row: (9 sc, inc) x3 times, 30 sc = 63 sc
Row 17: (10 sc, inc) x3 times, 30 sc = 66 sc
18 row: sc in each loop in a circle = 66 sc
19 row: (10 sc, inc) x6 times = 72 sc
Row 20: sc in each loop in a circle = 72 sc
21 row: (11 sc, inc) x3 times, 36 sc = 75 sc
Row 22-25: sc in each loop in a circle = 75 sc
26 row: (11 sc, dec) x3 times, 36 sc = 72 sc
27 row: marker for leg cotter pin, 36 sc, marker for leg, 36 sc = 72 sc
28 row: (10 sc, dec) x6 times = 66 sc
Row 29: (9 sc, dec) x6 times = 60 sc
30 row: (8 sc, dec) x6 times = 54 sc
31 row: (7 sc, dec) x6 times = 48 sc
32 row: (2 sc, dec) х12 times = 36 sc
Comb well the connected part of the body.
After this row, we put the legs, turning the socks to the front side of the body.
Fill well the connected part of the body, add granulate or cabochon to the belly for weighting if desired.
33 row: (4 sc, dec) x6 times = 30 sc
34 row: (3sc, dec) x6 times = 24 sc
35 row: (2 sc, dec) x 6 times = 18 sc
36 row: (1 sc, dec) x 6 times = 12 sc
Donate without voids.
37 row: 6 decreases
Decreases to the end, fasten the thread, hide.
Attach the belly, fasten it as you like, sew it on.
Attach wings. If the length is enough, sew them, if not, you can add two or three rows at the top to the required length.
Belly pad.
We knit in pivoting rows, starting each new row with ch.
We knit the part completely with a thread of an additional color (I have white)
1st row: 6 sc into magic ring = 6 sc
2nd row: 6 inc = 12 sc.
3rd row: (1 sc, inc) x 6 times = 18 sc.
4th row: sc in each loop = 18 sc
5 row: (2 sc, inc) x 6 times = 24 sc.
6 row: sc in each loop = 24 sc
7 row: (3 sc, inc) x 6 times = 30 sc
8 row: sc in each loop = 30 sc
9th row: (4 sc, inc) x 6 times = 36 sc
10 row: sc in each loop = 36 sc
11 row: (5sc, inc) x 6 times = 42 sc
12 row: sc in each loop = 42 sc
Then we knit along the reverse side of knitting, along the bottom, that is, we do not make a reverse turn at the beginning of the row, but go to the lower part.
13 row: we collect on this – bottom – part 28 sc = 28 sc
We continue with pivoting rows along these 28 loops.
14 row: sc in each loop = 28 sc
15 row: dec, 24 sc, dec = 26 sc
16 row: dec, 22 sc, dec = 24 sc
17th row: dec, 20 sc, dec = 22 sc
Row 18: dec, 18 sc, dec = 20 sc
19 row: dec, 16 sc, dec = 18 sc
20 row: dec, 14 sc, dec = 16 sc
21 row: dec, 12 sc, dec = 14 sc
22 row: dec, 10 sc, dec = 12 sc
Row 23-24: sc in each loop = 12 sc
Attach the patch to the tummy, if the length is not enough – you can knit another row or two 12 sc. Compete the part from the outside, fasten it as you like, sew it to the body.
Tail.
We knit the tail in the same way as the foot, only with the main thread, hook 1.25
Initial part (3 pcs)
1st row: 6 sc into magic ring = 6 sc
2nd row: 6 increments = 12 sc
3-5 row: sc in each loop in a circle = 12 sc
On the first and second parts, fasten the thread, cut it off. We knit the third piece in the same way, but we do not break the thread, we continue to knit further. Automatically, this part becomes the first, further from it and counting.
The main detail.
We knit according to the part in which we did not break off the thread, it automatically becomes the first.
1st row: 6 sc along the first part, attach the second part -6 sc along the second, attach the third part -12 sc along the third, 6 sc along the second, 6 sc along the first = 36 sc
Row 2: sc in each loop = 36 sc
3rd row: (4 sc, dec) x6 times = 30 sc
4th row: (3 sc, dec) x6 times = 24 sc
At this stage, fill the feathers very weakly. If the thread is very fluffy and dense, you don’t need to stuff it at all.
5 row: Fold over the edges of the piece and knit over both edges 12 sc.
Fasten the thread, leave for sewing.
Comb well and trim the feathers neatly.
Sew on the tail and wings as you like) try different positions to see which one is best for your toy.
Toning.
This baby does not require strong toning. On a brush or soft toothbrush, pick up some dry pastels that match the color of your thread.
Walk gently along the contours of the wings, the sides of the legs, from above between the eyebrows. With toning, the main thing is not to overdo it, let it be light and uneven so that the effect of owlet fluff is created.
I tinted the puziko with a marker. I combed the detail, put down light rare stripes with a brown marker along the depth of the canvas. The length of the strips is 2-3 mm.
I let it dry and combed the detail again. You can practice on the reverse side first – the one that is sewn to the body. You can not tint at all.